Nakivo Backup and Replication 8.1 introduced a new feature called Policy Driven Data Protection allowing you to automate of backup job creation. For larger infrastructures, repetitive tasks such as adding VM(s) to a backup job are additionally also subject to errors.
So Policy Driven Data Protection is a time-saving and error-free function which does not provide immediate and obvious benefit for some, but it does provide a guarantee that at scale, you'll work more efficiently and faster because you won't lose time by creating backup jobs or adding VMs to an existing backup job. Also, you'll avoid repetitive (and boring) tasks which might be prone to errors.
With policy, you are now able to define let's say a set of parameters, and then the system will make sure that your environment meets those parameters. The Policy-based data protection by Nakivo has this function that allows you to define a way to identify existing VMs and automatically base jobs from those parameters set in the policy definition.
When new VM(s) are added/created/cloned/deployed from templates within your virtual infrastructure, the policy identifies those VMs to the protection jobs automatically and adds those VMs to the data protection job. This works also the other ways around, when you decommission/delete VM(s), those are automatically removed from the data protection job(s).
Basically, with policies, you can create rules that easily add matching items to NAKIVO Backup & Replication jobs.
Lastly, Nakivo's Policy Driven Data Protection Integrates with VMware vSphere tags (not enough known and not enough used – I'll do a post on tags soon). vSphere Tags do associate useful metadata with a virtual machine. By using tags, the admin is able to create characteristics that can be queried by policy-based management from Nakivo and then obviously used for policy-based data protection.
Let's have a look.
Policy Driven Data Protection – Where to find this and How to use?
In order to add a new policy rule, you'll be willing to follow these steps:
Follow the steps below to add a policy rule:
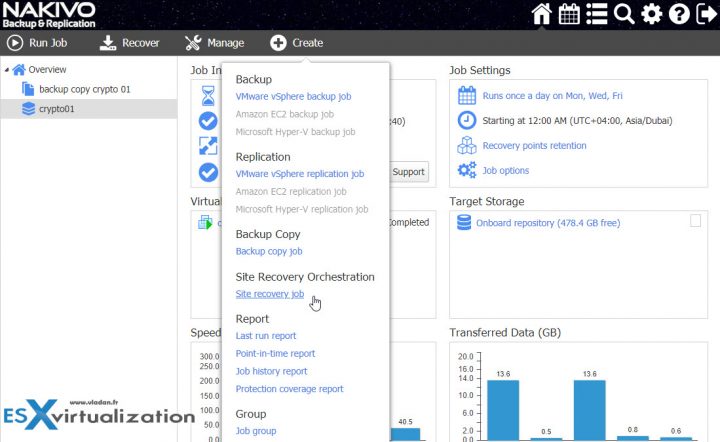
First, click on the button to create a new job
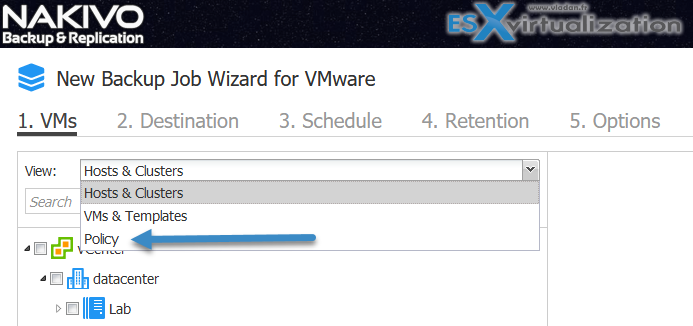
Open the drop-down menu and select Policy.
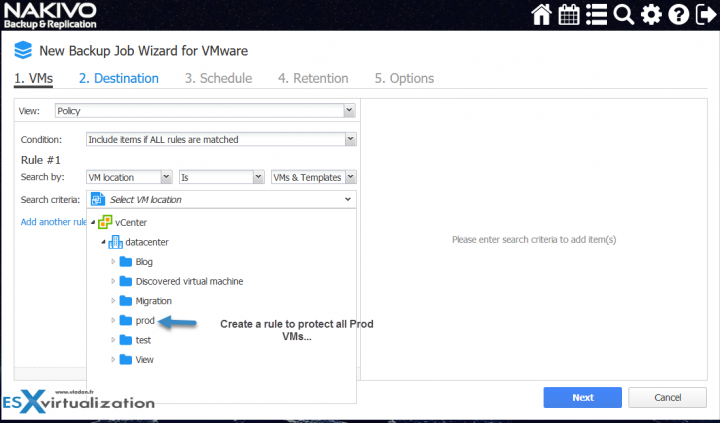
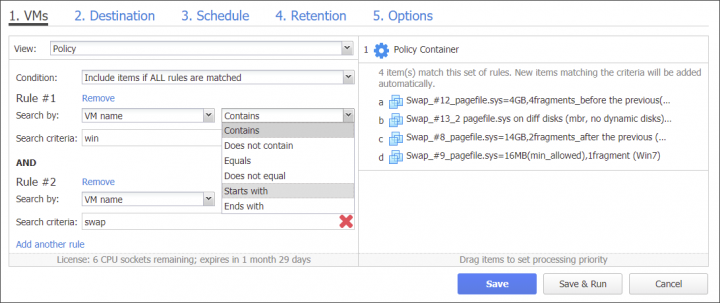
The wizard displays a new policy rule, Rule #N. Provide necessary parameters of your policy rule. Make sure that at least one item matches the available set of policy rules.
In our example we're creating a rule based on VM location where we want to protect VMs placed in a folder called “Prod“.
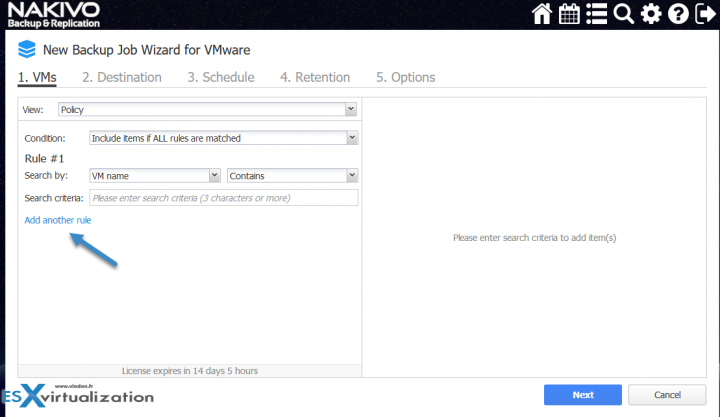
In the left pane of the wizard, click Add another rule.
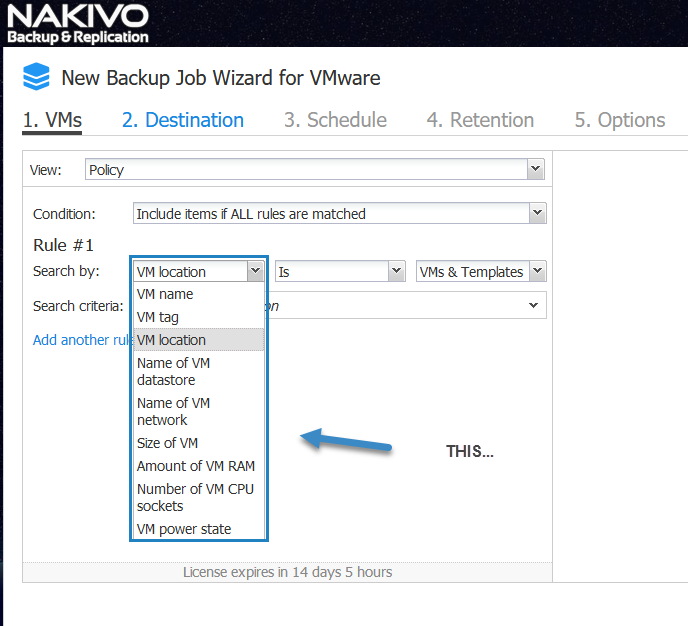
This was just our example, but below I'll show you the drop-down menu where you can see the different possibilities you can explore
Here it is.
Save the job policy. Refer to Job Policies for details.
In order to modify an existing rule:
- Make sure your job is opened in the Policy view.
- Choose either of the following Condition for your job policy:
- Include items if ALL rules are matched. If selected, the logical AND will be applied to the set of policy rules.
- Include items if ANY rule is matched. If selected, the logical OR will be applied to the set of policy rules.
- Provide necessary policy rules.
Example from Nakivo's user guide page concerning VM Name attribute…
Of course, you can combine rules by “AND” denominator to apply several parameters in once.
Nakivo was very productive this year. There have been many releases and new features this year announced. The principal winner here is the end client, the admin who needs to have the job done no matter what. Admin with a lot of pressure on his/her elbows because the number of VMs is exploding, because the size of data to protects explodes and because ransomware and attacks are on the rise etc…..
Some features from last's year Nakivo's releases:
- vSphere 6.7 Support – VMware vSphere 6.7 supported. vSphere 6.7 increases performance and adds several advanced features, including Enhanced vCenter Server Appliance, vSphere Quick Boot, Encrypted vMotion, and more.
- EMC Data Domain Boost – Nakivo and Data Domain Boost increases the speed of your backup jobs (up to 15x) and allows you to save storage space (up to 17:1) due to deduplication engine from EMC/Dell. Nakivo has been officially certified by EMC Data Domain.
- Advanced Site Recovery – You’ll be able to build a site recovery (via Site recovery jobs) to automate site recovery process. For example, a Site Recovery job can include any combination of the following steps: gracefully shut down source VMs, run a final VM replication, change replica VM IPs, connect replica VMs to appropriate networks, set the replica VM boot order, verify successful recovery, send email notifications, etc.
- Site Recovery Testing – Do tests of SR jobs and define recovery time objectives (RTOs) for recovery workflows and perform scheduled non-disruptive site recovery testing. The tests can verify whether site recovery can run successfully and whether the recovery process can be completed within the target time frame.
- Single-Click Site Recovery – you can do a planned failover, emergency failover, failback, and data center migration in a single click. You can create a single recovery workflow for an entire organization or create multiple workflows for individual departments, branch offices, etc.
- Advanced Bandwidth Throttling – you can now have a global rule for the whole environment, and (or ) also per-job limitations. You specify the amount of bandwidth used by data protection processes.
You can set up global bandwidth throttling rules for your whole virtual infrastructure or create them on a per-job basis.
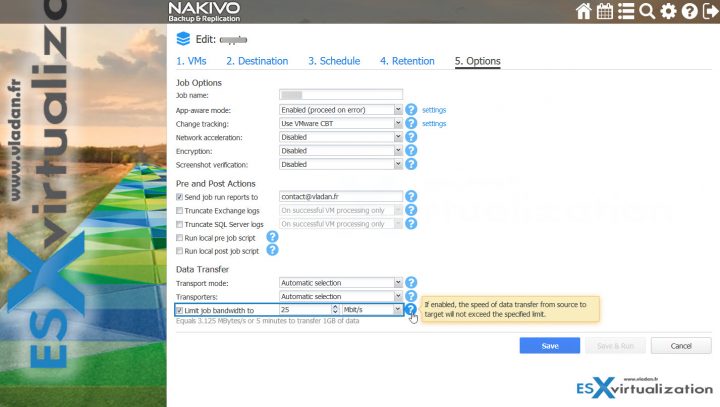
Bandwidth throttling is the ability to set speed limits for your jobs. This way, for example, you can restrict a backup job to 25 MB/s. Screenshot from the lab where we, as you can see, limited the job’s bandwidth to 25MB/s.
- Cross-Platform Recovery – Backup our VMware, Hyper-V or Amazon AWS VMs and chose the export format (VMDK, VHD, or VHDX). A truly portable solution for your VMs as you see. This can be used for different scenarios too, especially for archiving.
- Automated VM Failover – With your replication jobs, you have an identical copy of your VMs with a data which differs only by the delta of what’s your RPO settings. If you let’s say replicate every 15 min, you lose at most 15 min of data. The VM failover job you’re able to specify which VM replicas should be powered on and create rules for network config (re-ip is necessary in most cases).
- Automated Self Backup – it saves automatically the whole Nakivo config including jobs, inventory, product config and all other settings such as repositories and replication information. If in any case, you need to reinstall the Nakivo product, you can do so easily by doing a clean installation and then restoring the config.
- Instant VM recovery for Hyper-V VMs – You can now boot Hyper-V VMs right from compressed and deduplicated backups without the need to restore the VM first.
- Instant Object Recovery for Microsoft SQL Server 2017 – Granular restore of individual databases or tables. You can recover Microsoft SQL objects (databases and tables) to their original location or a custom location.
- Log Truncation for Microsoft SQL Server 2017 – SQL server registers the DB changes in a transaction log, which grows and grows over time. (Files with extension .ldf as you know). Log Truncation feature from Nakivo is able to automatically delete the log files on the source VM after a successful backup or replication to free up space.
- Instant File Recovery To Source – when restoring individual files, you have the option now to restore directly to the source. Where previously you could restore to some local drive or send it through e-mail to your coworker, now you can restore directly to where the file was backed up from. I imagine that you’ll get a prompt in case the original file is still there (but corrupted for example). If the original file was deleted non intentionally, you restore directly to the original location without receiving prompt.
- Automated VM Failover – With your replication jobs, you have an identical copy of your VMs with a data which differs only by the delta of what’s your RPO settings. If you let’s say replicate every 15 min, you lose at most 15 min of data. The VM failover job you’re able to specify which VM replicas should be powered on and create rules for network config (re-ip is necessary in most cases). So all VMs in the VM failover job is powered On at the DR site. This feature is also useful when doing planned failover. During planned failover or a data center migration, you can choose to power off the source VMs at the primary site, ensuring they do not interfere with the VM replicas when they come online.
Wrap Up:
Nakivo Backup and Replication v8.1 GA release added some good enterprise features. The policy-based data protection jobs allow you to have a more powerful way to protect your virtualized environment and production VMs. Automation is the key, and we know that VMware is on this journey for several years. Nakivo follows and the right to do so.
More about Nakivo on ESX Virtualization:
- Nakivo Backup and Replication 8.0 Released
- Disaster Recovery with NETGEAR and Nakivo
- Nakivo Backup and Replication FREE Edition
- Nakivo Backup and Replication available for QNAP NAS
- How to Setup an AD Integration with Nakivo Backup and Replication 7
More from ESX Virtualization
- VCP6.5-DCV Study Guide
- VMware Transparent Page Sharing (TPS) Explained
- VMware Virtual Hardware Performance Optimization Tips
- Veeam Backup and Replication 9.5 Update 4 Announced
- StarWind Virtual Tape Library (VTL) for Veeam and AWS further details
- What Is Nakivo Transporter?
Stay tuned through RSS, and social media channels (Twitter, FB, YouTube)


