VMware Certificate Automation Tool 1.0 which has been released few days back (my post: vCenter certificate automation tool 1.0) enables to automate (or rather semi-automate) the management of SSL certificates of different vCenter components. This tool is the only tool that automates the job and which is supported by VMware.
Certificates are real pain, and if not setup right, certain vSphere components just won't work with default self-signed certificates. That's why it is important to do a test in lab environment, note all the steps, and try it yourself. And that's the principal reason for this post. Principally it's for my own needs. For my own learning purposes. If it can help others, good……
Note also that the VMware certificate automation tool 1.0 is meant to be used on VMware vSphere 5.1 only, so the VMware Certificate Automation Tool 1.0 is meant to be used with vSphere 5.1 only. Note also that the tool cannot be used on vCenter Server Appliance (vCSA), the Linux based vCenter.
How to use VMware Certificate Automation Tool?
Before using the tool, you must first setup your environment correctly, do some planning and also create OpenSSL config files, generate certificate requests via OpenSSL, Get the certificate files and create PEM files….. A lot to do..-:). Ok, let's do it…
- Download the SSL Certificate Automation Tool ( in the Drivers and Tools section ) and copy it on every server that hosts a vCenter component that you needs to replace an SSL certificate.
- Download OpenSSL from https://slproweb.com/products/Win32OpenSSL.html and install it to the default directory c:\openssl-Win32. (use the OpenSSL version 0.9.8 !)
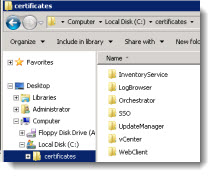
- Create a folder to store your certifiate files (I've created C:/certificates) with different subfolders for each of the vcenter components (there is seven in total: vCenterInventory, LogBrowser, Orchestrator, SSO, UpdateManager, vCenter, WebClient).
- Create 7 configuration files (one for each component). Each config file is created in the directory for the specific component.
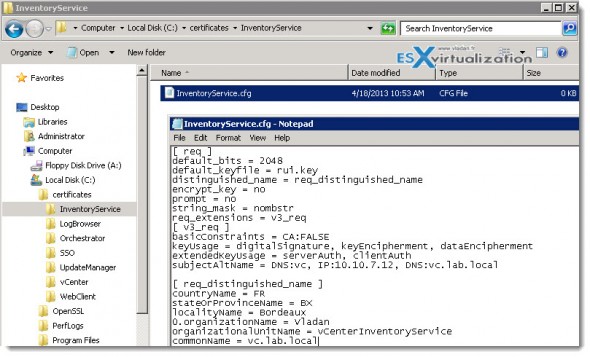
Example below is created in the InventoryService subfolder. I have in place a local Microsoft Domain structure called vc.lab.local. The country code is always two digit code!
So to detail the steps for use in my case, for vCenterInventory I created the config file in: c\certificates\InventoryService\inventoryservice.cfg
[ req ]

default_bits = 2048

default_keyfile = rui.key

distinguished_name = req_distinguished_name

encrypt_key = no

prompt = no

string_mask = nombstr

req_extensions = v3_req

[ v3_req ]

basicConstraints = CA:FALSE

keyUsage = digitalSignature, keyEncipherment, dataEncipherment

extendedKeyUsage = serverAuth, clientAuth

subjectAltName = DNS:vc, IP:10.10.7.12, DNS:vc.lab.local
[ req_distinguished_name ]

countryName = FR

stateOrProvinceName = BX

localityName = Bordeaux

0.organizationName = Vladan

organizationalUnitName = vCenterInventoryService

commonName = vc.lab.local
Here is the screenshot. You can click to enlarge:
For each of those components re-create different configuration file. If your vCenter component is not installed on the same server as vCenter, then you'll have to modify the FQDN accordingly. Here are all my config files:
- Generate Request – by using the OpenSSL. Open a command prompt with admin privileges and cd to the directory where you installed OpenSSL (c:\OpenSSL in my case) and run this command:
openssl req -new -nodes -out c:\certificates\InventoryService\rui.csr -keyout c:\certificates\InventoryService\rui-orig.key -config c:\certificates\InventoryService\inventoryservice.cfg
You should see this output:
- Now, convert the key to the good RSA format with this command
openssl rsa -in c:\certificates\InventoryService\rui-orig.key -out c:\certificates\InventoryService\rui.key
Repeat those steps for each of the vCenter server component, remember there is 7 in total! Again, you can look at mine here.
Next Step – We need Microsoft Certification Authority to be in place. So I have installed a 2008R2SP1 VM with Enterprise Root CA. Even if I thought that we can do without, I was wrong. Still need Microsoft CA.
- Log-in to your CA server via web-interface https://your_server/certsrv ,and click the request certificate link.
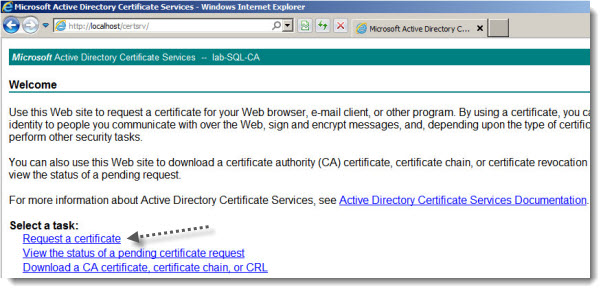
- Click the Advanced Certificate link and click the Submit a certificate request by using a base-64-encoded CMC or PKCS #10 file, or submit a renewal request by using a base-64-encoded PKCS #7 file link.
- Open one of the rui.csr files in notepad, files that has been generated in the steps above. Copy all the text like that… —–BEGIN CERTIFICATE REQUEST—– —–END CERTIFICATE REQUEST—– like in the image bellow….
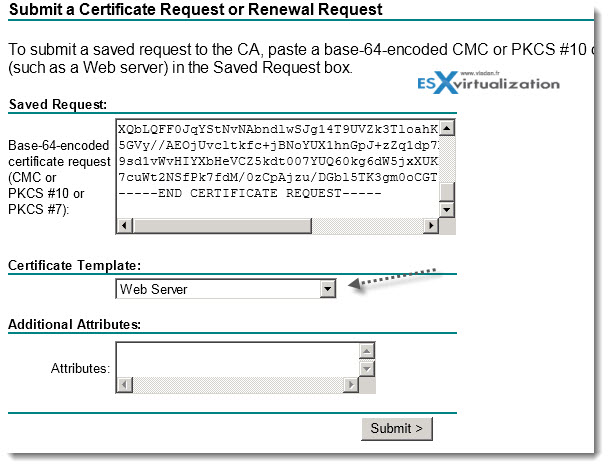
Then click submit and click Base 64 encoded, and click DOWNLOAD CERTIFICATE link . Save the certificate as rui.crt in the folder which you've created above for each service. Ex: C:\certificates\InventoryService\rui.crt
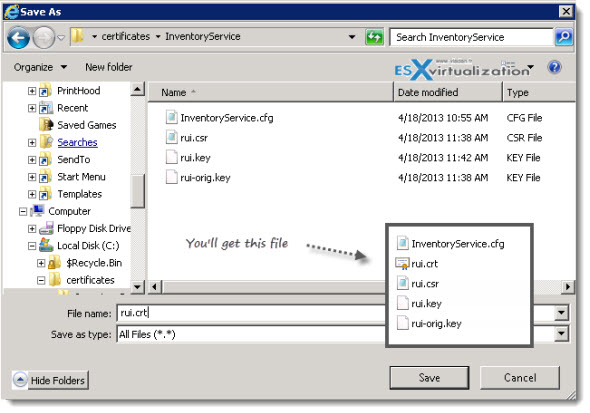
As for now, its going well. Repeat those steps for each of the 7 vCenter components…
- Go back to the CA at this address – https://your_server/certsrv and click Download a CA certificate, certificate chain or CRL, click Base 64 as an option and click the Download CA Certificate chain link.
- Save the certificate chain as cachain.p7b file in the root of the c:\certificates folder
- Doubleclick the file, which opens an MMC console, navigate to the certificate > right click >export.
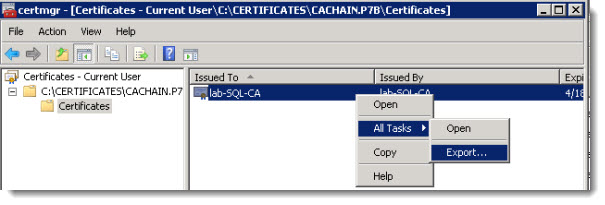
Follow the assistant and select Base-64 encoded X.509 (.CER) > click Next > save the file as c:\certificates\root64.cer and next to finish the assistant. You should be able to see those two files in the root of the c:\certificates folder.
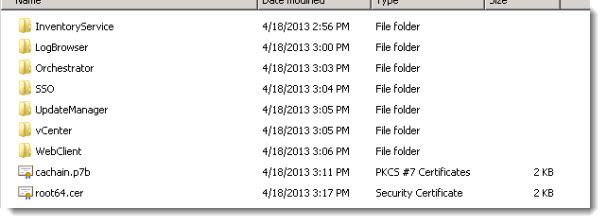
Follow the next steps, for creation of PEM files and actually using the VMware Certificate Automation Tool on next page –>


Great write-up. For those that want a more automated approach, I’ve written a script that handles certificate generation when using a Windows PKI with automatic certificate approval.
http://www.rivnet.ro/2013/04/automate-replacing-of-certificates-in-vcenter-5-1.html
After using the tool, the steps from your blog post apply.
Nice. Thanks for sharing.
Vlad, in your experience, does the tool behave differently based on how you’ve upgraded vcenter? We started off with 4, upgraded 5.0…then skipped 5.1 (introduction of SSO), then upgraded from 5.0 to 5.5.
I believe many of the file paths may be different with this way we upgraded as it isn’t “typical”. I spent 4 hours most was once I got to the 3rd SSL Cert to replace (vcenter cert). I was trying to fix the vcenter SSL cert getting various errors and looking up several KB articles to the point where I just gave up and reverted my snapshot. I did not have a good feeling about how it was going and am actually considering burning it down and reinstalling fresh.
We are currently in a state where the SSO and Inventory certs were replaced, but the rest aren’t.
thoughts?
It’s a post from April 2013. Many things has changed since. Shall you get the latest utility from VMware or perhaps test third party scripts, like the ones from Derek Seaman’s blog. The write up was done on simple lab environment which in that time (I guess) was running 5.1. So I can’t really give you direct answer on that.
hi,
vladen,
I read your article and i impressed your way of explaining.
i have a question for u.if you kindly answer to these question .it will much appreciated.
1. Can we install 2012 server on virtual machine and then then we can install vCenter on this VM machine
and this should not be domain controller.my setup is like this:
1.2 Two esxi machines Esxi1 andEsxi2 with 24 port hp switches. vsphere 5.5 on my client machine on same subnet or same network,but i am confused.
where can i install Vcentre .Either on vsphere client machine or make anotherVM machine on my esxi hypervisor and give name vcenter machine and install 2012 server on that machine and then give static ip address connected to sql2012 server for SSO.is this the way or any other way.
Please let me know .much appreciated.
regard,
was