This tip comes from Nico Stein, a fellow Veeam Vanguard. I saw his presentation during Veeam Summit 100 in Prague, but I said to myself that I won't publish it before I test it. And that's why this post (and a video). In fact, it is good that I tested it by myself because EasyBCD software did not worked as expected and only by making sure on certain point, it correctly registers the second multiboot entry.
Yes, we're into multiboot, but it's been a very long time since we haven't done any. And yest, it's via multiboot that we're able to use Veeam Bare Metal restore feature. In this video we'll be creating a multiboot for Windows Server 2022 with Veeam Recovery Environment placed on a recovery partition, and as such we'll have a multi-boot system ready to be recovered if needed.
It's supercool to have Veeam Recovery environment on a recovery partition rather on a slow USB stick, right? It's not difficult to do so! At the same time, we're making sure that all the necessary drivers that are needed for Veeam Bare Metal Recovery to work, are present on the recovery partition as well. Everything is in the video, but if you prefer a write-up, here it is.
Veeam Bare Metal Recovery Without using USB Stick – The Steps:
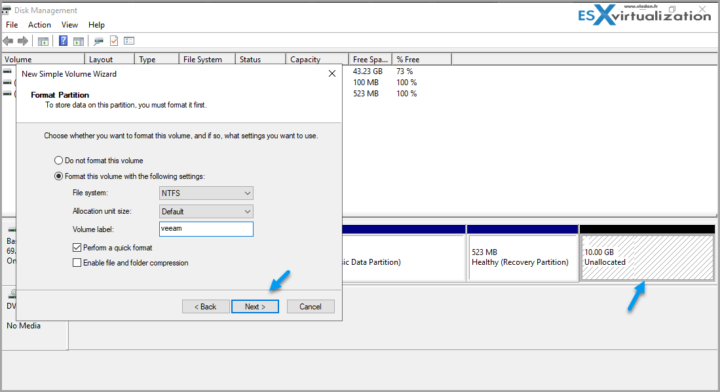
Step 1: Before we get started, make sure that you create a separate partition on your server. This partition will be used to store the Veeam Recovery environment files.
You can some partition management software, such as GParted, create a bootable ISO, then create a partition. Once we have that, the steps are fairly simple. If you have a free space, you can create partition via Disk management tool of your Windows server.
Step 2: I assume that Veeam Agent for Windows is already installed. If not, download and install Veeam Agent for Windows.
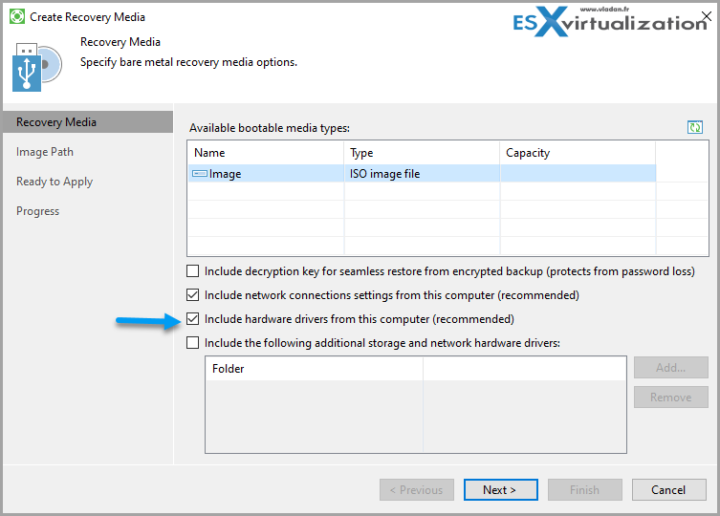
Step 3: Create recovery media, via Recovery media creator tool, make sure to leave the checkbox “include hardware drivers from this system” checked. Save the ISO to your desktop.
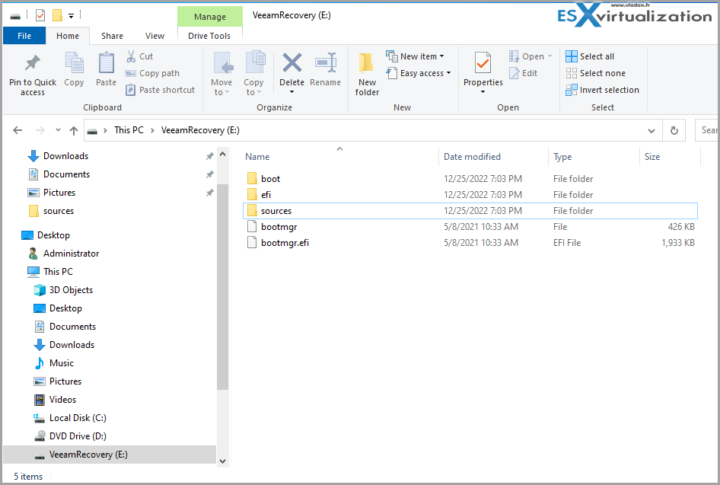
Step 4: Mount the ISO and copy paste all the files to the recovery partition.
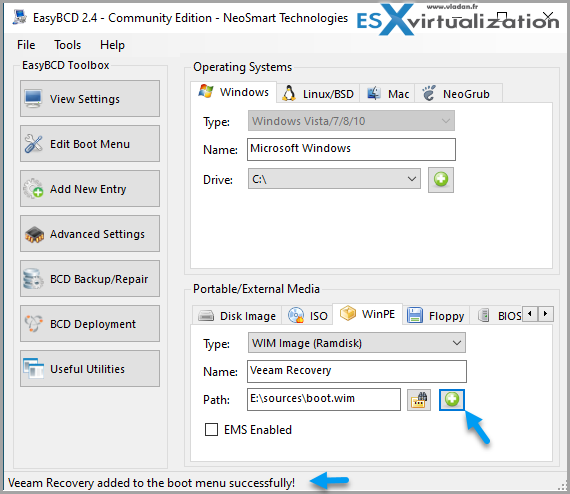
Step 5: Launch EasyBCD software community edition, that you can download for free here, and create a second entry (the first one is the default one that your system is using already).
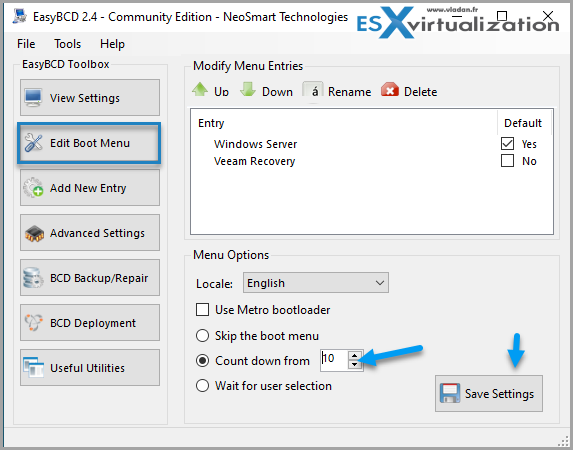
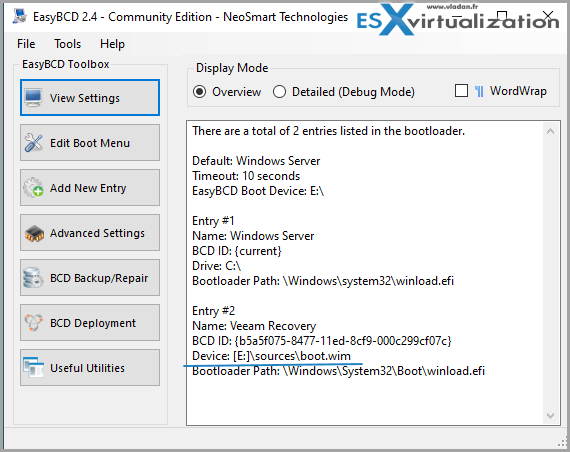
Then make sure that by clicking the Edit Boot Menu and change the Count down time. Then click the Save Settings. It's important, because if you don't do that, the entry 2 path stays wrong (“E:” only and not “E:\sources\boot.wim” !!!!!! That's a bug I think).
Once done, just Save Settings and you're good to go….
To double check the settings before we actually reboot, just go to View Settings and check the second entry's path. If it points to \sources\boot.wim then you're good to go!!!
Note: If you're reboot without having the path wrong, then the Veeam Recovery environment won't load!
Here is the video that I made. Sorry about the sound which is not the best (recorded on my old iPhone), because I wasn't at home while producing it, so I haven't got the usual setup with a mic… but the overall quality is still pretty good (4K btw) and yes, enjoy -:).
Final Words:
Why would be more interesting to use multi-boot to launch Veeam Bare Metal Restore instead of using USB stick? Well, it's faster. Within a server environment, each boot takes time, and also, you'll have to go into a BIOS to change the boot order, to be able to boot your USB stick, right? By having this environment prepared ahead of time, you only save some minutes when needed in case something goes wrong.
Why would something goes wrong. A system corruption, ransomware, just two examples. As a good practice is always to use separate media, separate systems, separate clouds, to store your backups. Always password protect your backups, and always use 3-2-1 backup rule!
More about Veeam on ESX Virtualization Blog:
- Veeam VMCE – Why become Veeam Certified Engineer?
- Veeam Backup and Replication v12 – news from Barcelona 2022
- Veeam Backup for AWS – FREE backup of 10 instances
- Veeam Backup for Microsoft 365 v6a – What’s New?
- Veeam Backup for Google Cloud Platform – FREE 10 instances backup
- Veeam Immutable Backups – Your protection against Ransomware
- Veeam Backup and Replication 12 (Beta2) Installation
- Veeam Backup and Replication 12 (BETA) – adding Hardened Linux Repository
- Quickly setup a Veeam immutable repository via this GitHub Script
- Veeam v12 Announced
- VeeamON 2022 – (recordings are online…….v12, Ransomware, Kubernetes, Cloud-native Backups, Salesforce and Microsoft 365)
More posts from ESX Virtualization:
- vSphere 8.0 Page (NEW)
- Patch your ESXi 7.x again
- VMware vCenter Server 7.03 U3g – Download and patch
- Upgrade VMware ESXi to 7.0 U3 via command line
- VMware vCenter Server 7.0 U3e released – another maintenance release fixing vSphere with Tanzu
- VMware vCenter Converter Discontinued – what’s your options?
- How to upgrade VMware VCSA 7 Offline via patch ISO
- vSphere 7.0 U3C Released
- vSphere 7.0 Page[All details about vSphere and related products here]
- VMware vSphere 7.0 Announced – vCenter Server Details
- VMware vSphere 7.0 DRS Improvements – What's New
- How to Patch vCenter Server Appliance (VCSA) – [Guide]
- What is The Difference between VMware vSphere, ESXi and vCenter
- How to Configure VMware High Availability (HA) Cluster
Stay tuned through RSS, and social media channels (Twitter, FB, YouTube)

