Today's post will focus on security – VCP6-DTM Objective 2.4 – Configure and Manage Security in Horizon (with View). We will have a look at certificates and certificate-based authentication as well as other security options like smart cards, RADIUS and configuration of SAML authenticator.
We're cleared more than half the objectives from the official VMware blueprint. Check out our VCP6-DTM Study Guide page.
VMware Knowledge
- Import certificates
- Enable certificate-based authentication
- Identify authentication requirements for RSA, Smart Cards, and RADIUS
- Configure SAML authenticator
- Create Horizon View access groups for delegated administration and roles
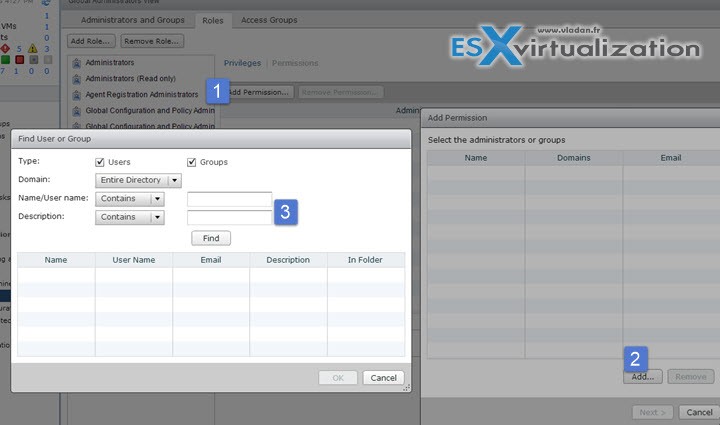
- Create and assign delegated administrative roles
- Configure clipboard redirection
Tools
- Horizon View Installation Guide
- Horizon View Security Guide
- Horizon View Administration Guide
- Horizon View Administrator
Check the Admin guide on the Overview of Tasks for Setting Up SSL Certificates (p. 67 of the installation guide).
Import certificates
Production environments have to use (or shall do) use certificates provided by certification authority. Those are usually certificates you pay for. The certificate is then imported into view. Determine the fully qualified domain name (FQDN) that client devices use to connect to the host. To comply with VMware security recommendations, use the FQDN, not a simple server name or IP address, even for communications within your internal domain.
You must import the SSL server certificate into the Windows local computer certificate store on the Windows Server host on which the View Connection Server instance or security server service is installed. You also must perform this task on the Windows Server host where the View Composer service is installed. Depending on your certificate file format, the entire certificate chain that is contained in the keystore file might be imported into the Windows local computer certificate store.
Steps:
Perform those steps on View Connection Server instance, security server service is installed. Also on Composer, if used.
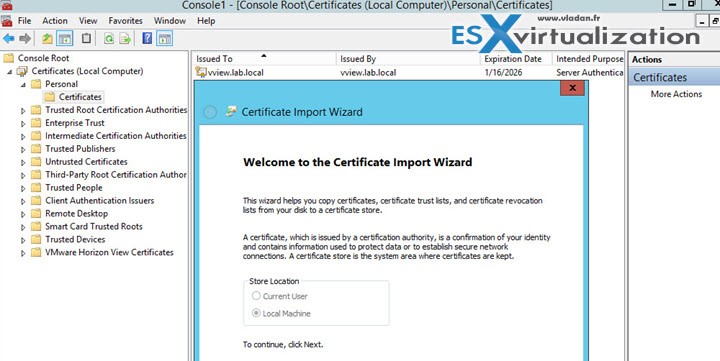
Fist open MMC and Add the certificates snap-in for local computer. In the MMC window, expand the Certificates (Local Computer) node and select the Personal folder. In the Actions pane, go to More Actions > All Tasks > Import.
In the Certificate Import wizard, click Next and browse to the location where the certificate is stored.
Select the certificate file and click Open. To display your certificate file type, you can select its file format from the File name drop-down menu. Type the password for the private key that is included in the certificate file. Select Mark this key as exportable. Select Include all extended properties> Next > Finish.
Verify that the new certificate contains a private key. In the Certificates (Local Computer) > Personal > Certificates folder, double-click the new certificate.
In the General tab of the Certificate Information dialog box, verify that the following statement appears: You have a private key that corresponds to this certificate.
Modify the certificate Friendly name to vdm. (for connection server, not composer).
Import a Root Certificate and Intermediate Certificates into a Windows Certificate Store – In the MMC console on the Windows Server host, expand the Certificates (Local Computer) node and go to the Trusted Root Certification Authorities > Certificates folder.
If your root certificate is in this folder, and there are no intermediate certificates in your certificate chain, skip to step 7.
If your root certificate is not in this folder, proceed to step 2.
Step 2: Right-click the Trusted Root Certification Authorities > Certificates folder and click All Tasks Import.
next etc etc…
Step 7: Restart the View Connection Server service, Security Server service, View Composer service, or vCenter Server service to make your changes take effect.
Note for Composer: View Composer, you must run the SviConfig ReplaceCertificate utility to replace the certificate that is bound to the port used by View Composer. This utility unbinds the existing certificate and binds the new certificate to the port. (p73. Horizon View Installation guide)
Enable certificate-based authentication
You need to not only install the SSL certificates on required servers (above), but also you must configure the client to trust those certificates. Check details for each of the Systems (Windows, OSX, MacOS… on p73 – 74.
There you'll find also PCoIP gateway configuration concerning SSL. Basically PCoIP Secure Gateway (PSG) service uses default certificate after install, so you must follow the whole procedure:
- Verify That the Server Name Matches the PSG Certificate Subject Name on page 78
- Configure a PSG Certificate in the Windows Certificate Store on page 78
- Set the PSG Certificate Friendly Name in the Windows Registry on page 80
- (Optional) Force a CA-Signed Certificate to Be Used for Connections to the PSG on page 80
Identify authentication requirements for RSA, Smart Cards, and RADIUS
You can configure a View Connection Server instance so that users are required to use RSA SecurID authentication or RADIUS (Remote Authentication Dial-In User Service) authentication.
you must have those servers configured and accessible to the View Connection Server host. For example, if you use RSA SecurID, the authentication manager would be RSA Authentication Manager. If you have RADIUS, the authentication manager would be a RADIUS server.
2 Factor Authentication – You need to have third-party software for 2-factor authentication. Install and configure the two-factor authentication software, such as the RSA SecurID software or the RADIUS software, on an authentication manager server.
RADIUS – The RADIUS server has not been configured to accept the View Connection Server instance as a RADIUS client. Each View Connection Server instance using RADIUS must be set up as a client on the RADIUS server.
Smart Card – To use smart cards, client machines must have smart card middleware and a smart card reader. To install certificates on smart cards, you must set up a computer to act as an enrollment station.
Configure SAML authenticator
VMware Horizon Suite uses SAML 2.0 authenticators to provide Web-based authentication and authorization across security domains. If you want View to delegate authentication to the Horizon Suite, you can configure View to accept SAML 2.0 authenticated sessions from Horizon Suite. When Workspace is configured to support View, Workspace users can connect to remote desktops by selecting desktop icons on the Horizon User Portal.
In View Administrator, you can configure SAML 2.0 authenticators for use with View Connection Server instances. Before you add a SAML 2.0 authenticator in View Administrator, make sure that the SAML 2.0 authenticator uses a certificate that is signed by a CA.
Requirements:
- Verify that the root certificate for the signing CA for the SAML server certificate is installed on the View Connection Server host
- Verify that Horizon Workspace is installed and configured
- Make a note of the FQDN or IP address of the Workspace Gateway server or external-facing load balancer.
- Make a note of the URL of the Workspace Connector Web interface.
Where?
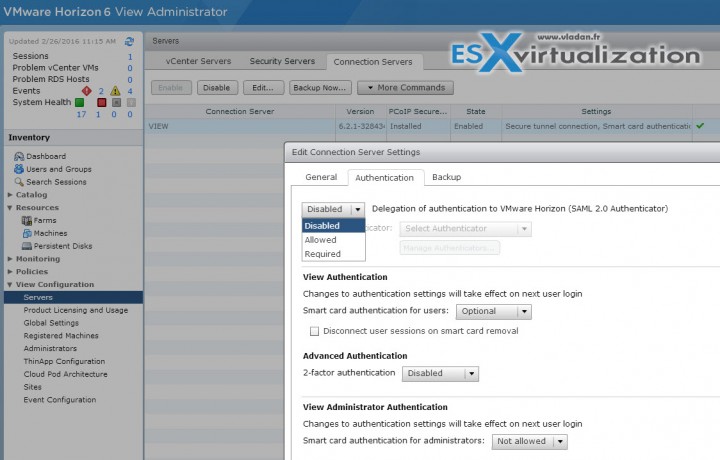
Horizon View admin UI > View configuration > Servers > Select Connection Server > Edit > Authentication tab.
- Disabled – SAML authentication is disabled. You can launch remote desktops and applications only from Horizon Client.
- Allowed – SAML authentication is enabled. You can launch remote desktops and applications from both Horizon Client and Workspace.
- Required – SAML authentication is enabled. You can launch remote desktops and applications only from Workspace. You cannot launch desktops or applications from Horizon Client manually.
Check more details on p.51 of Horizon View administration guide.
Create Horizon View access groups for delegated administration and roles
You can define who can use View Administrator role and what tasks those users are authorized to perform. With role-based delegated administration, you can selectively assign administrative rights by assigning administrator roles to specific Active Directory users and groups. The same way as in vCenter server, admins are allowed to perform tasks in View Administrator is governed by an access control system that consists of administrator roles and privileges.
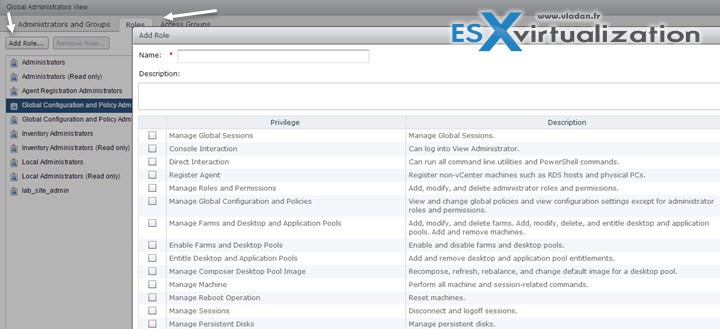
Administrator Role – is a collection of privileges. Privileges grant the ability to perform specific actions, such as entitling a user to a desktop pool. Privileges also control what an administrator can see in View Administrator.
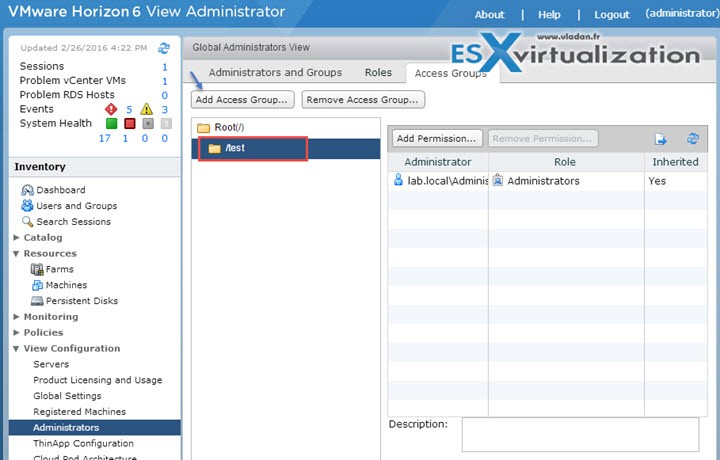
Root Access Group – Automated desktop pools, manual desktop pools, and farms are created in the root access group, which appears as / or Root(/) in View Administrator. RDS desktop pools and application pools inherit their farm's access group. You can create access groups under the root access group to delegate the administration of specific pools or farms to different administrators.
A role must contain at least one object-specific privilege to apply to an access group. Roles that contain only global privileges cannot be applied to access groups. You can use View Administrator to create access groups and to move existing desktop pools to access groups. When you create an automated desktop pool, a manual pool, or a farm, you can accept the default root access group or select a different access group.
After you create a role you can assign a permission…
Create and assign delegated administrative roles
A role must contain at least one object-specific privilege to apply to an access group. Roles that contain only global privileges cannot be applied to access groups.
You can delegate the administration of specific machines, desktop pools, or farms to different administrators by creating access groups. By default, desktop pools, application pools, and farms
reside in the root access group.
You can have a maximum of 100 access groups, including the root access group.
Move a Desktop Pool or a Farm to a Different Access Group – In View Administrator, select Catalog > Desktop Pools or Resources > Farms
Select a pool or a farm > Select Change Access Group from the Access Group drop-down menu in the top window pane > Select the access group and click OK. View Administrator moves the pool to the access group that you selected.
Configure clipboard redirection
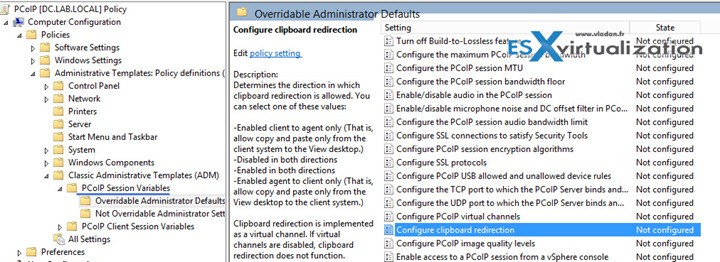
Horizon View has PCoIP Session Variables ADM template files (), which contains GPO settings that configure general session characteristics such as PCoIP image quality, USB devices, and network ports.
Note: To know how to install those ADM template files check out the Objective 2.3 – Configure PCoIP/RDP Protocol Settings
Configure clipboard redirection – Determines the direction in which clipboard redirection is allowed. You can select one of these values:
- Enabled client to agent only (That is, allow copy and paste only from the client system to the remote desktop.)
- Disabled in both directions –
- Enabled in both directions –
- Enabled agent to client only (That is, allow copy and paste only from the remote desktop to the client system.)
Clipboard redirection is implemented as a virtual channel. If virtual channels are disabled, clipboard redirection does not function.
This setting applies to View Agent only.
When this setting is disabled or not configured, the default value is Enabled client to agent only.

