My VCP6-DCV Study Guide on my blog is getting crowdy with more and more objectives. Today's topic is Objective 10.1 – Configure Advanced vSphere Virtual Machine Settings. We'll be looking into some advanced options (with some tweaks) which are not only needed to pass the VCP6 exam, but are useful in real life.
 There is many tips and tricks I have published in the past for vSphere 5.x and vSphere 6. You can check the How-to articles, config/troubleshooting videos on vSphere 5.5/vSphere 6.x on those two WordPress pages.
But today's topic needs some more deep info concerning the VMs configuration parameters including settings like disabling VMs acceleration.
vSphere Knowledge
- Identify available virtual machine configuration settings
- Interpret virtual machine configuration files (.vmx) settings
- Identify virtual machine DirectPath I/O feature
- Enable/Disable Advanced virtual machine settings
—————————————————————————————————–
Identify available virtual machine configuration settings
The configuration settings of a VM can be accessed through vSphere client and vSphere web client. We'll focus however on the settings through vSphere web client as this is the main client going forward even if it's still flash based and here and there the performance aren't optimal. We shall see HTML5 based client in the next update of VMware vSphere.
So start vSphere web client and edit a single VM by going to Select VM > Edit settings > VM Options
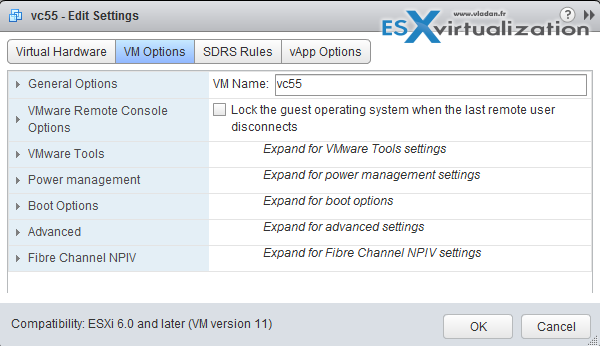
General Options – Virtual machine name and location of the virtual machine configuration file and virtual machine working location. View or change the type and version of the guest operating system.

VMware Remote Console Options – Locking behavior and settings for simultaneous connections.

VMware Tools – Power Controls behavior, VMware Tools scripts, automatic upgrades, and time synchronization between the guest and host.
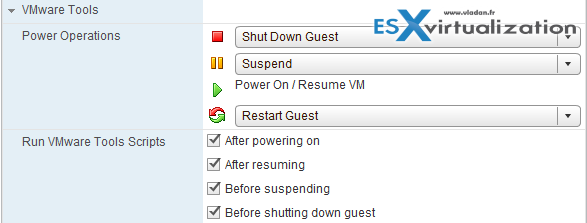
Power Management – Virtual machine Suspend behavior and wake on LAN.

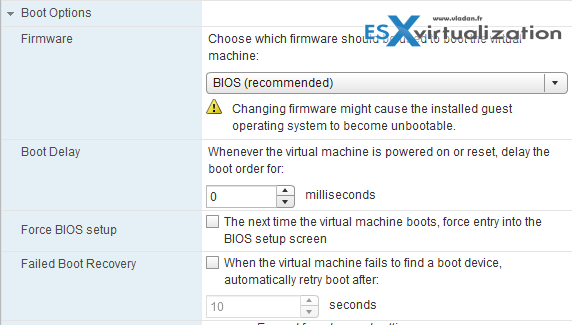
Boot Options – You can set the boot delay and other cool stuff here. Virtual machine boot options. Add a delay before booting, force entry into the BIOS or EFI setup screen, or set reboot options.
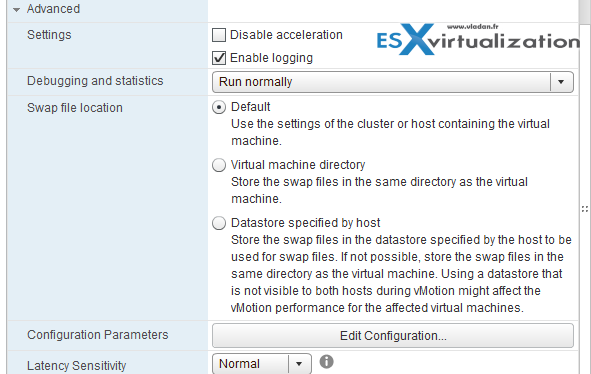
Advanced Advanced virtual machine option –
- Settings – Specify acceleration and logging settings.
- Debugging and statistic – Specify the level of debugging information that is being collected.
- Swap file location – Specify the swap file location.
- Configuration Parameters – View, modify, or add configuration parameters.
- Latency Sensitivity – Set a value for latency sensitivity.
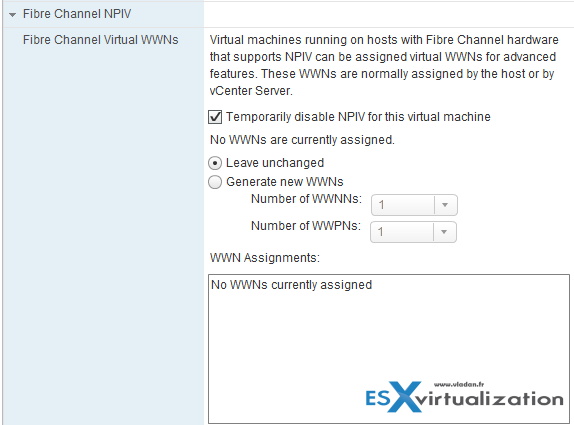
Fibre Channel NPIV Virtual node and port World Wide Names (WWNs).
Interpret virtual machine configuration files (.vmx) settings
The VMX settings can be changed through the VMs Options > Advanced configuration > Edit configuration
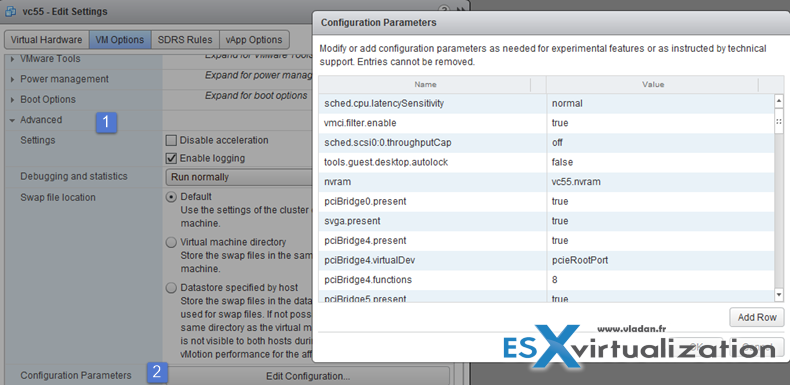
Usually the VMX file is in the same folder as the VM, but it can happen that the VMx files are stored elsewhere. To check where are the files located you can see it in general options where the path to the location of the virtual machine configuration file shows. The path to the virtual machine working location appears in the VM Working Location text box.
1. The location of the VMX file
2. The location of the working location (VMDK,

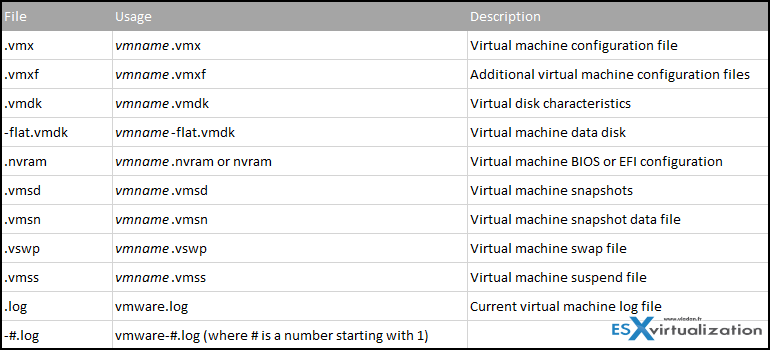
VMs files:
Identify virtual machine DirectPath I/O feature
VMdirect Path I/O – what's that? When enabled, the VM can access physical PCI functions with an I/O memory management unit (MMU). vSphere DirectPath I/O allows a guest operating system on a virtual machine to directly access physical PCI and PCIe devices connected to a host. Each virtual machine can be connected to up to six PCI devices. PCI devices connected to a host can be marked as available for passthrough from the Hardware Advanced Settings in the configuration tab for the host.
Limitations (quite a few…):
- No snapshot support – Snapshots are not supported with PCI vSphere Direct Path I/O devices
- No Hot Add – Hot adding and removing of virtual devices
- No Suspend and resume
- No Record and replay
- No FT – No Fault tolerance
- No HA – No High availability support either…
- DRS? – A kind of. DRS is limited to static….. The VM can be inside of DRS cluster, but cannot be vMotionned…
Where to enable?
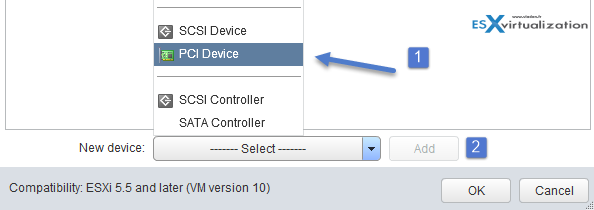
Edit Settings > On the Hardware tab, click Select > select PCI Device and click Add > Select the passthrough device to connect to the virtual machine from the drop-down list > click Next.
DirectPath I/O vs SR-IOV
SR-IOV offers performance benefits and tradeoffs similar to those of DirectPath I/O. DirectPath I/O and SR-IOV have similar functionality but you use them to accomplish different things.
SR-IOV is beneficial in workloads with very high packet rates or very low latency requirements. Like DirectPath I/O, SR-IOV is not compatible with certain core virtualization features, such as vMotion. SR-IOV does, however, allow for a single physical device to be shared amongst multiple guests.
With DirectPath I/O you can map only one physical function to one virtual machine. SR-IOV lets you share a single physical device, allowing multiple virtual machines to connect directly to the physical function.
Enable SR-IOV on a Host Physical Adapter
You must first enable it on the host level. In the vSphere Web Client, Select the host > Manage tab > Networking and select Physical adapters > Select the physical adapter > Edit > Select Enabled from the Status drop-down menu > OK > Restart the host.
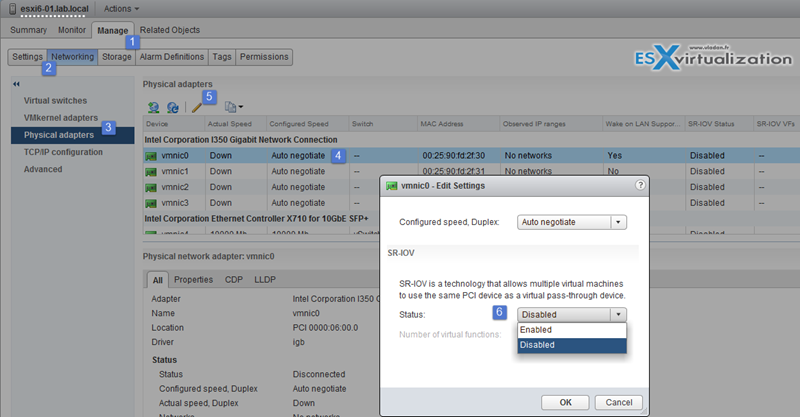
once enabled at the host level, then it's accessible to the VM as a physical device… The VM must be turned off before starting to add the device.
To Assign Virtual Function as SR-IOV Passthrough Adapter to a Virtual Machine
VM settings > Add new device > Network > from the Adapter type drop-down menu, select SR-IOV passthrough.
Than expand the memory section, select reserve all guest memory (All locked) and click OK. I/O memory management unit (IOMMU) must reach all virtual machine memory so that the passthrough device can access the memory by using direct memory access (DMA).
Enable/Disable Advanced virtual machine settings
Well here we could list how to enable/disable different parameters, but I think it's pretty obvious as I added a screenshot for each of those values. Keep in mind that you're modifying config of individual VMs so to keep track of those changens on per-individual VM might be quite tedious, but it might be worthy the effort when seeking to gain a performance or troubleshoot an issue (activate logging).
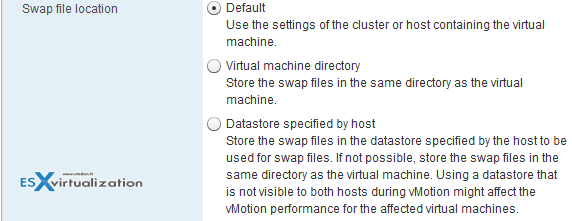
One of the features that we haven't discussed is the Change swap file location. As you know, when a VM is powered On, the ESXi host creates vmkrnel swap file which allows to back up the VMs RAM content. The default swap file (vmname.vswp) location is at the same location as the other VMs files.
- Default – Use the settings of the cluster or host containing the VM
- VMs Directory – store the swap files in the same directory as the VM
- Datastore specified by host – you can store the swap files in the datastore specified by the host to be used for swap files. Note that using a datastore that is not visible to both hosts during vMotion might affect the performance of the vMotion operation for the VM(s).
Change a Swap File location How-to?
vSphere web client Select VM > Edit settings > VM Options > Advanced
Tools and documentation for this topic
- vSphere Installation and Setup Guide
- vSphere Administration with the vSphere Client Guide
- vSphere Virtual Machine Administration Guide
- vSphere Client / vSphere Web Client

Excellent!!