Today's objective is VCP6.5-DCV Objective 9.2 – Configure vCenter Server Appliance (VCSA) HA. A very cool topic which I tested in my lab as well. The process is able to protect VCSA appliance against failures by auto-deploying passive and witness nodes. In case of problem where the active node is lost, the passive node becomes the new active and new passive node is created. The witness node never becomes active or passive node and uses an only small amount of data center resources.
Our New VCP6.5-DCV Study Guide page is starting to fill up with topics from the Exam Preparation Guide (previously called Exam Blueprint). I highly recommend getting the full vSphere 6.5 documentation set and the latest exam preparation guide (PDF) as well when preparing for the exam. I'm not linking directly in purpose as those PDFs can change URL, but you can find those easily through Google search.
You have a choice to study towards the VCP6-DCV – Exam Number: 2V0-621, ( it has 28 Objectives) or going for the VCP6.5-DCV (Exam Code: 2V0-622) which is few chapters longer (it has 32 Objectives). Both exams are valid for two years, then you have to renew. You can also go further and pass VCAP exam, then VCDX.
Update: VMware released new “bridge” upgrade path. Any VCP who is two versions behind the most current available version in the same solution track can upgrade to the latest by only taking one exam. Previously, you would first have to earn the VCP6-DCV (by passing the delta exam) and then upgrade to the VCP6.5-DCV (again, through the delta exam.) Now you can go straight from VCP5 to VCP6.5.
Exam Price: $250 USD, there are 70 Questions (single and multiple answers), passing score 300, and you have 105 min to complete the test.
Check our VCP6.5-DCV Study Guide Page.
You can download your free copy via this link – Download Free VCP6.5-DCV Study Guide at Nakivo.
VCP6.5-DCV Objective 9.2 – Configure vCenter Server Appliance (VCSA) HA
Enable and Configure vCSA HA
To set the foundation for the vCenter HA network, you'll need to add a port group to each ESXi host and add a virtual NIC to the vCenter Server Appliance that later becomes the Active node. You have the option to set up the VCSA HA in two ways:
- Simple
- Advanced
The simple way first. After some network configuration, you will create a three-node cluster that contains Active, Passive and Witness nodes.
Here is the network part config:
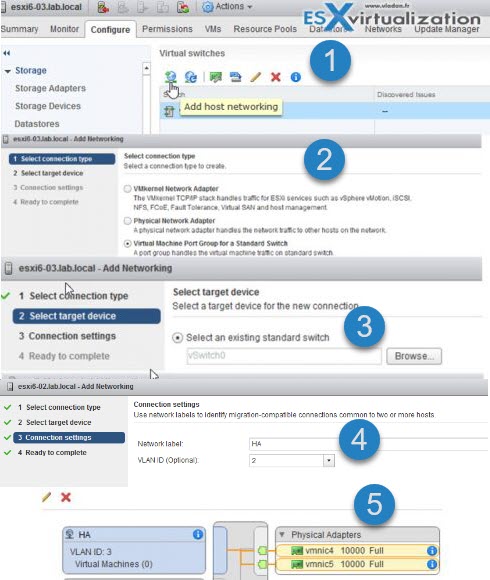
Create a vSphere HA network. Open vSphere web client and select host. > configure > Networking > virtual switches.
Here is the workflow…
If you’re on Standard switches, you’ll have to do that for all the hosts in the management cluster.
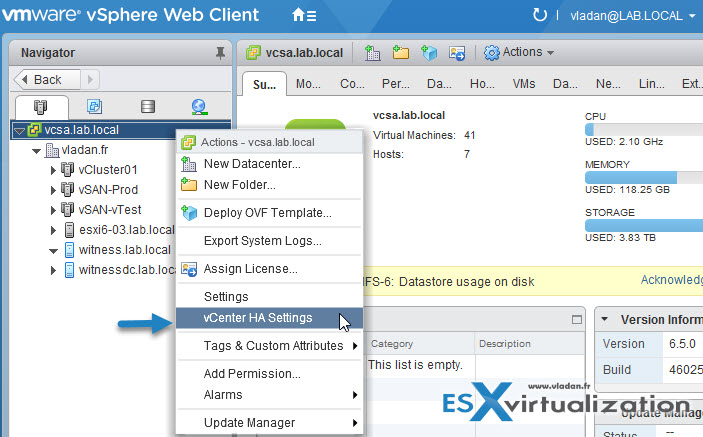
Next, Start the main assistant which will configure the vCenter HA. After you log in to the vSphere Web client, select the vCenter Server > do a right click > vCenter HA settings
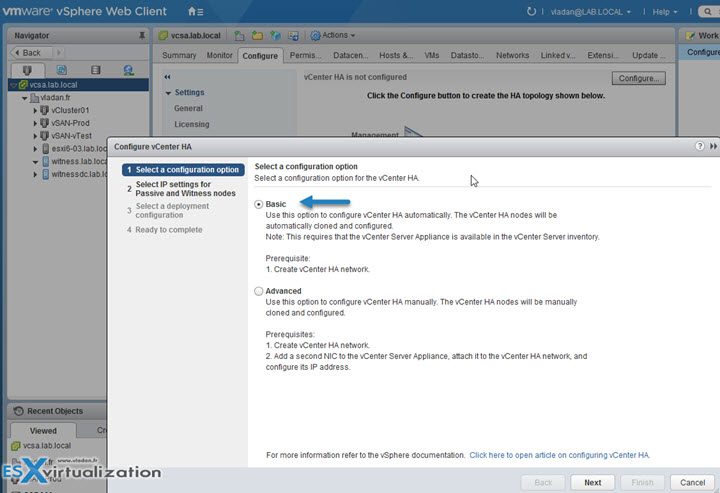
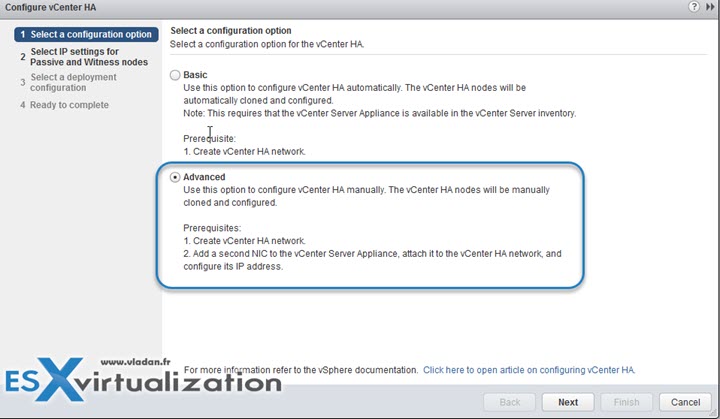
You’ll have a nice screen telling you that vCenter HA is not configured. Hit the Configure button to start the assistant which has the fist radio button preselected. It is the Basic option. Click the next button. (Note that you’ll need to be a member of the SSO Admin group).
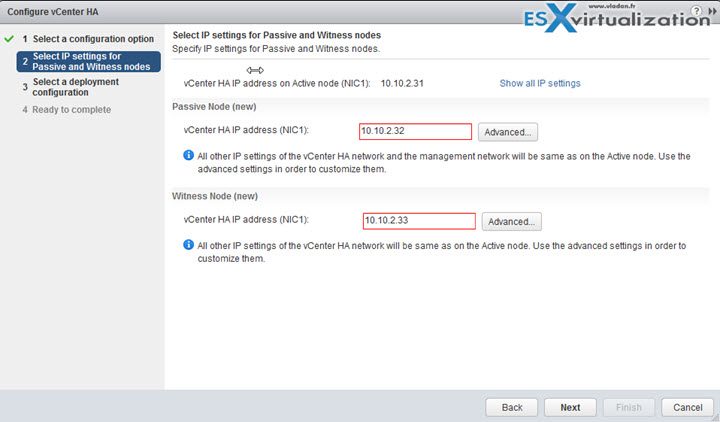
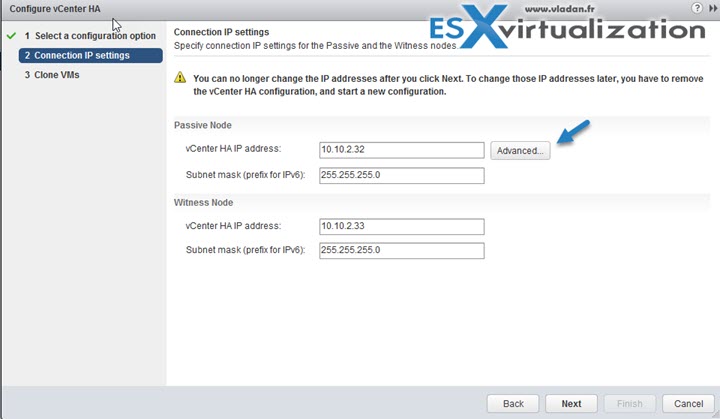
Next page will show up the
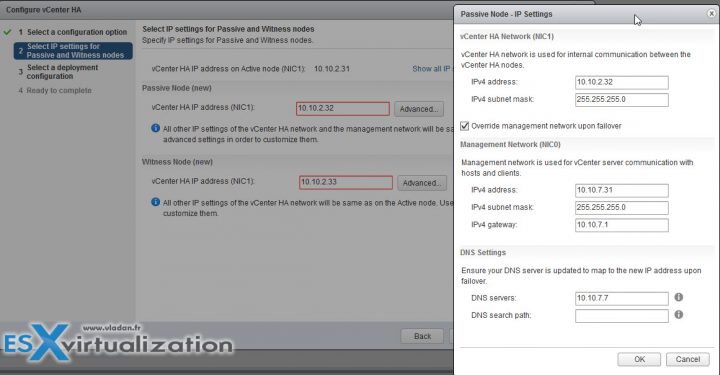
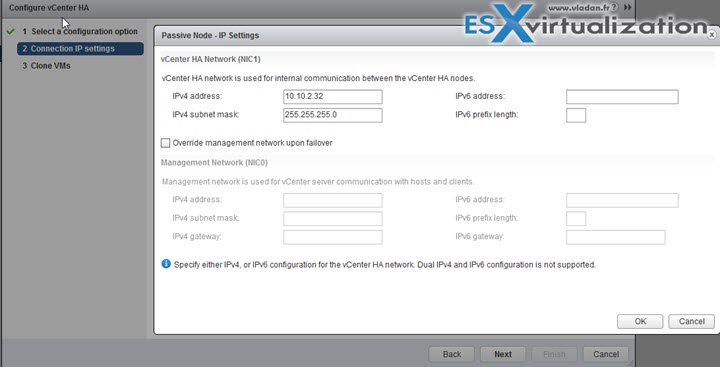
And when you click the Advanced button on the Passive node you can see that you can override management network upon failover. (there is a checkbox)..
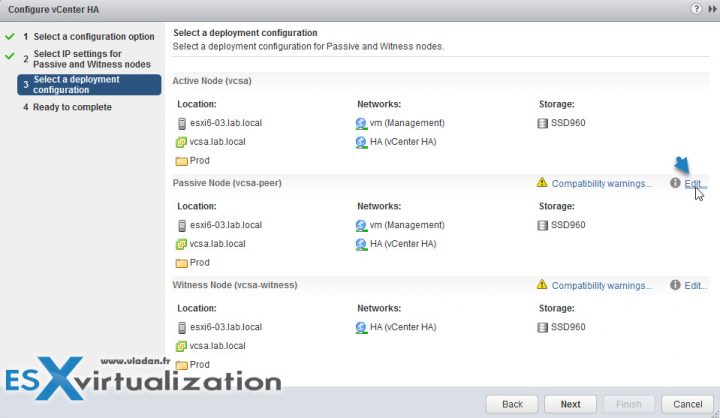
Next, we move the passive node and the Witness node elsewhere.
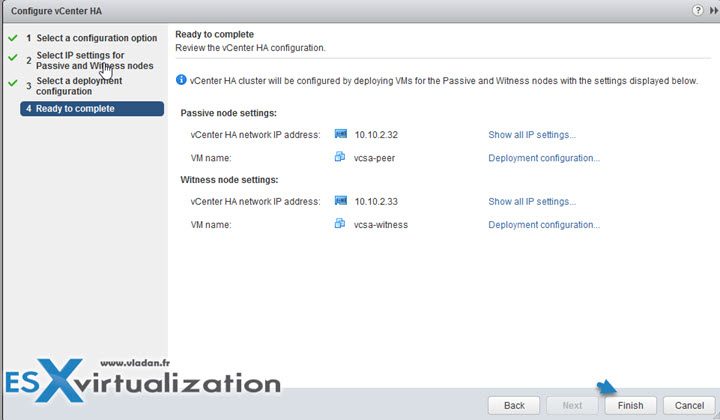
And then finally we can hit the Finish button.
This concludes the workflow. You should have 3 components running:
- VCSA (your primary active VCSA 6.5)
- VCSA-secondary (the passive node)
- VCSA-Witness (appliance running the tiebreaker code)
Here is the final screenshot…. You can see all 3 nodes up and running.
The Advanced option needs more manual steps, but at final, you might be able to adjust things that you would not be able to if you would have gone through the “Simple” config (example set a different SSO domain). The manual steps needs:
- Add manually a second vNIC to our main VCSA 6.5 – (the same as in “Simple” config)
- We need also to add an HA network – (the same as in “Simple” config)
- Clone Active Node manually, to have a Passive Node (and also assign an IP information through the OS customization wizard… yes, it takes longer)
- Clone Active Node manually, to have a Witness Node (and also assign an IP information through the OS customization wizard… yes, more and more manual steps )
- Create affinity and anti-affinity rules so DRS won’t place all 3 nodes on the same host.
Check the advanced config here:
At one point you'll have to clone the active node (without exiting the HA wizard).
You'll have those options:
- New Virtual Machine Name – Name of the Passive node. For example, use vcsa-peer.
- Select Compute Resource – Select Storage – Use a different target host and datastore than for the Active node if possible..
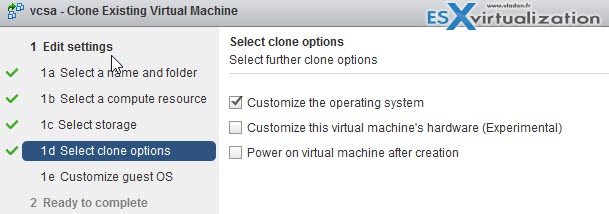
- Clone Options – Select the Customize the operating system and Power on virtual machine after creation check boxes and click the New Customization Spec icon on the next page. In the New Customization Spec wizard that appears specify the following.
- Use the same host name as the Active node – Ensure the timezone is consistent with the Active node. Keep the same AreaCode/Location with UTC as the Active node. If you have not specified AreaCode/Location with UTC while configuring the Active node, keep London in AreaCode/Location during cloning. London has 0.00 offset, so it keeps the clock to UTC without any offset.
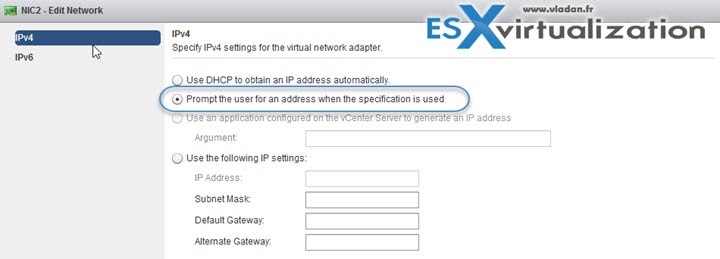
- On the Configure Network page, specify the IP settings for NIC1 and NIC2, which map to the management interface and the vCenter HA interface. Leave the NIC2 Default Gateway blank.
choose the Advanced option.
then enter the IP information concerning the Passive node and a Witness node.
The advanced section allows you to specify advanced override options for the management NIC (NIC0).
The system “watches” what you’re entering and trying to correct the errors. Here is an example if you forgot to add a second NIC…. the system detects it.
Step 3: You’ll need manually clone the VM, otherwise, the assistant won’t let you continue. So you’ll have to open another browser window just for the cloning operation and:
- Put a name
- Select Compute
- Select Storage
- Select clone options
Etc, etc…
Basically, you have to prepare a customized template which will be used during the clone operation
and then when during the cloning, you’ll have the wizard like this…
then the recap screen….
Then rinse and repeat for the Witness. Also needed are the affinity and anti-affinity rules. I assume that you know your way. And at the end, you should end up again with the screen like this one, where you’ll have one appliance with the Active role, one with Passive role and one with Witness role.
The same as with Simple config. At this screen you can manually initiate failover with the Initiate Failover button.
Understand and describe the architecture of vCSA HA
VCSA HA Nodes are 3 in total:
Active – Runs the active vCenter Server Appliance instance. Uses a public IP address for the management interface. and uses the vCenter HA network for replication of data to the Passive node. Also, it uses the vCenter HA network to communicate with the Witness node.
Passive – Is initially a clone of the Active node. It constantly receives updates from and synchronizes state with the Active node over the vCenter HA network. And it automatically takes over the role of the Active node if a failure occurs.
Witness – Is a lightweight clone of the Active node. Provides a quorum to protect against split-brain situations.
The active node is your usual VCSA 6.5 which manages your infrastructure, and the passive node is a node which sits there doing nothing, just receiving files from the active node.
A vCenter HA cluster consists of three vCenter Server Appliance instances. The first instance, initially used as the Active node, is cloned twice to a Passive node and to a Witness node. Together, the three nodes provide an active-passive failover solution.
Deploying each of the nodes on a different ESXi instance protects against hardware failure. Adding the three ESXi hosts to a DRS cluster can further protect your environment.
When vCenter HA configuration is complete, only the Active node has an active management interface (public IP). The three nodes communicate over a private network called vCenter HA network that is set up as part of the configuration. The Active node and the Passive node are continuously replicating data.
Check also:
More from ESX Virtualization
- VCP6.5-DCV Study Guide
- vSphere 6.5
- What's New in vSphere 6.5 – New Training Course from PluralSight
- How to patch VMware vCenter Server Appliance (VCSA) from Offline Depot ZIP file
- How to reset root password in vCenter Server Appliance 6.5
Stay tuned through RSS, and social media channels (Twitter, FB, YouTube)

