Today's objective is VCP6.5-DCV Objective 10.1 – Create and Manage vSphere Virtual Machines and Templates. HA, DRS and FT are core technologies of VMware clusters. It's important to master their requirements, configuration, and troubleshooting.
Check our VCP6.5-DCV Study Guide page which is starting really to take shape and fills up with topics from the Exam Preparation Guide (previously called Exam Blueprint). I would recommend getting the full vSphere 6.5 documentation set and the latest exam preparation guide (PDF) as well when preparing for the exam. I'm not linking directly in purpose as those PDFs can change URL, but you can find those easily through Google search.
You have a choice to study towards the VCP6-DCV – Exam Number: 2V0-621, ( it has 28 Objectives) or going for the VCP6.5-DCV (Exam Code: 2V0-622) which is few chapters longer (it has 32 Objectives). Both exams are valid for two years, then you have to renew. You can also go further and pass VCAP exam, then VCDX.
Note: VMware released new “bridge” upgrade path. Any VCP who is two versions of the most current available version in the same solution track can upgrade to the latest by only taking one exam. Previously, you would first have to earn the VCP6-DCV (and passing the delta exam) and then upgrade to the VCP6.5-DCV (again, through the delta exam.) Now you can go straight from VCP5 to VCP6.5.
Exam Price: $250 USD, there are 70 Questions (single and multiple answers), passing score 300, and you have 105 min to complete the test.
Check our VCP6.5-DCV Study Guide Page.
You can download your free copy via this link – Download Free VCP6.5-DCV Study Guide at Nakivo.
VCP6.5-DCV Objective 10.1 – Create and Manage vSphere Virtual Machines and Templates
- Determine how using a shared USB device impacts the environment
- Configure virtual machines for vGPUs, DirectPath I/O and SR-IOV
- Configure virtual machines for multicore vCPUs
- Differentiate virtual machine configuration settings
- Interpret virtual machine configuration files (.vmx) settings
- Enable/disable advanced virtual machine settings
Determine how using a shared USB device impacts the environment
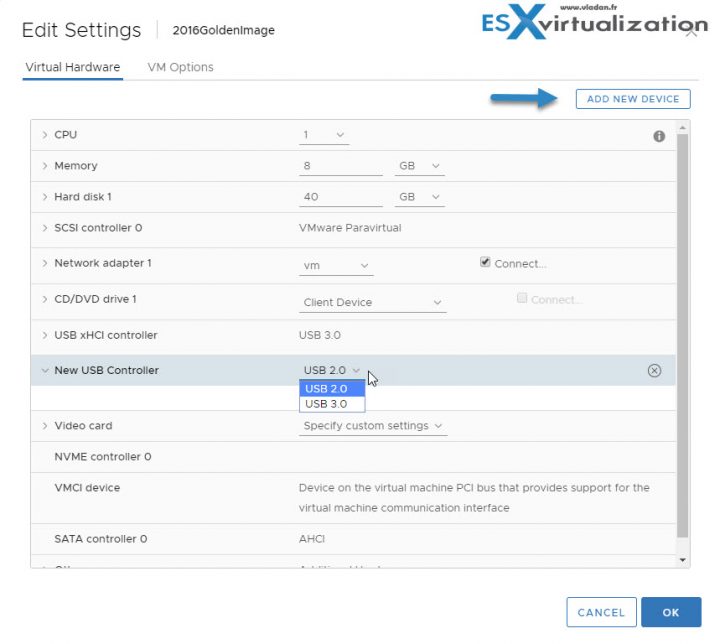
You can add multiple USB devices to a virtual machine when the physical devices are connected to an ESXi host. USB passthrough technology supports adding USB devices, such as security dongles and mass storage devices to virtual machines that reside on the host to which the devices are connected.
First you need to add USB controller to the VM. After that you can select the version of the protocol.
When you attach a USB device to a physical host, the device is available only to virtual machines that reside on that host. The device cannot connect to virtual machines that reside on another host in the datacenter.
A USB device is available to only one virtual machine at a time. When a device is connected to a powered-on virtual machine, it is not available to connect to other virtual machines that run on the host. When you remove the active connection of a USB device from a virtual machine, it becomes available to connect to other virtual machines that run on the host.
Configure virtual machines for vGPUs, DirectPath I/O and SR-IOV
If an ESXi host has an NVIDIA GRID GPU graphics device (or other compatible devices), you can configure a virtual machine to use the NVIDIA GRID virtual GPU (vGPU) technology.
It's necessary that VM is compatible with ESXi 6.0 and later.
Select VM > Edit Settings > Virtual Hardware TAB > Shared PCI Device drop down menu > Add > New PCI device > Select Nvidia GRID vGPU passthrough device > Select GPU profile > Click Reserve All memory > OK.
SR-IOV – For low latency network characteristics you can leverage SR-IOV. To use the capabilities of SR-IOV, you must enable the SR-IOV virtual functions on the host and connect a virtual machine to the functions. SR-IOV is a specification that allows a single Peripheral Component Interconnect Express (PCIe) physical device under a single root port to appear as multiple separate physical devices to the hypervisor or the guest operating system.
Direct Path I/O – allows a guest OS on a VM to directly access physical components on the host such as PCI and PCIe devices. Use cases for this could be high-performance graphics cards or sound cards.
There is a maximum of 6 devices a VM can be connected to
Note: Snapshots are not supported with PCI vSphere Direct Path I/O devices.
The virtual machine and the physical adapter exchange data without using the VMkernel as an intermediary. This adapter type is suitable for virtual machines where latency might cause failure or that require more CPU resources.
Note: When using DirectPath I/O on a virtual machine you CANNOT suspend, vMotion or perform snapshots on that virtual machine.
SR-IOV enabled PCIe devices does require an appropriate BIOS and hardware support, as well as SR-IOV support in the guest operating system driver or hypervisor instance.
SR-IOV is beneficial in workloads with very high packet rates or very low latency requirements. Like DirectPath I/O, SR-IOV is not compatible with certain core virtualization features, such as vMotion. SR-IOV does, however, allow for a single physical device to be shared amongst multiple guests. With DirectPath I/O you can map only one physical function to one virtual machine. SR-IOV lets you share a single physical device, allowing multiple virtual machines to connect directly to the physical function.
Configure virtual machines for multicore vCPUs
VMware multicore virtual CPU support lets you control the number of cores per virtual socket in a virtual machine. This capability lets operating systems with socket restrictions use more of the host CPU's cores, which increases overall performance.
Note: You can also enable Hot-Add.
Using multicore virtual CPUs can be useful when you run operating systems or applications that can take advantage of only a limited number of CPU sockets.
You can configure a virtual machine that runs on an ESXi host 6.0 and later to have up to 128 virtual CPUs. A virtual machine cannot have more virtual CPUs than the actual number of logical CPUs on the host. The number of logical CPUs means the number of physical processor cores or two times that number if hyperthreading is enabled. For example, if a host has 128 logical CPUs, you can configure the virtual machine for 128 virtual CPUs.
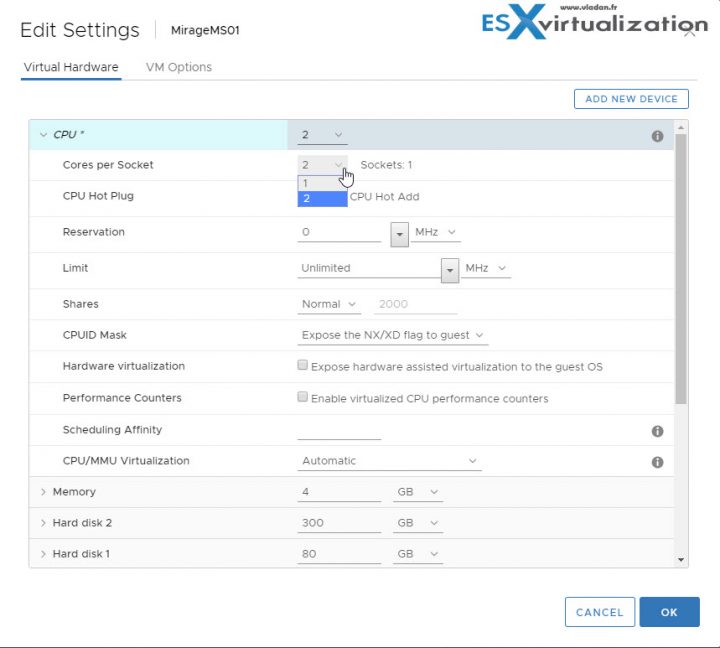
You configure how the virtual CPUs are assigned in terms of cores and cores per socket. Determine how many CPU cores you want in the virtual machine, then select the number of cores you want in each socket, depending on whether you want a single core CPU, dual-core CPU, tri-core CPU, and so on. Your selection determines the number of sockets that the virtual machine has.
Click VM > Edit settings > Virtual Hardware tab > expand CPU > select the number of cores from the CPU drop-down menu > Select the number of cores per socket from the Cores Per Socket drop-down menu > Click Save.
Check the image.
When using cpuid.coresPerSocket advanced setting, you should always ensure that you are in compliance with the requirements of your operating system EULA (that is, regarding the number of physical CPUs on which the operating system is actually running).
Also, check VMware KB 2020993
Differentiate virtual machine configuration settings
You can edit VM config by going to its configuration page. Simply select and right-click a VM > Edit Settings.
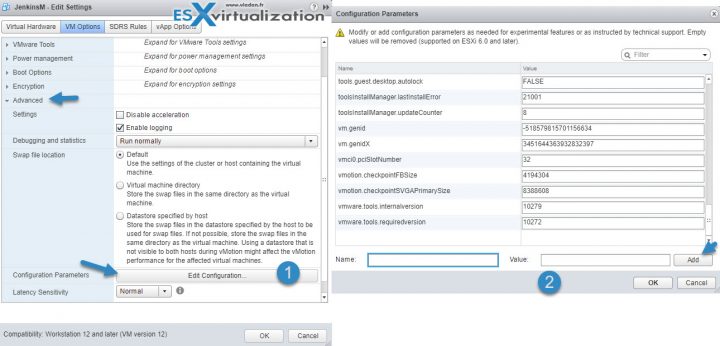
You can edit VM's advanced settings (including adding new advanced options) there.
Interpret virtual machine configuration files (.vmx) settings
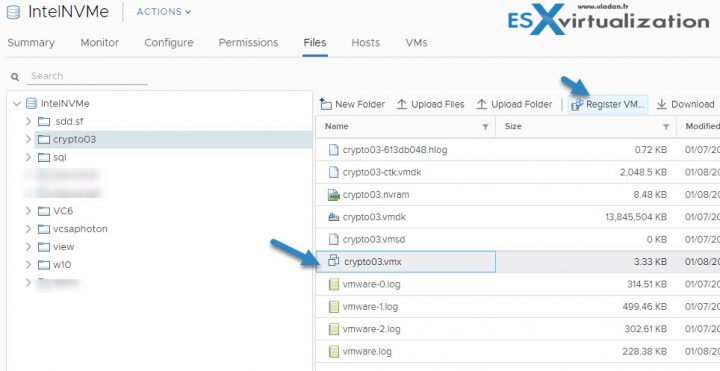
In order to modify the virtual machine's .vmx file:
- Remove the virtual machine from vCenter Server inventory. Do a right-click the virtual machine and click Remove from Inventory.
- Edit the .vmx file.
- Re-register the virtual machine by browsing the datastore where the VM's files are located.
Before you edit the .vmx file:
- Always power off the virtual machine.
- Make sure you are logged on as a user with the correct permission level to edit the file.
- Make a backup copy of the .vmx file. If your edits break the virtual machine, you can roll back to the original version of the file
Enable/disable advanced virtual machine settings
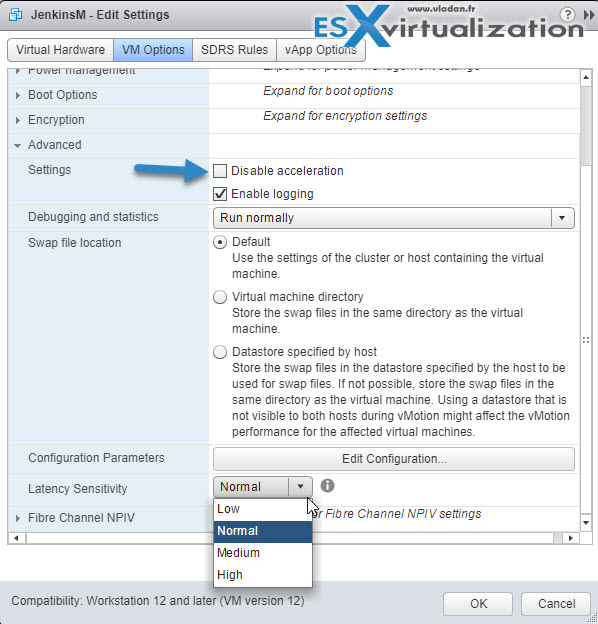
Sometimes you need to enable or disable advanced settings of a VM. It can be in a situation when you need to install an old software which to complete successfully, we have to disable acceleration. More option :
- Enable Logging – Collect log files for the VM for debugging or troubleshooting
- Debugging & Statistics – Allows for collection/recording for further log analysis.
- Swap File Location – You can modify where the swap file resides.
- Latency Sensitivity – Configure sensitivity between VM and physical host resource.
And the option we have talked about – Disable Acceleration.
Well, this is another chapter done today, just before the WE. I hope you enjoyed the reading and will follow up with another blog post, guide, or topic, in the future. Stay tuned.
More from ESX Virtualization
- VCP6.5-DCV Study Guide
- vSphere 6.5
- Configuration Maximums
- VMware Transparent Page Sharing (TPS) Explained
- VMware Virtual Hardware Performance Optimization Tips
- VCP6.5-DCV Objective 4.1 – Perform ESXi Host and Virtual Machine Upgrades
Stay tuned through RSS, and social media channels (Twitter, FB, YouTube)

