When you start a new blog, there is things that you have to do right after installing. WordPress installation is easy to do and most of the time it's even provided by your hosting provider. But before start pumping out some content, let's have a look what necessary steps you should take.
TOP 5 things to do after installing WordPress
There is many guides or tutorials for tweaking WordPress setup. This one teaches really the basics, but giving some good overall tips on what configuration or which setup to use for a blog, in order to be successful on a long run. This guide will teach you at least that, but to be able to say one day, hey I'm well know blogger, there is more to know than that…
Ok, let's start with some basic elements, which are good to setup before starting creating some content.
1. Change the Permalinks Structure
By default, WordPress provides you with default permalink structure which is not optimized for SEO. Just go into your Settings > Permalinks page and either select one of the options or enter your own. My preference is to create a custom structure the /%postname%/ but in the latest version of WordPress there is the one just above that, it does the same thing. So any of those will work.
It's shorters than the www.vladan.fr/category_name/post_name even if you can use that one as well.
2. Change the default Category name
By default, WordPress has this “uncategorized” category. But you would need to change that, because your readers might think that you just don't care too much about the name. I'd suggest something relevant to your posts which you'll create for this category. I've named mine Backup and DR, with a slug's name backup.
The slug name should not have spaces (won't work) or special characters. If you setup permalinks to show the %postname% only, than the category slug won't show in your URL, but the slug will still apear when browsing by category. For example like this:
https://www.vladan.fr/category/backup/
3. Change your admin password
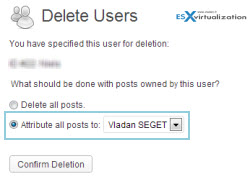
By default, WordPress has an admin account. To avoid being hacked, create your own account (different than admin or administrator), and use really strong password. If you have already created posts which the admin account, than you have the opportunity to chose option Attribute all posts and links to.
By taking this option all posts written by this user are migrated to the user of your choice. It's a batch operation, not one-by-one step.
The old user gets deleted and all the posts will get attributed to another author.
4. Change the Title / Description of your Blog
This is where you need to take particular attention, because by tweaking the name of your blog for your favorite keyword you have a good chance to setup the SEO correctly. The search engines will find your blog not only when writing and optimizing an individual article, but also about what's put in the Title of your blog. By default WordPress has just “Just Another WordPress Blog” as description, so you'll definitely want to change that.
Settings > General is the place to look and change this to fit your needs.
5. Plugins I recommend
There is milions of plugis for WordPress. While it's not possible to use many of them and overcharge your blog, especially while on shared hosting, there are some of them which are quite indispensable:
- Yoast SEO – one of the best SEO plugins for WordPress
- CodeGuard – WordPress backup to the cloud ( Read my article – CodeGuard)
- WordFence Security Plugin – Firewall and security ( Read my article – Wordfence)
- WP Touch – go mobile with your blog… (there is a ProVersion too)
- Digg Digg / SexyBookmarks – social sharing
- Google Analyticator – Google Analytics


