If you need to downgrade virtual hardware version of your VM there are several choices. I have previously wrote about this possibility and why one would want to do it here and here (for Wkst local VMs only). Basically VMware supports three ways to downgrade virtual machine hardware version.
But first let's go back in time to see which versions of virtual hardware were introduced in each of the vSphere release. Practically every version of vSphere (starting the 4.1) brought new version of virtual hardware. I borrowed this screenshot from VMware what's new in vSphere Platform pdf…
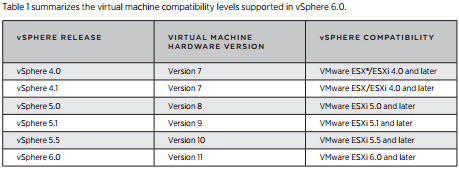
So what's are the Three Ways to Downgrade Virtual Machine Hardware Version?
1. Snapshot – You can revert back in case you took a snapshot before you upgraded the virtual machine hardware. Well this obviously not work if the VM has already been created in for example vmx-10 and you only want vmx-8….
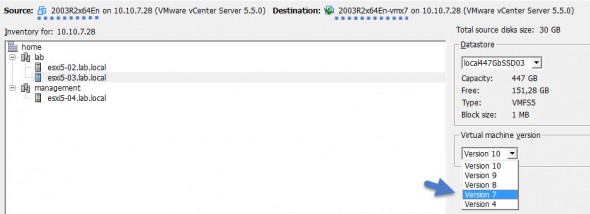
2. Convert the VM – with VMware converter you have a possibility to specify which virtual hardware you want for the destination VM. Easy and without a risk as it's a cloning operation which does not alter the source disks.
3. Create New VM – You can create new VM with let's say C# client and specify for example virtual hardware version 8. Then attach the existing virtual disk to that VM. Yes it's supported way, according to this VMware KB article.
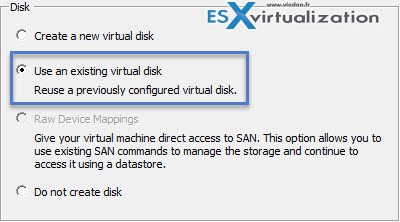
Then there are some unsupported ways to change the virtual hardware by editing the vmx file, but I won't list those, as it's unsupported. For me, the VMware converter works well and it's a safe method. The only thing you need to watch out is the network configuration which is not retained, so you have to re-configure the NIC once the VM is up and running.
The other thing is that if you chose the second way (creating new VM), just make sure that you pick the same components that were in the “old” VM. For example chose the same disk controller, same virtual NIC type etc….
The other way around. Usually it's very easy to upgrade virtual hardware.
What's the way?
It's easy to do:
1. By using the vSphere C# client – You can create VMs up to version 8 and then if you upgrade via menu VM > Upgrade virtual hardware, you go up to version 10 directly! (or higher…) Oh well, that's the way it is – you were warned….

2. By using the vSphere Web client – ) or through the vSphere web client. (up to version 10 now, and soon up to version 11 in vSphere 6.0). But the way back – to downgrade isn't that simple! In fact, there is no simple way back through some menu or command. However VMware supports curently 3 ways to downgrade virtual hardware version.
The web client is more “gentle” if I can say that…
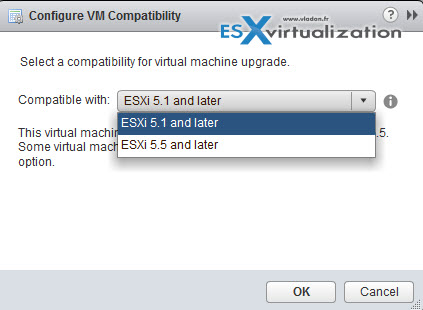
a) you can upgrade to vmx-9 or vmx-10
Select your VM > Actions > All vCenter Actions > Compatibility > Upgrade VM compatibility
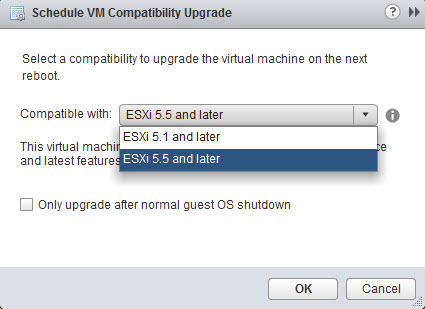
b) You can schedule the upgrade – if for example you want to do this after the working hours….
Select your VM > Actions > All vCenter Actions > Compatibility > Schedule VM compatibility upgrade
In this case you got this screen first

And then this screen where you can check a box indicating to upgrade only in case that the vm gracefully reboot (not a hard reboot)…
The virtual machine compatibility setting determines the virtual hardware available to the virtual machine, which corresponds to the physical hardware available on the host.
![]()

in workstation :
VM tab -> manage -> change hardware version compatibility !
Yes, for local Workstation VMs only…. The hardware compatibility of remote virtual machines cannot be downgraded.
All I can say is you’ve never had to revert a large environment.
Editing the .vmx file can be scripted.
Absolutely true. Never. Hope you have found your way through if it was your case….
In Workstation 12, it works for remote VMs :
File -> Connect to Server ->
then
VM -> Manage -> Change hardware version compatibility
In my case, the “change hardware version compatibility” is grayed out for remote VMs.