StarWind Virtual SAN is a software based solution allowing to create a shared storage for VMware ESXi hypervisor. Not only that StarWind can create a shared storage, but it can also be a pool of HA and fault-tolerant storage served to hypervisor's VMs.
VMware vSphere and Hyper-V are supported platforms, but today I'll focus on StarWind Virtual SAN for VMware for 2 nodes. This version allows synchronously replicate the storage from one node to the other. In case of failure of the underlying host, all the data (encapsulated in VMDKs) are protected in a mirror so the second node is still online.
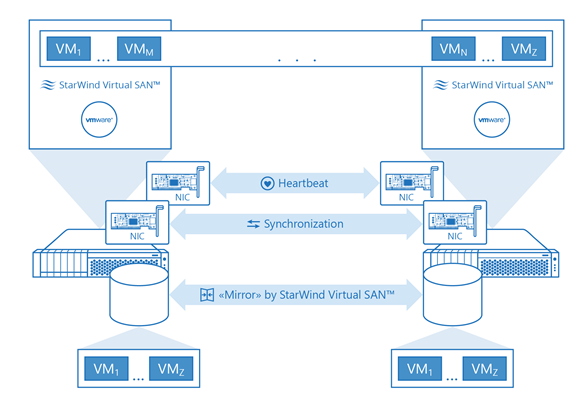
I'll describe the architecture more in details, but basically small shops could possibly start for free from a VMware licensing perspective (or take just Essentials entry package) and grow up later if they want to add more functions like vMotion or High Availability (HA). StarWind will protect the data by synchronously mirroring the datastore.
To illustrate this I borrow an image from StarWind website:
A two-node ESXi configuration with only local disks on every host would need VMware Essentials Plus license to achieve HA. In case with StarWind, automatic failover VM restart would take only free versions of ESXi and StarWind Virtual SAN at both ends.
From VMware perspective, there’s no need to configure replication. VMs stored on the shared (mirrored by StarWind) volume are automatically replicated as ALL the data which are on that datastore are replicated. If you chose not to buy vSphere Essentials Plus license and you have only Free ESXi hosts it’s possible to run guest VM clusters based on Windows and shared storage StarWind Virtual SAN Free provides. It’s absolutely OK to have Shared Nothing SQL Server FCI or Exchange cluster with only two physical hosts and free VMware ESXi hypervisor. Domain Controllers required for Windows Cluster can be virtualized since Windows Server 2012 and it’s fine to use two AD controller VMs hosted by two different ESXi hosts (AD do own replication so don’t need shared storage).
We could easily imagine a situation like this with two offices. Place one ESXi in each office, run StarWind on each side and you have very nice and low cost solution for your small business. All the benefit I see in not investing in hardware SAN device, which, at the end of the day, is itself a single point of failure! Yes I know that there are hardware raid cards, the disks are RAID5/6 or 10 protected, double HBAs, double switch, double NICs…
By implementing virtualization it's possible to abstract the dependency on hardware and actually use different hardware on both ends. A “Beefed” server on principal site and just-enough-server on the other is perhaps a good plan to start with?
StarWind Virtual SAN – What we need to get started?
- A VMware vSphere ESXi hypervisor
- A Windows server VM running on each ESXi host
- A StarWind Virtual SAN Software and License for 2 Nodes
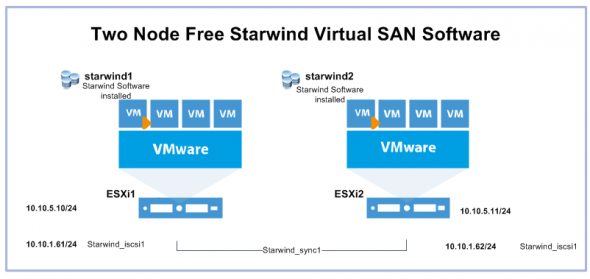
Let's see some of the steps that needs to be done. First we start with the networks. Each ESXi host needs to have vmkernel interface for iSCSI traffic, and also a synchronization channel(s). There is a physical switch (not represented in the scheme below) where the pNICs from each of the ESXi hosts are connected, but one could also implement point-to-point connections for synchronization channels (supported by StarWind).
Preparation of VMs for StarWind iSCSI SAN.
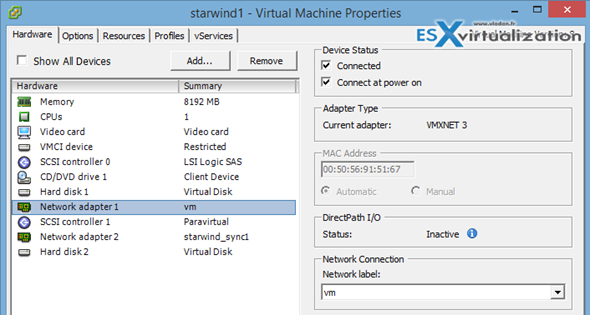
I have prepared 2 VMs with Windows Server 2012 R2. Each VM has 2 disks, where 1st disk (OS disk) in my lab lays on SSD drive and the second disk is on spinning SATA storage. Note that I have created a separate SCSI controller for the second disk and I'm using VMware paravirtual driver which has the best performance. But it's optional.
Also note that I have created Thick disk capacity 70 Gb for the disk I'm testing. This is the second disk and the VMDK is located on a separate datastore which is a spinning SATA storage, (a DAS storage in my host).
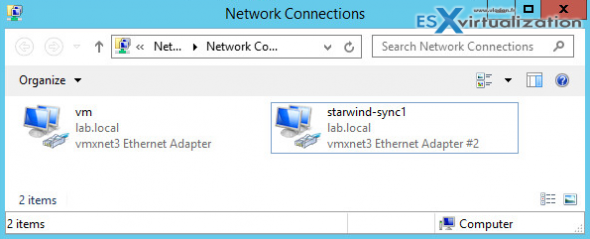
While adding the vNICs to each VM I think it's a good idea to map the names to each of those. Let's be organized!
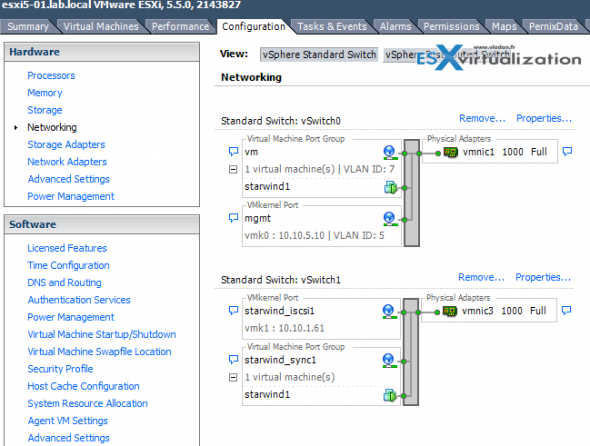
The network view on each of the hosts looks like this. I created a separate switch iSCSI, but it's not the only possible configuration. You could do only with one vSwitchs too and bind the vmkernel port to active NIC each time. But I like it separate, when it looks cleaner. Note that StarWind recommends to have a second synchronization channel and as a general thumb – More NICs is better!
The Installation of StarWind
Basically it could resume in just two main steps:
- Install StarWind on both W2012R2 VMs
2. Connect to the first VM to do the configuration of the whole environment
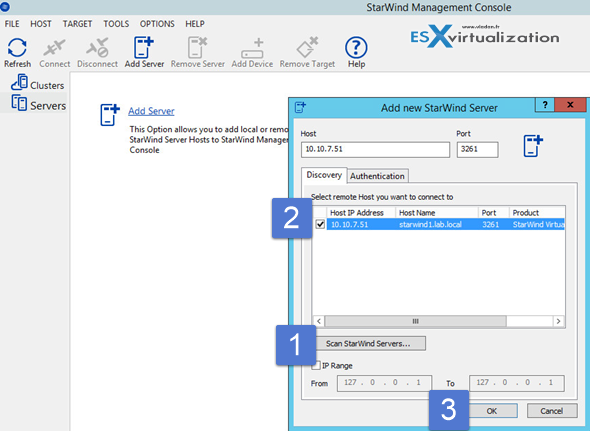
There is an SMI-S agent option if you want to manage StarWind Storage by using VMM 2012 R2. The solution offered by VMM allowed us to use SMI-S Standard to perform automatic storage management. I left it checked as the whole setup of StarWind Virtual SAN takes only about 100 Mb on the system disk. Once installed on both StarWind VMs, you can add both servers to the console. One console manages the whole environment so no need to go back and forth between StarWind1 and StarWind2 VMs…
Here is a screenshot showing the scan of the network for StarWind servers.
After Installation, create a device first.
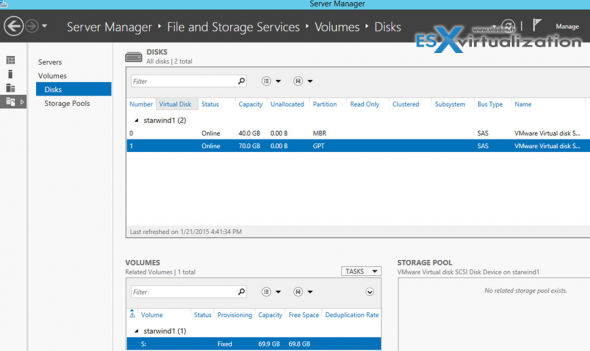
The creation of device consist of presenting a volume which is visible in the Windows server manager. If you don't see the volume, you must initialize the disk > bring online > format > assign drive letter to it.
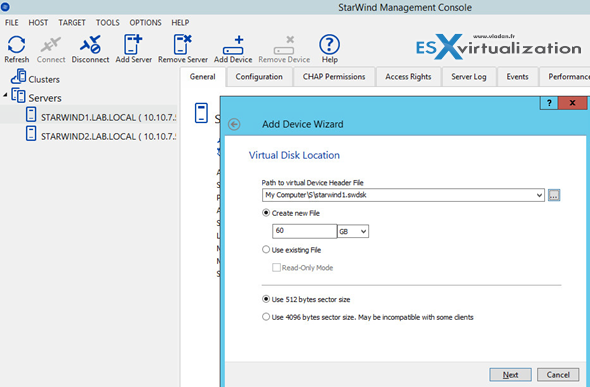
Then you can start the Add Device (advanced) wizard > Virtual disk location. Note that I'm creating Thick provisioned disk located on the S drive.
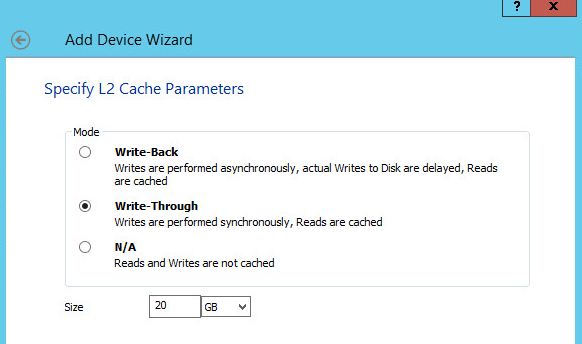
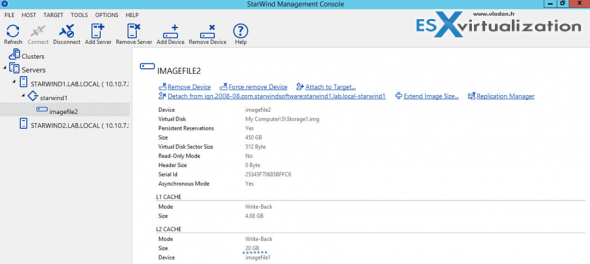
Also I'm allocating 20 Gb of L2 cache on my C drive (the VMDK located is on on a local SSD). It's optional, but allows some performance boost.
Done.
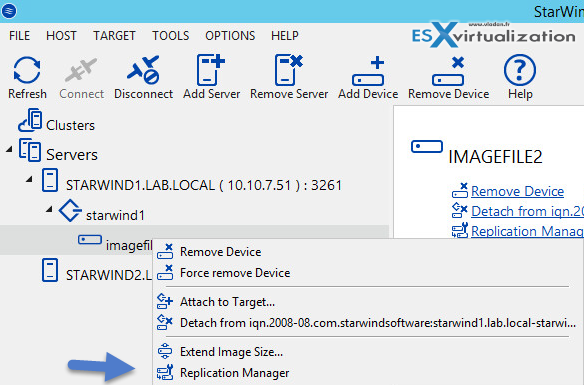
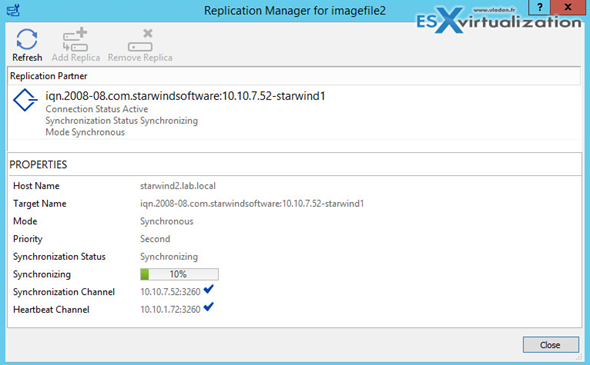
Next step would be to create the mirror. Right click the Imagefile2 > Replication manager, where we'll add a replication partner.
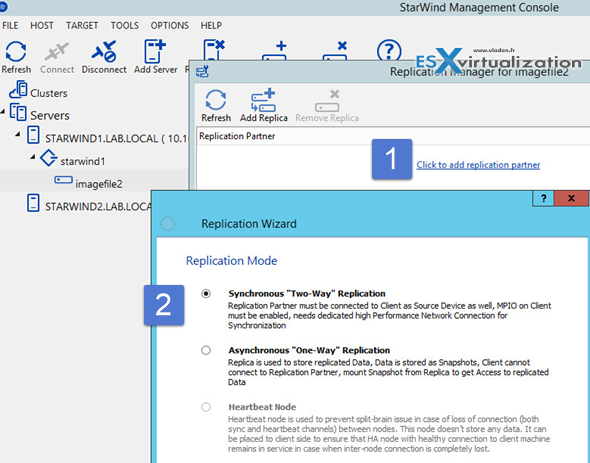
Replication partner is our second StarWind node, and we will remotely create another image file there which will be used for the mirror.
Click the Add Replication partner link and follow the assistant.
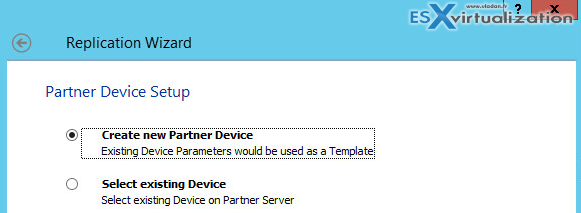
Continue with the assistant > add the IP address of the second StarWind VM > And select create new partner device option.
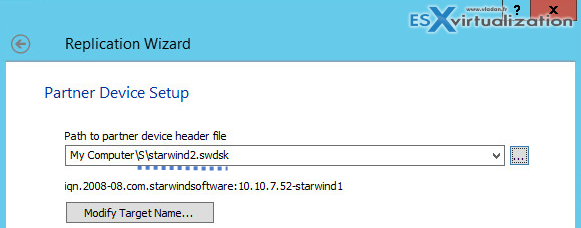
Again, go for the S drive and create new image file (in my case the name is starwind2.swdsk).
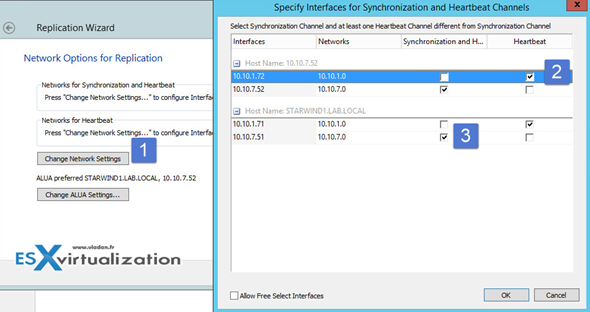
And on the next screen, click the Change network settings buton to select which network is used for syncing and which for heartbeat.
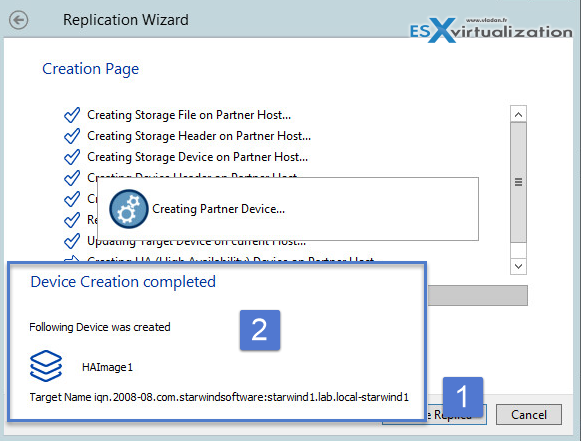
Then you click the Create replica button…
Click finish to close the assistant window and then you should see the replication starting…
Configuration of ESXi hosts
Configuration of iSCSI initiator through vSphere “FAT” client.
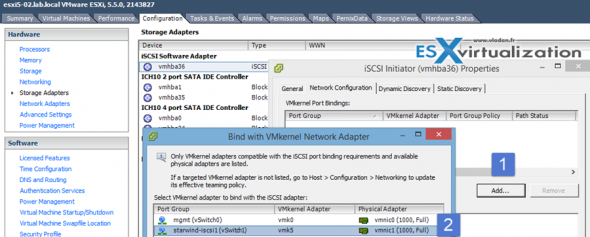
First, add the NIC being used by iSCSI network traffic…
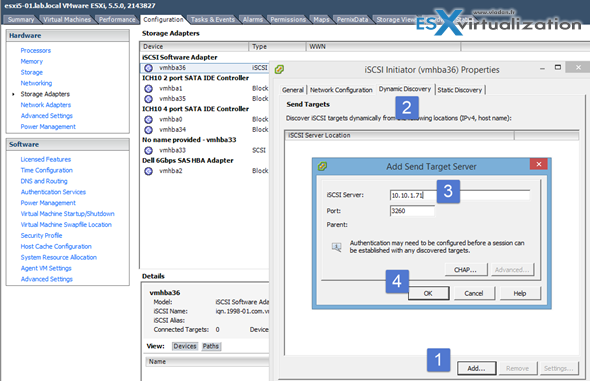
Then change TAB and add the IP address of Starwind1 VM acting as an iSCSI target (the IP storage NIC)
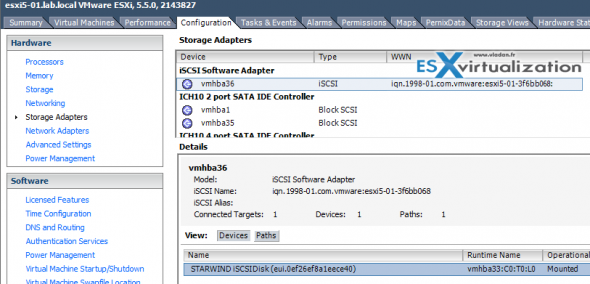
Click Yes to re-scan the storage… You should see that when selecting the Initiator, bellow the StarWind target interface will appear…
While you there, add the second StarWind node to have multiple storage paths.
Adding the iSCSI storage
To add an iSCSI storage you need to go to the configuration > Storage > add storage. And here is a screenshot when adding a new storage wizard starts …
Note that the disk shows Hardware acceleration – supported. The reason why is that because of VAAI support which is built into Starwind. The storage can accelerate basic VM tasks like snapshot, clone etc…. I quickly tested and love that -:).
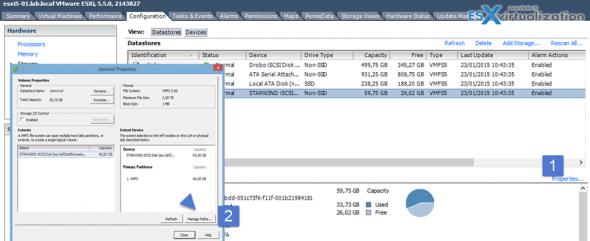
You can check the storage paths in properties of the datastore. You should see multiple paths to the Starwind datastore now…
Do the same for the second host and you're done. You have a shared storage provided by Starwind virtual SAN free 2-node license.
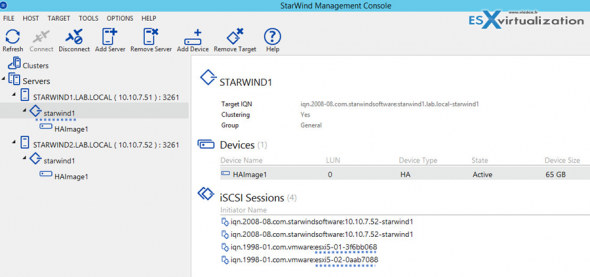
And the other way around we can check that both ESXi are connected to the Starwind datastore. Connect to the Starwind console and select the starwind1 device.
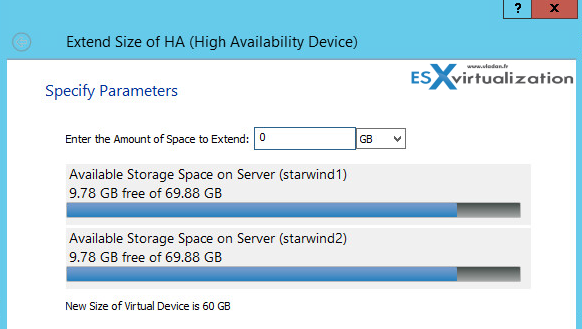
If you need to expand the Storage there is no need to re-install as Starwind provides a wizard which can expand the mirrored image file.
Manual way ok, but how about automating all that!
Note that in this review I walked you through the whole process via (almost) a step-by-step so even the users who aren't much experienced with VMware or Microsoft can implement it. However experienced administrators shall know that Starwind has also automated way of deployment, which is however outside of the scope of this review.
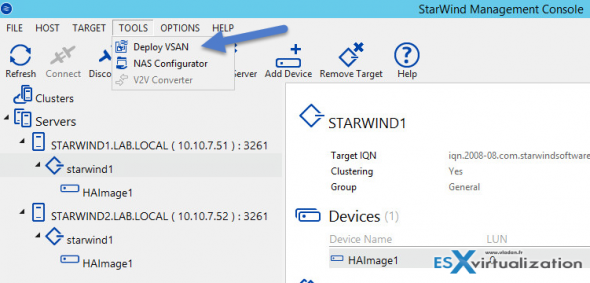
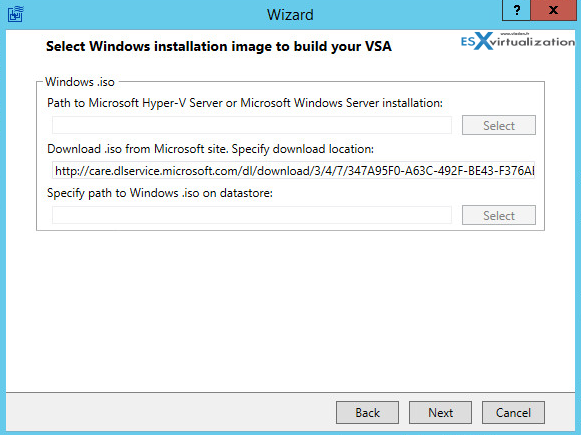
The automated deployment is done via Starwind Wizard.
After connection to the ESXi host, you have the possibility to specify a Microsoft ISO to begin with and complete the build of the VSA an automated manner!
Thoughts:
I know Starwind Software since their Conception, when virtualization has started, few years back. It was one of the easiest ways to build quickly a software based iSCSI SAN. But the folks at Starwind never sleeps and they kept evolving their product with constant innovation.
The 2 node Hyper-Converged scenario is just the part of the iceberg. StarWind Vitual SAN scales out and supports unlimited amount of nodes in a cluster and either 2-way or 3-way replication between HA LUNs. Is it possible to add that NFS failover shares on top on an HA iSCSI LUNs, so configures like NexentaConnect with StarWind Virtual SAN are free of charge.
As far as I know, the roadmap brings additional enhancements like per-VM policy support allowing to control not individual LUNs/datastores but VMs directly by specifying different storage policies.
Note: Please note that this review was sponsored by Starwind.




Hello,
Interesting post, I would just add that a VMware Essentials kit allows backup with VEEAM, and how much does the 2 host licence cost to have an idea?
Thank you for your posts!
Dear Demarque,
May I interfere and suggest you to contact StarWind Software Sales Department by following this link http://www.starwindsoftware.com/quote-request.
Thank you for your comment and for this question!
You may also like to send a quick email at [email protected]
Im curious how performance (Disk Throughput and IOPS) compare to VSAN in a similar config.
Would love to see some numbers considering Starwind using Ramcaching.
Don’t hesitate to contact them as they have enough hardware to do the benchmarks.. -:)
I really like your blog and articles you publish, but on this occasion, since title says ‘review’ I would expect more than product presentation – some failover/failback tests, performance vs direct access (if you allowed), CPU use of the VM etc.
Something that would allow reader to see product in action, in real life situation.
Hope you see my point 🙂
All I can say that is that this 1600 words review was not oriented on performance, but rather explaining the ground-up, use cases and “look and feel” installation/configuration.
A certified hardware lab would certainly be a better place for a review on such a product. But yes I see the point… -:). Thanks for your comment Thomasz.
Hi
Thanks for that great post!
But i have one question: In case you have only 1 datadisk per node or a RAID 0 below and a disk failed. At the diskcrash the second node keep working. But how can you rebuild the “Starwind Mirror”? Have you played with this scenario?
Thanks a lot!