Installing Drobo Dashboard and updating the firmware.
VMware vSphere 5 Essentials or Essentials plus are the editions of VMware vSphere oriented for the Small Business Market (SMB). Both editions suppose and permits you to use up to 3 physical ESXi hosts with up to 2 CPU each. I'll try to walk you through the setup of Drobo Elite as a shared storage solution for this particular VMware vSphere Edition, but the setup is exactly the same if you for example only use one physical ESXi host.
Those vSphere Editions are oriented to the SMB market, for small shops, which will not be able to pay a consultant to setup the shared storage, so Drobo can be a good alternative with an easy setup.
In the first part of my mini-serie you discovered the BeyondRAID technology used in all Drobos. It's funny because me, an IT professional, I did not really knew what that technology can offer and how flexible it is. I'll definitely be able to talk to my clients about the benefits which BeyondRAID can bring in terms of flexibility and availability.
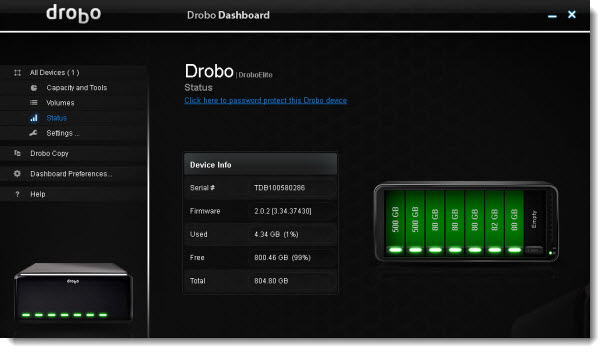
This is the second part of the review will start with the actual setup of the device. In order to benefit the latest firmware release, it's highly recommended to get the latest firmware upgrade and get also the latest management software called Drobo Dashboard. This software is available for Windows, MAC, You can find the latest releases on this page at Drobo. In my particular case I found out that the latest firmware release for Drobo Elite was 2.0.2 , and the Drobo Dashboard for PC, which release date was July 14, 2011 and the Version was 2.0.3.40648.
Once done, I installed the Drobo Dashboard on my laptop. To configure Drobo Elite, there is an USB port and cable included to do so. The 2 iSCSI ports on the back side of the device are only intended to use for the storage traffic, not for configuration. This is a bit unusual comparing to other SAN, NAS devices which are usually configurable via the LAN port, but I'm fine with that.
You'll find the configuration guide and Drobo Dashboard software included on the bundled CD, but when I checked for the latest release on the Drobo's website, I went and downloaded the latest version.
Here you can see that I mixed the capacity of the SATA drives in my Drobo. I found a bit of everything as a capacity, some 500Gigs drives and some 80 gigs drives.
The configuration of Drobo Elite for my lab is the following. I do use a VLANs to separate the storage traffic, vMotion traffic etc… but you don't have to if you don't want to. In case you don't want to do all the hassle and configure VLANs on your switch (which might not even support it, if it's not level 3 switch), you can just buy an additional gigabit switch which will be used for the storage traffic. You can find gigabit switches for couple of bucks today. It's really bad idea to use single switch without VLANs, because the performance will be degraded.
In case you're using 2 ESXi hosts with let's say 3 NICs, you can configure 2 NICs for iSCSI Storage traffic (have redundancy and load ballancing) and 1 NIC for VM traffic. You can then put the ESXi console on the same network as your VM network. I'm not saying that that's the best practice. Normally you would like to separate the console traffic from VM traffic by a specific VLAN….. but for this particular case when one uses 2 ESXi hosts, it's fine…
In my homelab my 2 ESXi hosts are both having 4 NICs, but to match this case I'll do the setup for 3 NICs with 2 separate switches. I'll have my Cisco SG 300 with VLANs switch for management and other services (FT,vMotion..) and the other dumb switch will be serving only the storage traffic for Drobo.
Here you can see the setup of the network on the Drobo Dashboard.
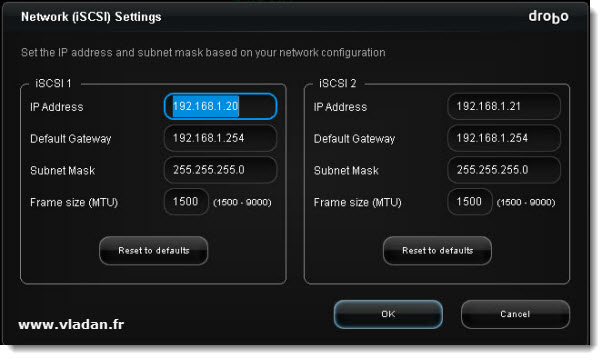
As you can see I left the Frame size (MTU) value as is. I did not configure Jumbo frames, since I'm not sure that my dumb switch I'm using for the traffic passing through supports JF. And so is better play safe than have a problems with bad performance.
Once done, the device will ask you to reboot in order to validate the configuration.
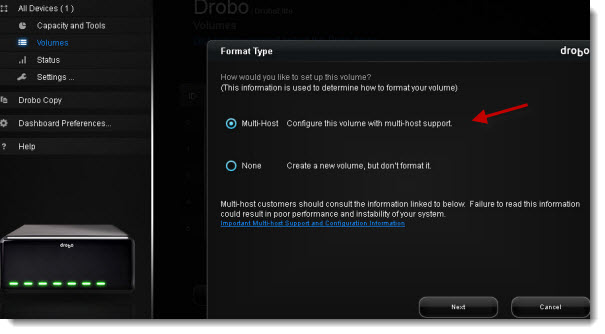
After a reboot we can have a look at the volume creation. By default there is single 16TB volume created on the device, which you can safely delete. Then when you click on the create volume button, you're presented with an assistant asking if the volume will be used in multi host environment (that's our case).
At the next page you'll see that I have created already some volumes. I basically created a bunch of 1TB volumes which will be presented to my ESXi 5 host. We will see it afterwards when I'll get to the configuration of the iSCSI initiator on the VMware vSphere 5 side.
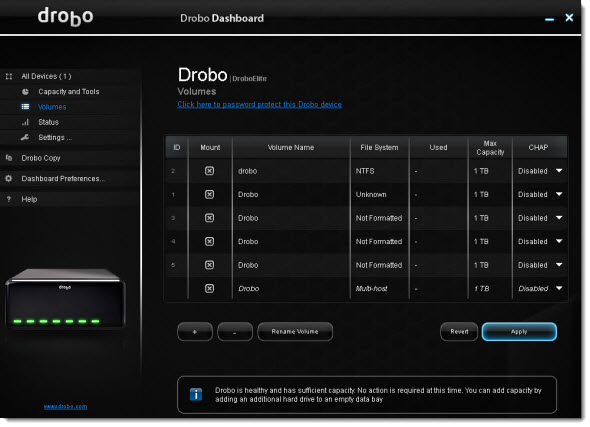
As you can see the interface is very clean and simple.
There are more options on the device, like e-mail alerting which can be quite convenient, or also the possibility to change the redundancy. In fact you can go from single to double disk redundancy without reboot, or without deleting/restoring your files. This is another advantage of the BeyondRAID technology.
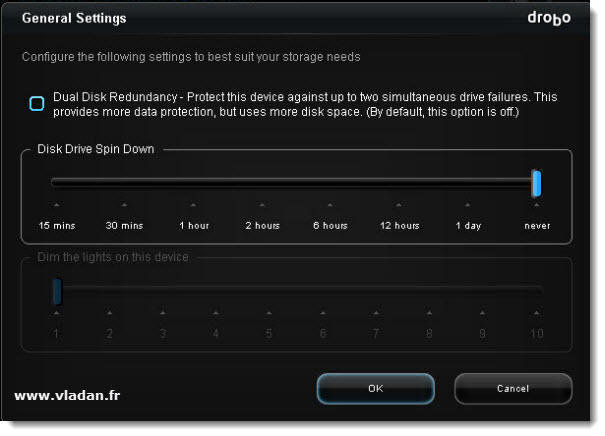
As for now, that's about it for the Drobo's Side. There is nothing more to do on this side, but to disconnect the USB cable which is used for the configuration. Now, you might find this a bit “bizzarre” but it will save you your time searching the web on “why I can't find the iSCSI target….”… Anyway.
Let's close this article and see in the next one the ESXi 5 and vSphere Configuration, where we will needs to configure the network and the iSCSI software initiator through the vSphere client so we will be able to connect to the iSCSI target – the Drobo Elite SAN.
You can stay tuned via RSS to see when another article is released on this website, but I can tell you that I update my website daily.
Enjoy.. -:)
- Drobo Elite – iSCSI SAN which supports multi host environments
- Setup of Drobo Elite as a shared storage for VMware vSphere 5 – This Post
- How to configure ESXi 5 for iSCSI connection to Drobo
- Drobo B1200i at VMworld Copenhagen 2011- SSDs and auto-tiering iSCSI SAN
