Nakivo Backup and Replication v7 has introduced integration to the Microsoft's Active Directory (AD). The vast majority of enterprise customers are using Microsoft AD for resource management, authentication so it's only a logical step to benefit the integration between Nakivo Product and Microsoft AD. This post will teach you How to Setup an AD Integration with Nakivo Backup and Replication 7.
Before we get started, I'd like to bring the important features and enhancements that Nakivo Backup and Replication v7 brought to customers. It was especially awaited that a full support for VMware vSphere 6.5 and Windows Server 2016/Hyper-V 2016 will be added. Hyper-V VMs can also be replicated to another site/datacenter. VMware vSphere VMs has had this feature in the previous release.
Hyper-V customers will also welcome backup copy jobs allowing to storing backups at a different location than the main production site or Instant recovery of individual items such as Ms Exchange, SQL, AD, etc…
Nakivo also introduced more efficiency by skipping swap files and partitions during backup jobs or enhancing, even more, the UI with New Activities TAB. Also, maintenance of backup files is easier allowing to delete backups in bulk. It is possible to filter backup files (orphaned backups) that do not belong to any backup job or backups that are older than one year and delete them in a single click.
How to Setup an AD Integration with Nakivo Backup and Replication 7
As being said, we'll walk you through the configuration of Nakivo product with Microsoft AD. There is a section within the configuration, where you'll need to enter some AD groups. You may want to create them first (if not done yet).
I show the configuration with two groups:
- Administrators – a default admin group within Microsoft AD for the product administration.
- NakivoBackupViewers – a group that I created for the purpose of this demonstration and which can be used for viewing backup jobs as guest user.
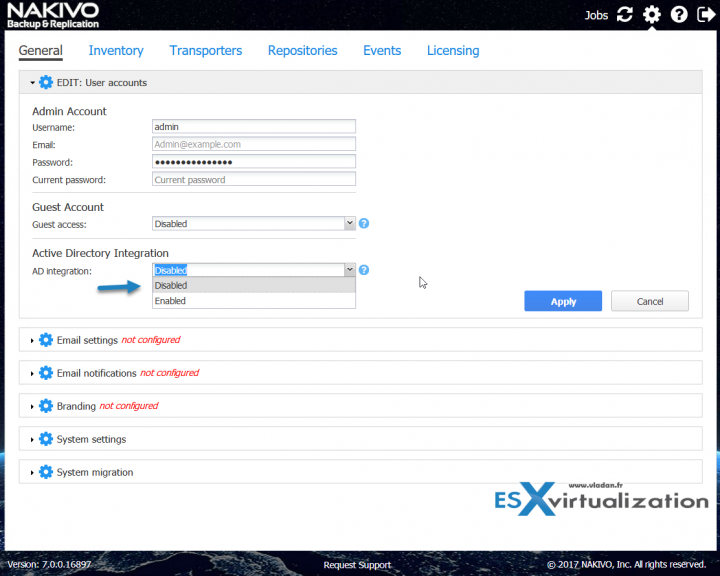
Connect to the admin UI and go to the Setup page by clicking the Gear icon >Expand the User Accounts > Edit
Click on the drop-down menu and chose Enabled
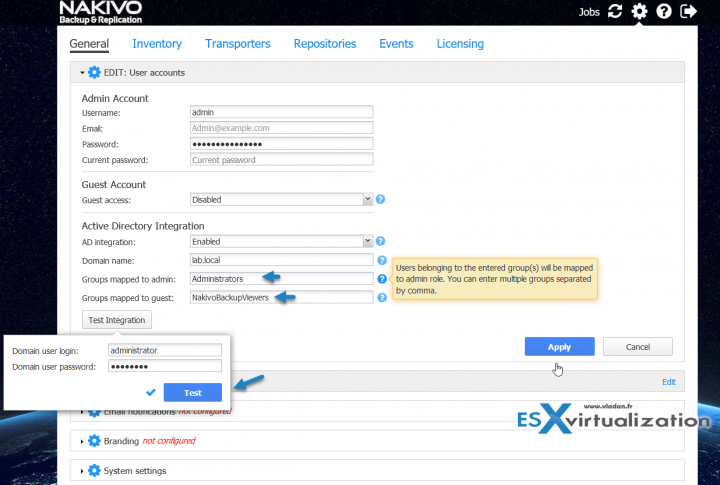
You'll be invited to enter your Microsoft Domain details and your credentials. There also you'll enter groups which will be mapped with Nakivo.
- Groups mapped to admin: AD groups (separated by comma) which users of the groups will be able to log into NAKIVO Backup & Replication as an admin.
- Groups mapped to guest: AD groups (separated by comma) which users of the groups will be able to log into NAKIVO Backup & Replication as a guest.
Note the big test button there which you must use otherwise the system won't allow you to go further.
When done, you can test by logging out and logging back in with your domain credentials. I have tested both formats of connections and either:
- [email protected]
- lab\administrator
Works just fine.
Wrap up:
Nakivo Backup and Replication matures release after release. The UI is fast and responsive not requiring any plugins to work. Users in multi-hypevrisor's environment can benefit the “single pane of glass” Nakivo offers for its management. Storage efficiency is important too so having features such as the cleaning the backup repository or the fact that the swap files are not backed up really helps to be more efficient and more economical too.
Worth to note few words about deduplication and compression too. While compression reduces the data size, deduplication stores only the unique data blocks are saved to the Backup Repository. Compression and deduplication are On by default when a new Backup Repository is created.
The product is flexible concerning installation options too. It's possible to install Nakivo on Windows or on Linux, deploy as Virtual Appliance, Install on Synology or WD NAS or deploy Amazon Machine image in AWS EC2.
You may also want to check our other posts about Nakivo Backup and Replication Software:
- Nakivo Backup and Replication 7 Released
- Nakivo Backup and Replication (NBR) Appliance – Easy deploy and config
- Nakivo Backup Copy – Why would you use it?
- Nakivo Flash VM Boot and how to configure and use
- How To Recover a vCenter VM if vCenter Is Down – With Nakivo
- Nakivo Backup and Replication 6.2 Embracing Amazon AWS
Stay tuned through RSS, and social media channels (Twitter, FB, YouTube)


