Nakivo as many other backup vendors has now a possibility to backup physical servers or workstations/laptops running Windows or Linux. This is very useful in corporate environments where you usually have in charge of not only virtual infrastructure but also a couple of physical servers that cannot be virtualized for “X” reasons. Also, your company certainly has mobile users with laptops/desktops and some of them might be critical so you need to have a backup with a possibility to restore in case disaster strikes.
Recent ransomware news is not very encouraging. A Hospital in Rouen (France) got hit by ransomware crippling most internal enterprise applications. Luckily, the guys had some backups and were able to restore, but only what was critical. Ransomware is bad, bitcoin is not. Everybody can use this blockchain technology at their will, including criminals, unfortunately. However, admins now have to deal with ransomware and be prepared and have backups of all critical parts of their infrastructure.
Additionally, those backups shall be copied to a remote location separated from the production site, with separate credentials too! It's only by separating those backups one can really feel safe as hackers can break into the corporate environment and gain access to privileged AD accounts.
Let's have a look at Nakivo Backup and Replication product (v9 but 9.1 is currently in Beta) which has Windows Physical Server Backup built-in. Nakivo simply installs agent remotely and then initiate the backup which is stored at the backup repository together with other VM backups.
In this post we will:
- Add Physical Server to the Inventory
- Create and execute a backup job of this physical server
How to Create a Physical Server backup with Nakivo Backup and Replication
First, go and download your trial at Nakivo here. You can install Nakivo on a physical computer running Linux or Windows, or deploy it as a virtual appliance and store the backups on a remote NAS device or you can directly install Nakivo on certain NAS devices itself. This has an advantage as you keep the backups separate from your virtual infrastructure. (don't put all eggs in the same basket).
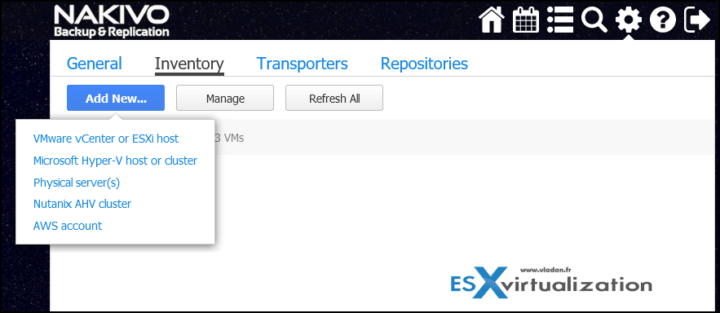
First, connect to Nakivo UI and go to Configuration > Inventory.
Screenshot showing how to add Physical Server Backup to the Inventory.
Click Add New > Physical Server, to start the assistant. Enter the username and password. The machine can be a domain attached system or isolated system. The latter one will need credentials of the local administrator as the Nakivo agents need to be installed with elevated privileges.
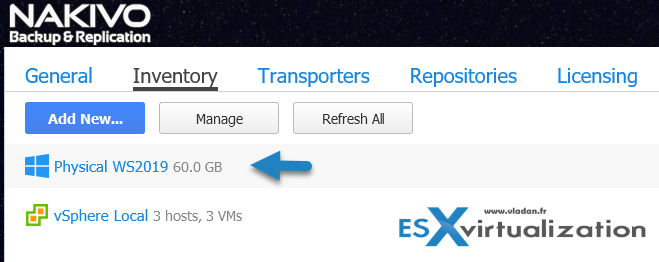
The Nakivo agent will be installed remotely on this system.
PowerShell must be installed.
SMBv2 or higher version of SMB protocol must be enabled.
Note: In case firewall is enabled, the corresponding rule for SMB-in should be enabled too.
Note that It will take some time. Like any other software installation, the agent first checks the requirements, and if they're not met, it also installs some sub-components needed along with the agent. All are without the admin's intervention and acceptation.
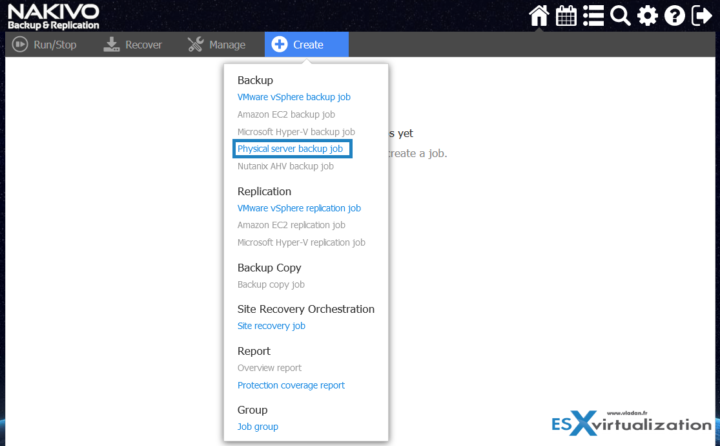
Once you have that agent installed, you can create a new backup job. Click on Create > Physical server backup job.
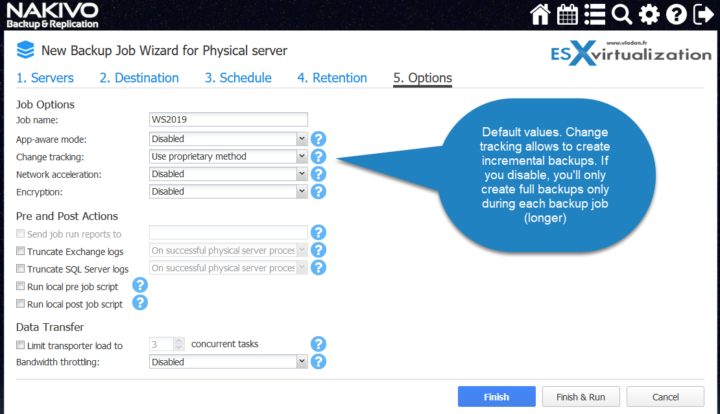
This will launch a new wizard allowing you to select the physical server from the inventory, specify a destination for the backup (you can chose from different inventories), specify schedule or run periodically (every couple of hours for example), chose retention period and specify different other options.
One of those, just to highlight, is the change block tracking proprietary method to do incremental backups. After first full, only incrementals. Saves time and space.
Once the first backup is done, you have a couple of different options for restore. You can restore individual files, Microsoft Exchange objects, SQL objects, AD objects, or Universal object recovery. There is also an interesting option to recover the server as a virtual machine in case the underlying hardware is lost or has a failure.
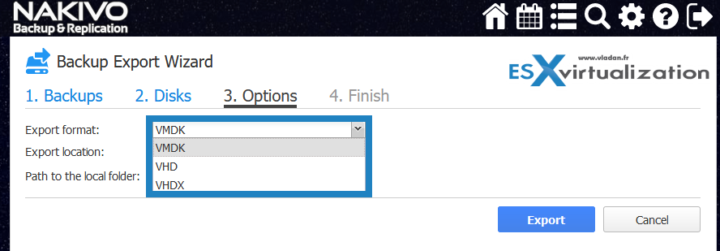
You can restore as VMDK, VHD or VHDX, then create a virtual machine and use an existing virtual disk. Start the VM and install VMware tools, reconfigure the network and you're up and running.
You can put this in your DR scenario if you don't have spare hardware where you're able to restore. Many times in my career I had to deal with clients willing to have DR plan and be able to continue the production and ready to pay for a secondary server which does nothing. Just takes dust and is ready “just in case” the production machine goes down….
With a possibility to do this kind of restore you don't need spare hardware if you have a virtual infrastructure in place, with sufficient capacity.
You can P2V (physical to virtual) from backup into a virtual machine (VM). It means that the backup of your physical hardware can be recovered and started up as VMs.
Quote from Nakivo blog post:
Last but not least, in v9.0 we have introduced the advanced P2V functionality. From this point forward, you can recover physical machines to VMware and Hyper-V VMs. With such functionality in place, you can rest assured that you’ll always be able to recover business-critical elements of your infrastructure.
Nakivo Backup and Replication is pretty flexible concerning the different platform support as installation. The UI is clean and fast, no plugins necessary and no extra software is necessary to install. If you're planning to buy a NAS device for storing backups you might consider buying a supported NAS device (some Synology and other vendors are supported, check the documentation for further details here.)
NAKIVO Backup & Replication provides data protection for the following platforms:
- AWS EC2
- Microsoft Hyper-V 2019, 2016, 2012R2, 2012
- Nutanix AHV 5.10 (LTS)
- Physical Windows Server 2019, 2016, 2012R2, 2012, 2008R2
- VMware vSphere v4.1 – v6.7
I created a quick video in the lab demonstrating the Nakivo physical server backup. Note that some parts of this video are accelerated so you don't have to watch for a long period of time.
You can get Nakivo 15 days trial (and you can extend this period if you want to, by e-mail).
More about Nakivo on ESX Virtualization:
- Nakivo 9.1 Beta with native tape support – check it out
- Nakivo 9 Released with Hyper-V 2019 support
- Nakivo Backup And Replication 8.5 Released
- Disaster Recovery with NETGEAR and Nakivo
- Nakivo Backup and Replication FREE Edition
- Nakivo Backup and Replication available for QNAP NAS
- How to Setup an AD Integration with Nakivo Backup and Replication 7
More from ESX Virtualization
- VMware Transparent Page Sharing (TPS) Explained
- VMware Virtual Hardware Performance Optimization Tips
Stay tuned through RSS, and social media channels (Twitter, FB, YouTube)


Hi Vladan, nice write up on Nakivo. I’ma long time virtual machine backup user of the product. You mentioned workstation and laptop backup in your article about Nakivo. However, I don’t see that as a feature in their option/product list. Can you confirm that is available and do you have any more info on that? Thank you. Brian
Hi Brian,
thanks for reading my blog. Yes, the feature will be present in the Nakivo 9.1 GA release.
Thank you for getting back to me. That’s great news! Looking forward to more of your articles and reviews. -Brian