Nakivo Backup and Replication is present during VMware Explore 2023 in Barcelona here. I'm by the booth to ask a few questions about the latest Nakivo development and see how the software is able to help you fight ransomware with its built-in Malware detection.
Photo from VMware EXPLORE Barcelona 2023 at the Nakivo Booth with Nick.
Customers can now integrate external anti-malware software and scan backups for malicious code before using them for recovery. The new functionality can help organizations strengthen ransomware resilience and meet strict security requirements.
Here is a video from VMware EXPLORE Barcelona 2023 event.
You can integrate external anti-malware scans depending on the solution you have already. Supported anti-malware software: Microsoft Windows Defender, ESET NOD32 Antivirus, Kaspersky Internet Security, Sophos Intercept X, Clam AV, Sophos Protection.
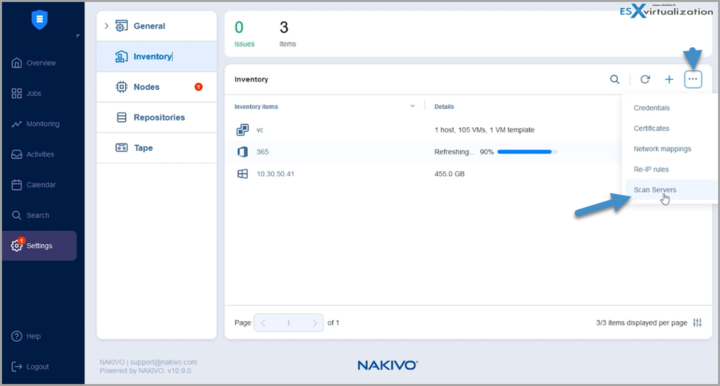
How to configure? Add your existing solution via the menu on the right as in the image below. Add your scan server solution via IP address.
Then you need to enable it for your VM backup job.
Here is a video from VMware EXPLORE Barcelona 2023 where Nick is telling us about new ransomware features that are in the latest release of Nakivo Backup and Replication. We also talk about real-time replication where you have a minimum RPO and RTO when using this feature.
Also new is a feature called direct connect.
Direct Connect
NAKIVO Backup & Replication now allows access to remote resources via a single port connection without the need to establish a VPN connection. This feature is especially useful for MSPs providing services to remote clients in case having a persistent VPN connection between the MSP data center and the client site is not desired.
Install Transporter in the remote environment and set the master password during the installation. Alternatively, deploy Transporter VA in the remote environment. The master password for the VA can be set after the deployment.
If you didn’t set up the master password during the installer setup or if you have deployed Transporter VA, you need to generate a pre-shared key. This can be done at any time after the installation. Execute the following command in the Transporter installation folder:
bhsvc -b “password”
Restart the Transporter service after generating the password to apply the change. Expose the Transporter port on the local machine to be externally available via the Internet.
Add the remote transporter to NAKIVO Backup & Replication by entering the Transporter details.
Select Enable Direct Connect for this transporter.
Enter the master password.
Click Connect.
View Transporter certificate information. Accept the received certificate and confirm adding the Transporter.
Trial downloads of Nakivo here.
More about Nakivo on ESX Virtualization
- Nakivo Backup 10.10 and Real-Time Replication Details
- Nakivo Backup and Replication 10.9 GA Adds Ransomware Scan as well as Bare Metal Recovery
- Nakivo Backup and Replication 10.9 will be adding Backup Malware scan and more
- Nakivo Backup and Replication 10.8 With vSphere 8 Support and more
- First Backup Vendor with VMware vSphere 8 Support – Nakivo
- How to Add a Physical Server and create a first backup with Nakivo Backup and Replication Software – (New)
- Security Tips for Nakivo Backup and Replication users
- Nakivo 10.7 New Features
- Backup a file share with Nakivo Backup and Replication
- NAS Backup with Nakivo Backup and Replication 10.6
- Nakivo Backup and Replication FREE Edition Features and Limitations
- How to configure immutable backups with Nakivo
- Nakivo Backup and Ransomware Recovery
More posts from ESX Virtualization:
- VMware vCenter Server 8.0 U1b resolves further upgrade issues and adds bunch of security patches
- VMware vCenter Server Appliance 8.0U1a Released
- Homelab v 8.0 (NEW)
- vSphere 8.0 Page (NEW)
- Veeam Bare Metal Recovery Without using USB Stick (TIP)
- ESXi 7.x to 8.x upgrade scenarios
- A really FREE VPN that doesn’t suck
- Patch your ESXi 7.x again
- VMware vCenter Server 7.03 U3g – Download and patch
- Upgrade VMware ESXi to 7.0 U3 via command line
- VMware vCenter Server 7.0 U3e released – another maintenance release fixing vSphere with Tanzu
- What is The Difference between VMware vSphere, ESXi and vCenter
- How to Configure VMware High Availability (HA) Cluster
Stay tuned through RSS, and social media channels (Twitter, FB, YouTube)


