Migration and changing virtualization platform can be (and it is) very complex process. Not only you need to copy a lot of data across the wire, but also you are using different tools and changing virtualization platform. If you want, let's say, migrate part of your production environment to Proxmox VE, a popular virtualization platform. You can use Veeam Backup and Replication for the job and also, you can use Veeam to continue backing up those workloads running on Proxmox VE too, with a help of a Proxmox VE Plugin for Veeam.
In fact, Veeam Backup & Replication uses an additional component called Proxmox Virtual Environment Plug-in for Veeam Backup & Replication. This component extends Veeam Backup & Replication functionality and allows you to back up and restore Proxmox VE VMs.
Migrating from VMware to Proxmox VE can be a complex process, but with the right tools and planning, it can be done smoothly. Veeam Backup and Replication is a powerful tool that can help you manage this migration efficiently. This guide will walk you through the steps to migrate and restore VMware workloads to Proxmox VE using Veeam Backup and Replication.
Prerequisites
Before starting the migration, ensure you have the following:
- Veeam Backup and Replication Server: Ensure you have a Veeam Backup and Replication server installed and configured.
- Proxmox VE Server: Ensure your Proxmox VE server is set up and running.
- Network Connectivity: Ensure there is network connectivity between your VMware environment, Veeam Backup and Replication server, and Proxmox VE server.
- Backup Repositories: Configure backup repositories where Veeam will store the backups.
- Proxmox VE Plug-in for Veeam: Install the Proxmox VE plug-in for Veeam Backup and Replication
The Migration Process
Install Proxmox VE Plug-in for Veeam: Download and install the Proxmox VE plug-in for Veeam Backup and Replication
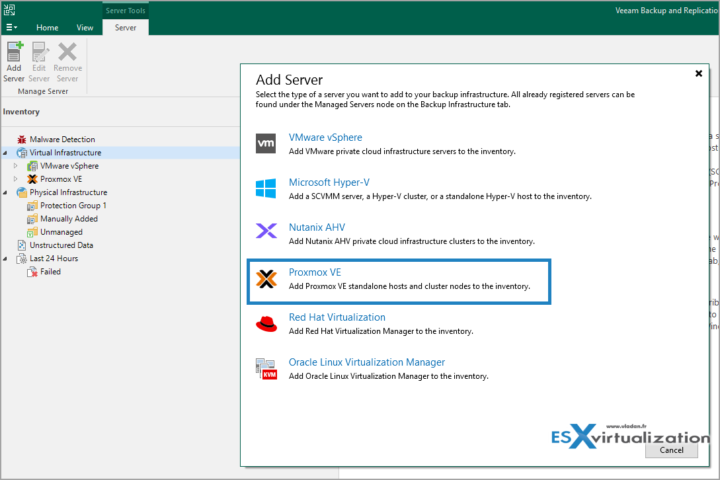
Add Proxmox VE Server to Veeam – In the Veeam Backup and Replication console, go to the Virtual Infrastructure tab and add your Proxmox VE server

Follow the wizard to add the server and deploy a worker.
Configure Backup Repositories – Set up backup repositories where Veeam will store the backups of your VMware VMs.
Make sure that these repositories are accessible from both your VMware environment and Proxmox VE server.
Create Backup Job: Create a backup job in Veeam Backup and Replication to back up your VMware VMs.
Configure the job to use the backup repositories you set up earlier.
Run Backup Job – Run the backup job to create a backup of your VMware VMs.
This will create backup files that can be used to restore the VMs on Proxmox VE.
Transfer Backup Files – Transfer the backup files from the backup repositories to the Proxmox VE server.
You can use network transfer or physical media, depending on your environment.
Restore VMs on Proxmox VE: In the Proxmox VE web interface, go to the Datacenter > Storage section and add the backup files as storage. Then, use the Import Wizard to import the VMs from the backup files.
Additional Considerations
Network Configuration: Ensure that the network settings of the restored VMs on Proxmox VE match those of the original VMware environment to avoid connectivity issues.
Post-Migration Tasks: After the migration, perform post-migration tasks such as updating IP addresses, DNS settings, and firewall rules as needed.
Testing: Thoroughly test the restored VMs to ensure they are functioning correctly and all services are running as expected.
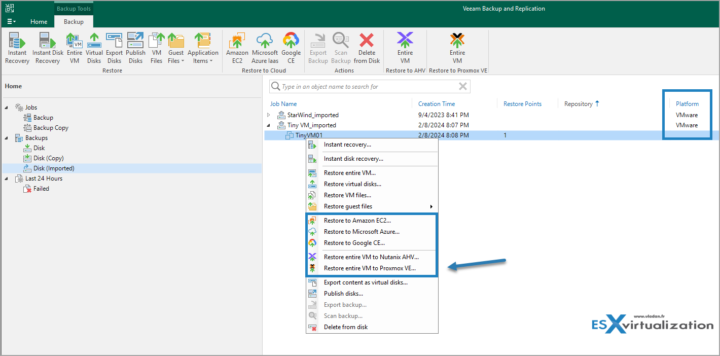
Where else it is possible to restore VMware VMs?
Well, Veeam has several options. Check out the image below… “restore entire VM to Proxmox VE” .. THIS is the way to go in case VMware is getting too expensive for you.
Final Words
You don't have to run all your workloads on VMware as this, after the Broadcom acquisition, has become extensively expensive. You can reduce your VMware workloads. License less hosts for the same price perhaps? And then run less critical workloads on alternate hypevisors. Yes, you need to purchase server hardware because if you migrate to the cloud, you will most likely pay even higher bills.
Migrating VMware workloads to Proxmox VE using Veeam Backup and Replication can be a smooth and efficient process with proper planning and execution. By following the steps outlined in this guide, you can ensure a successful migration and minimize downtime.
More posts from ESX Virtualization:
- Patching ESXi Without Reboot – ESXi Live Patch – Yes, since ESXi 8.0 U3 (NEW)
- Update ESXi Host to the latest ESXi 8.0U3b without vCenter (NEW)
- Upgrade your VMware VCSA to the latest VCSA 8 U3b – latest security patches and bug fixes (NEW)
- VMware vSphere 8.0 U2 Released – ESXi 8.0 U2 and VCSA 8.0 U2 How to update
- What’s the purpose of those 17 virtual hard disks within VMware vCenter Server Appliance (VCSA) 8.0?
- VMware vSphere 8 Update 2 New Upgrade Process for vCenter Server details
- VMware vSAN 8 Update 2 with many enhancements announced during VMware Explore
- What’s New in VMware Virtual Hardware v21 and vSphere 8 Update 2?
- Homelab v 8.0
- vSphere 8.0 Page
- Veeam Bare Metal Recovery Without using USB Stick (TIP)
- ESXi 7.x to 8.x upgrade scenarios
- A really FREE VPN that doesn’t suck
- Patch your ESXi 7.x again
- VMware vCenter Server 7.03 U3g – Download and patch
- Upgrade VMware ESXi to 7.0 U3 via command line
- VMware vCenter Server 7.0 U3e released – another maintenance release fixing vSphere with Tanzu
- What is The Difference between VMware vSphere, ESXi and vCenter
- How to Configure VMware High Availability (HA) Cluster
Stay tuned through RSS, and social media channels (Twitter, FB, YouTube)


Leave a Reply