You could have read my detailed post How-to Install VMware VCSA 6.0 on ESXi hypervisor already. Today we'll show you how from the installation ISO you deploy VCSA by using VMware Workstation or Player. This is not supported by VMware, but it might be useful for home lab testing or “vSphere-in-a-box” demos.
I have a 32 Gb box (previously used for ESXi) which has some SSDs and which I'm using to demo VMware VSAN with VMware Workstation. vCenter was until now configured in Windows VM, but after today's post, I will also be able to quickly spin VMware VCSA to show clients Linux version of vCenter server. The 32 Gb of RAM is really necessary for nested VSAN environments running on the top of Windows client OS. But it allows demoing VSAN with 3-4 hosts as well as running your DC, DNS… and vCenter server.
How To Install VMware VCSA 6 in VMware Workstation. Let's get started.
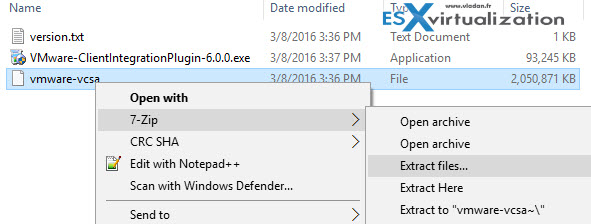
Step 1: If you haven't done yet, download VMware VCSA ISO > Mount it (natively since W8, if you're still on W7 you'll have to use third party tool like daemon tools for example) > Go to the vmware-vcsa folder where you'll find a file without extension > Do a right click and Extract. Choose some temp folder on your hard drive.
Step 2: Right click the “VMware-vCenter-Server-Appliance-6.0.0.20000-3634791_OVF10.ovf” file and select Open with VMware Workstation. (Note that you can also double click the OVF file and the pop-up asking which tool you want to open it with should appear…
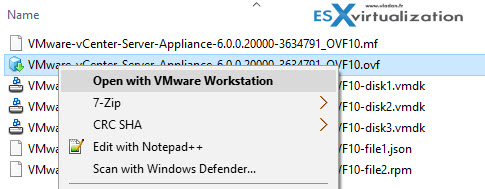
This opens up an import assistant.
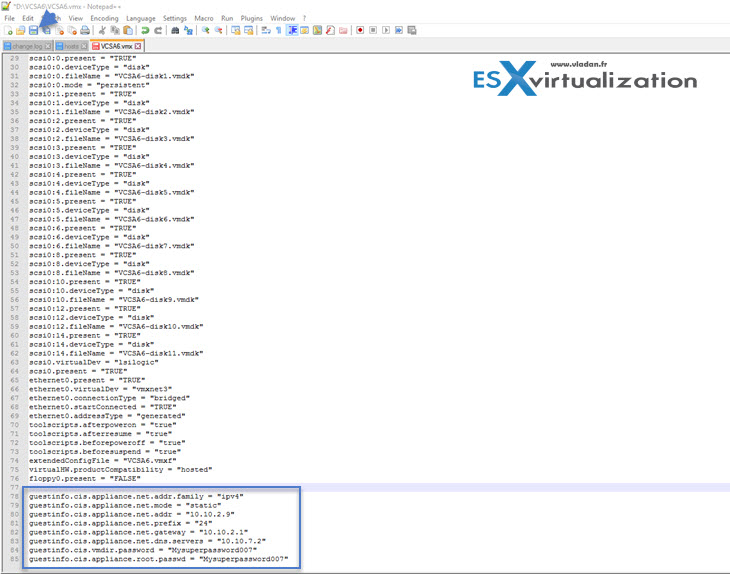
Step 3: Name the new VM as you like (VCSA6 in my case) and let VMware Workstation to import this VM to the desired location (in my case it's fast NVMe drive from Samsung (The Samsung 950 pro). Do not power On the VM just yet. Open Windows explorer and locate the VCSA6.vmx file (you have to have file view with extensions On) > Add those lines to the end of the file…

As you can see the config adds static IP address, gateway, DNS servers and root passwords…
guestinfo.cis.appliance.net.addr.family = “ipv4”
guestinfo.cis.appliance.net.mode = “static”
guestinfo.cis.appliance.net.addr = “10.10.2.9”
guestinfo.cis.appliance.net.prefix = “24”
guestinfo.cis.appliance.net.gateway = “10.10.2.1”
guestinfo.cis.appliance.net.dns.servers = “10.10.7.2”
guestinfo.cis.vmdir.password = “Mysuperpassword007”
guestinfo.cis.appliance.root.passwd = “Mysuperpassword007”
The whole file then looks like this…. Click Save and exit the notepad.
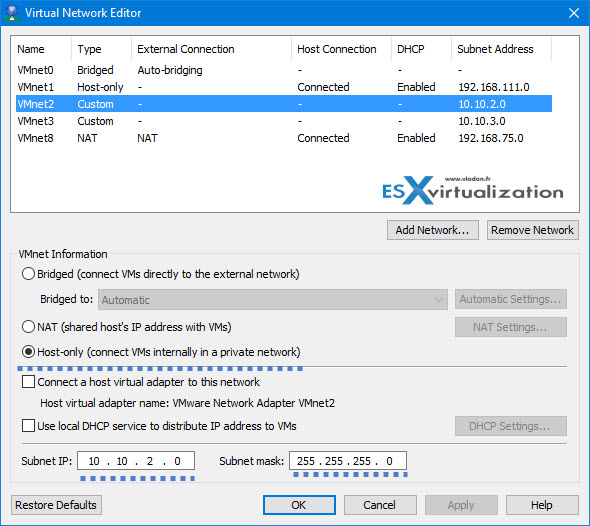
Step 4: Edit your network settings on the VM through VMware Workstation. In my case, my nested lab runs on VMNET2 and is isolated from the outside world. (I certainly do not want to interfere with other VMs in my home network, but rather create a separate “bubble” for the nested lab) … I know that many of you know your way, but I prefer to show this for folks which struggle…
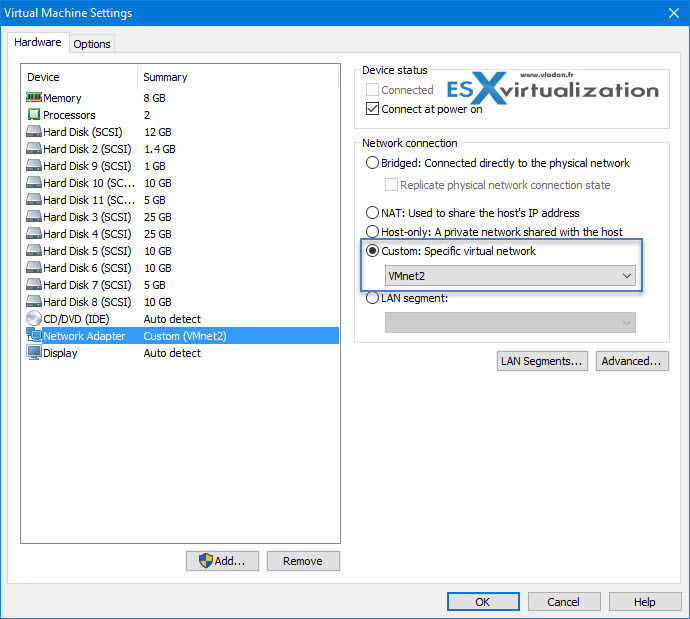
And those are my network settings (my VMnet2 network) when you go to Workstation Menu Edit > Virtual Network Editor…
Step 5: Boot the VM > Go for a cup of coffee -:) as the process takes good 10 min to install…
You can hit the Esc button to see the details, but that's all you can do. Just wait….
It takes a lot of time even on running the very fast (see the “fastest” Samsung 950 Pro consumer SSD). If your motherboard does not have M.2 slot you can use an adapter (ex. Lycom DT-120). Samsung has 2 models of different capacity. Mine is just 256Gb.
Samsung 950 Pro (256Gb) | Samsung 950 Pro (512 Gb)
Lycom DT-120 Adapter M.2
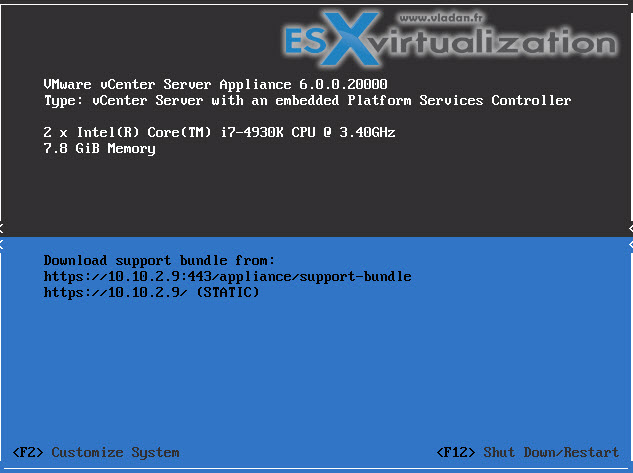
That's all folks… The final screen looks like this…
There are quite a few posts quite similar detailing this. I found the config on this blog, but there are other resources I'm sure as many folks tried to run the VCSA directly in Workstation without any configuration options and they failed.
Another option would perhaps be also to deploy the VCSA as nested VM on already nested ESXi, but I think that the performance would suffer. I might try in one of my future posts, just to see if it's possible to do some work actually.
I recorded a small video where you can see all the steps:
Update: You no longer need to use those tweaks. Just download the latest VMware Workstation 2017 Tech Preview and you can do that without any tweaks of VMX files. Check Deploy VMware vCSA 6.5 in VMware Workstation 2017 (Tech Preview)
Enjoy…-:)


hi,Vladan
i would like to know how to install External Platform Service Controller under VCSA 6 in VMware Workstation 12 for my lab.is it editing parameter of VCSA VMX file or uninstall VCSA mainly service for using External PSC in the Workstation?
Please advise
Thank you!
Kevin,
You may want to check this post which provides scripting options… http://www.vladan.fr/vcenter-appliance-6-0-simplified-scripted-installation/
++
Vladan
I saw the above link, it describes the method to deploy the PSC from Jason file to ESXi host.
But is it possible to deploy the PSC to VMware Workstation???
Because once we open the OVF file, it seems using the “Tiny” environment and using embedded mode by default when the first time boot-up. Is there any way to change the mode?
No the above link isn’t for Workstation.
The Workstation How-to deploys the PSC allong with VCSA – in the same VM.
If you want to deploy just the PSC of the VCSA then use VM Workstation 14, it has native support for both VCSA 6 and VCSA 6.5 and will allow you to do this.
To everyone doing copy/paste from the lines in this post:
Beware. You’ll end up with “ipv4” instead of “ipv4” for example.
This means that your .vmx file will have the wrong characters and VMware Workstation won’t recognize those lines, so you’ll end up with DHCP and who knows what password in your VCSA 6.0 appliance.
Alfonzo,
to be truth I’m not quite getting what you are pointing at. Your example shows the exact same characters… Please explain.
Vladan
Thanks Alfsonso,
I didn’t understood why the deployment failed 🙂
Vladan, try to past your code on Notepad++, you’ll see “” are different.
it needs to be replaced.
Thanks for the help guys. I’m taking few weeks OFF so, not so much online right now… -:)
Cheers.
Vladan
hi
when we deploy vCSA in this way, how we can update this vCSA??
the way you explain each and every thing is really a very good . I follow your steps and my VMware VCSA 6 has been installed on VMware Workstation. thanks
Thanks! This helped me test a VCSA upgrade in Workstation. Any chance you might extend this to also include how you set up VSAN within Workstation? I’ve never done VSAN before but we’re deploying it soon and would like to experiment with it before we receive all the equipment.
Thanks for the great post!
Two lessons I’ve learned:
1. Use a complex password (CAPS + small + numbers). If using a simple password, you will not be able to login and will have to redeploy.
2. If using DNS, make sure you create the A record before attempting to submit the installation wizard. Otherwise, you will have to redeploy:
https://kb.vmware.com/selfservice/microsites/search.do?language=en_US&cmd=displayKC&externalId=2115142
Hi Vladan,
great post on the vCSA on ESXi 6.5
btw, the reunion b&b looks fantastic , do you live there now ..
Thanks. Yes, we live at 1st floor. Downstairs is for tourists…. -:)
Hey guys I am trying to install the esxi 5.5 on My Vmware workstation pro 14 but i am not able to install it . The screen say to accept accepting the EULA press f11 but whenever i tried to press f11 it is not accepting in vmware workstation. I have tried to windows server on vmware workstation it got successful. My system configuration is as below
Ram 8 GB
Processor intel I5 2.3 ghz
1 TB hdd
Windows 10