In this post, we will walk you through the installation steps of VMware Mirage Management Server, which is one of the parts. VMware recommends to install Second Mirage Management Server will hold a mirror of MongoDB, installed locally on each Mirage Management Server. So this post will teach us How To Install VMware Mirage Management Server.
You'll see that there is only a slight difference between the installation on first Mirage Management Server and the second installation which will be the mirror copy. The process takes only a few minutes but we need to satisfy all the requirements, which we have listed in our previous post – VMware Mirage Infrastructure Preparation Steps.
We will use the “MirageAdmin” account we created in the previous post. It's a Mirage service account which we will be connecting to our Mirage management server. I assume you have created the Login rights for the SQL DB and assigned “dbcreator” right. I also assume that you have created some storage on your file share and assigned the right permissions.
How To Install VMware Mirage Management Server – The steps.
Step 1: Connect to “MirageMS01” (our First Mirage Management Server VM) and launch the installer by Shift + Right Click … Run AS and enter “MirageAdmin” as user with the proper password.
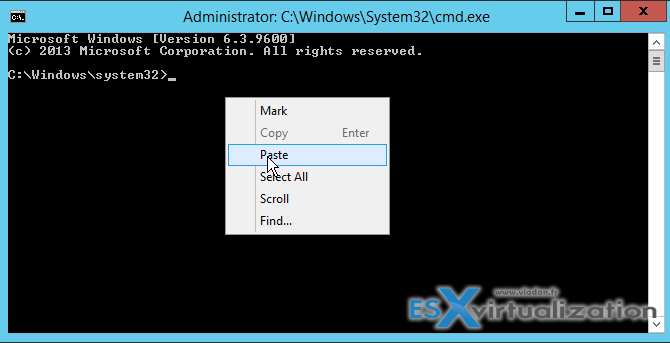
Note: If you getting some permissions error, try to launch first Elevated command prompt and then only do a SHIFT + right click on the MSI package > Copy As Path. Then Paste it to the cmd prompt window. (note that this command prompt window is launched with “Administrator”).
This
As this
and this
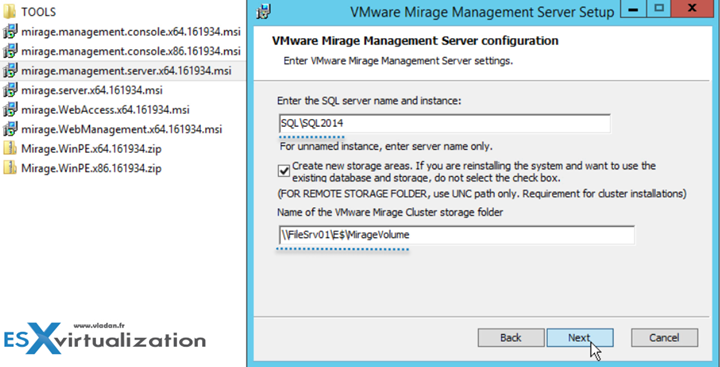
Enter the SQL Server name and Instance. (If you having a problem to connect, make sure to open following firewall ports on your SQL server). Eventually check the VMware Mirage Architecture preparation steps where you'll find all the ports which need to be opened:
- TCP 1432
- UDP 1432
Check the box “Create New Storage areas” and enter the path to your file server. Click Next.
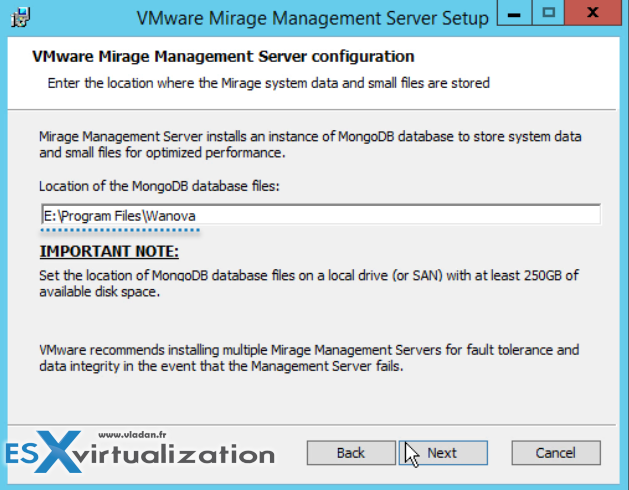
Step 2: Enter the path to the MongoDB database. We have added a second virtual disk to our VM and created a volume. The minimum required is 250Gb.
Click Next.
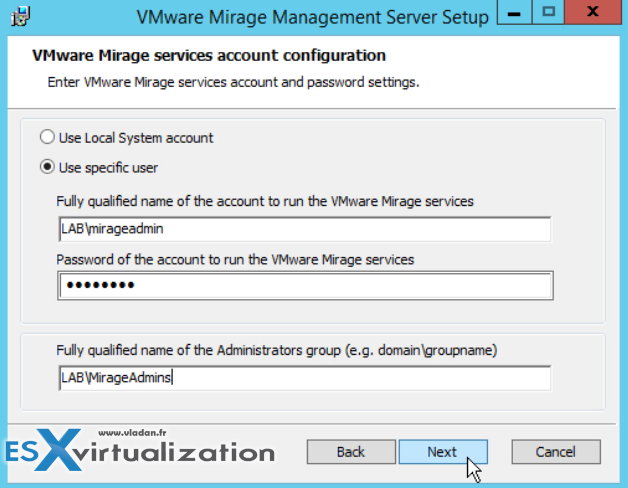
Step 3: Enter the “MirageAdmin” service account (is pre-filled actually by the installer) and password. Then enter FQDN of the Mirage Security group we have created in Microsoft AD.
Optional: Join the Customer Improvement Program (CEIP)
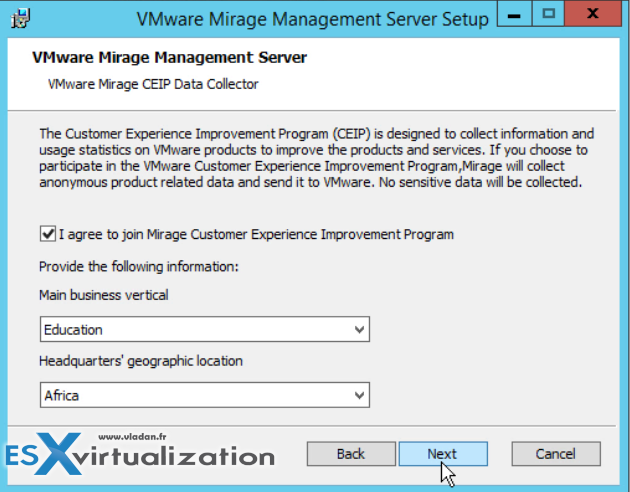
Click Next > OK. That was the first one. Now rinse and repeat for the second one.
Step 4: Connect to “MirageMS02” (our Second Mirage Management Server VM) and launch the installer by Shift + Right Click … Run AS and enter “MirageAdmin” as a user with the proper password.
Enter the SQL Server name and Instance.
Then don't check the box for creating storage areas, continue with the rest of the installation the same way as on the first server.
We only need to do that once.
Do NOT check the check box for the second instance of Mirage Management Server.

And that's about it. We have successfully installed the Mirage Management Server with MongoDB in a mirror for high availability. Next steps will follow.
We still have to install Mirage server (to a separate VM) and also Mirage file portal and Web manager, but those last two will gets installed on the Mirage Management server nodes later in this article series. Stay tuned.
Here is the detailed video from the installation:
VMware Mirage brings all the benefits of a VDI environment (refresh, recompose) to the physical desktops with native, physical PC performance. VMware Mirage divides OS, Applications and User data into different layers which can all be updated or restored individually and reduces the difficulty of maintaining a consistent corporate image on physical devices.
Always install a second Management Server with a separate MongoDB disk to eliminate single point of failure and prevent MongoDB corruption. MongoDB contains end users data and files that belong to all Mirage Layers. If you lose MongoDB, Mirage will stop working.
Installation of VMware Mirage Web Management and File Access portal
While we are here at the management server, we can install the other components as well. I did not do a (boring) step-by-step, but instead you can watch a video. The installation is pretty simple when taking care of command prompt with elevated privileges and then SHIFT + right click “copy path as” > paste into the CMD prompt window.
We're installing:
- Mirage Web Management
- File Access Portal
I have another video which I quickly recorded while producing this installation.
Enjoy…
VMware Mirage Guide
Server Installation and Configuration
- What is VMware Mirage?
- VMware Mirage Server Infrastructure
- VMware Mirage and Architecture Preparation Steps
- How To Install VMware Mirage Management Server, VMware Mirage File Portal, And Web Manager – [This Post]
- How To Install VMware Mirage Server
Image Management (through Mirage console)
- What is VMware Mirage Driver Library?
- How to Create a Reference CVD for Base Layer Capture
- How to Capture a VMware Mirage Base Layer?
- How to Capture an App Layer?
VMware Endpoint Management
- VMware Mirage Client Installation and Configuration
- How to backup a Desktop with VMware Mirage
- Create VMware Mirage Bootable USB Stick
- How to Provision a New Endpoint with VMware Mirage Base Layer?
- How to Apply a VMware Mirage App Layer?
- How to Enable Branch Reflector on a device or endpoint?
- How to Migrate Windows 7 to Windows 10 using VMware Mirage?
- How to restore Individual File for VMware Mirage Client system
Stay tuned through RSS, and social media channels (Twitter, FB, YouTube)


