Today's post is a post detailing the process of migration of Windows 7 to Windows 10 (In-place migrate). VMware Mirage can handle migrations between different Windows OS in two ways. Either you can do an in-place migrate where the user keeps the same hardware, or Mirage will migrate user to W10 and the user will get a new PC at the same time.
The migration installs a Windows 7, Windows 8.1, or Windows 10 base layer on each target endpoint while preserving user profile data and settings through the Microsoft User State Migration Tool (USMT). This tool has to be previously imported into VMware Mirage.
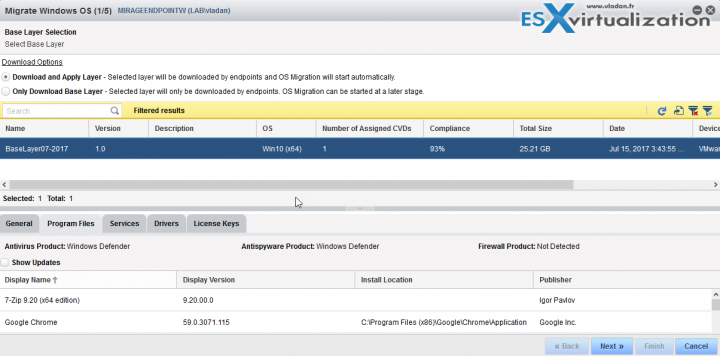
Further, Mirage can download and apply the Windows base layer in one step, OR, you can just let the Image to be downloaded to the endpoint, but the actual migration is launched at the latter time.
In both cases, we'll be applying VMware Mirage Base Image which we created earlier. We have our corporate Apps in it, as well as all the configuration to the base OS, such as Antivirus.
The migration process installs a complete OS image, including local user profiles as configured on the reference machine when the base layer was captured. You can use this to set up a local
administrator and default user account. The migration moves the existing content of a target endpoint to the C:\Windows.Old directory, which is then processed by USMT.
Application settings and data that are not handled by USMT are kept in the C:\Windows.Old directory. You can manually restore this data, or delete it when you do not need it.
How to Migrate Windows 7 To Windows 10 Using VMware Mirage – The Steps
Phase 1 – USMT preparation
Step 0: USMT. We need to download and import USMT into a VMware Mirage. The process isn't that straight forward as different versions of USMT exists as a part of Microsoft ADK. Here are the different download links:
- USMT 5 – Supported OS for Migration and Restore: XP Embedded, XP, Vista, Vista (x64), Win7, Win7 (x64), Win7 Embedded, Win7 Embedded (x64))
- USMT 6.3 – Supported OS for Migration and Restore: Windows 8 and 8.1
- USMT 10 – Supported OS for Migration and Restore: Windows 10 (including Anniversary update 1607)
Step 1: Create a file share on your file server. In my example it is:
\\filesrv01\usmt
Copy there the USMT files for your different OS (depending what are you migrating from). If you copying several USMT's versions, separate them each with different sub folder. Then do the import one by one.
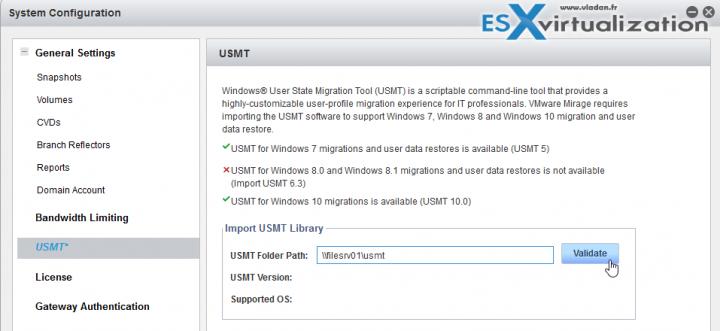
Step2: Go to VMware Mirage Web console and hit the Gear icon on the right (configure) > USMT
paste the UNC path and hit the Validate button to import those files into Mirage Server.
then hit the OK button. Mirage starts importing those files…
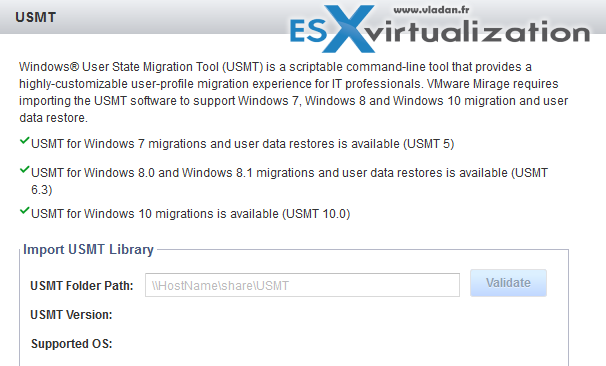
To finally have all green check marks….
The User State Migration Tool (USMT) is a highly customizable user-profile migration tool created and provided by Microsoft for more than 15 years. Mirage leverage this tool for OS Migration, Hardware Refresh with OS Migration and for Disaster Recovery when only the User Profile and data are being restored.
Phase 2: System Migration
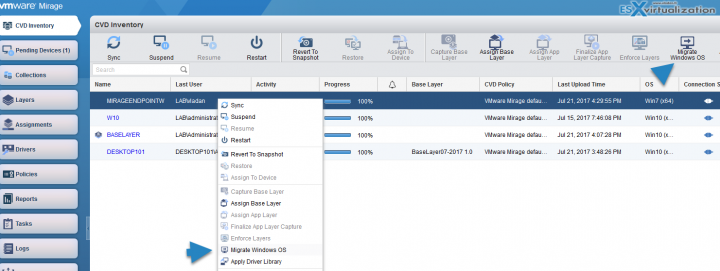
Connect to VMware Mirage and select your Windows 7 endpoint which you have previously installed VMware Mirage client with and you have centralized.
Then follow the assistant the Migrate Windows OS.
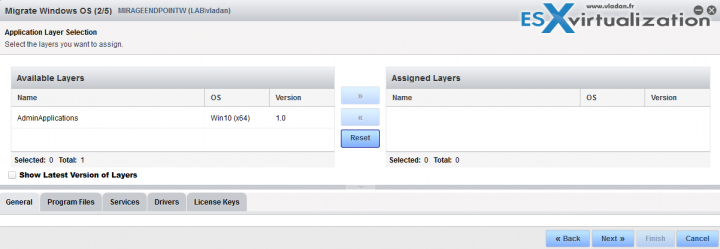
It will propose you to do an Application layer at the same time. We skip this.
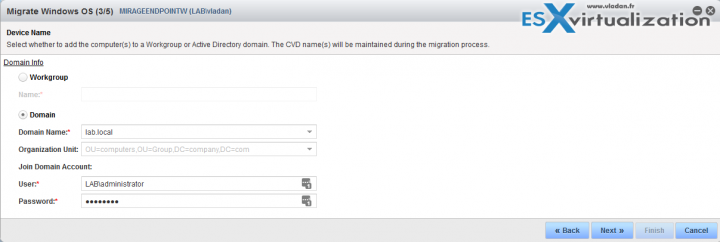
And you also have a possibility to join directly to your Microsoft domain… OS migration with Mirage retains the original computer name but requires rejoining the domain to create a
Windows 7, Windows 8.1, or Windows 10 machine account.
How many Endpoints will be migrated? Only one in our case.
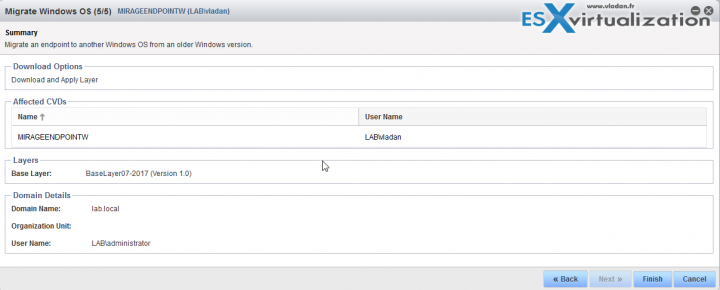
A summary page which shows an overview what's going to happen.
Then the process starts. As usually with VMware Mirage, we can monitor the process through the Main Web console, and also through the endpoint if it's close enough.
Custom boot loaders on the target machine are removed by the migration. If an endpoint includes multiple operating systems, the migration overwrites only the one on the active OS partition and does not provide boot options for the others.
The post-migration script runs the USMT and then rejoins the domain. The PC must be connected to the corporate network to be assigned a network address.
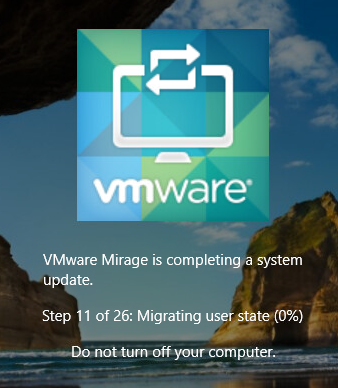
Login is disabled until the system completes the migration process.
Below you can see the usual Windows 10 login screen which is replaced by Mirage preventing to log in.
The new OS is loaded and Plug-and Play hardware is installed and configured. This process might take a few minutes, during which the computer is busy.
The system does migrate user's files and settings, not previously installed apps by user. The old system is renamed to Windows.old.
Wrap Up:
If you have a user(s) to be migrated from W7 to W10 without changing hardware, this is the way of doing it. If there is a plan to change the hardware at the same time, this is two step process. First step migrates the user to new hardware with W7 which is then upgraded to W10 in step2.
USMT does not migrate applications installed on Windows XP or Windows Vista to Windows 7, or applications installed on Windows 7 to Windows 8.1 or to Windows 10, or applications installed on Windows 8.1 to Windows 10.
VMware Mirage Guide
Server Installation and Configuration
- What is VMware Mirage?
- VMware Mirage Server Infrastructure
- VMware Mirage and Architecture Preparation Steps
- How To Install VMware Mirage Management Server, VMware Mirage File Portal, And Web Manager
- How To Install VMware Mirage Server
Image Management (through Mirage console)
- What is VMware Mirage Driver Library?
- How to Create a Reference CVD for Base Layer Capture
- How to Capture a VMware Mirage Base Layer?
- How to Capture an App Layer?
VMware Endpoint Management
- VMware Mirage Client Installation and Configuration
- How to Centralize a VMware Mirage Endpoint (to create a backup)
- Create VMware Mirage Bootable USB Stick
- How to Provision a New Endpoint with VMware Mirage Base Layer?
- How to Apply a VMware Mirage App Layer?
- How to Enable Branch Reflector on a device or endpoint?
- How to Migrate Windows 7 to Windows 10 using VMware Mirage? – [This Post]
- How to restore Individual File for VMware Mirage Client system
VMware Mirage Licensing and pricing
VMware Mirage has a simple licensing system. You can buy it either as:
- Standalone VMware Mirage product
- Horizon View Advanced or Horizon Enterprise. (ex. 100 licenses of Horizon Advanced entitles you for 100 Mirage Users).
VMware Mirage standalone sells in a package of 10 licenses. (or 100 licenses). One copy of the software allows you to manage 10 endpoints. There is also an option only to license the Windows migration feature. In this case, you’re buying a 6-month term license focused on subscription.
More from ESX Virtualization
- VMware Mirage Guide – Main Page
- How to Install Ubuntu Bash Shell on Windows 10
- How to Clean Previous Windows Installation Files after latest Windows 10 Update
- Windows 10 with ReFS For Veeam Backup Repository
Stay tuned through RSS, and social media channels (Twitter, FB, YouTube)




how to use it on window 10