The problem with the auto lock feature is that it really slow down when working in a multi-server environment in a lab. This is especially true of lab environments. Servers in lab environments are usually used much more than usual production servers. So, in the long run, the automatic lock can be especially painful. In this post, we will learn How to Disable Auto Lock on Windows Server via Group policy, for a home lab environment, by creating and applying a group policy.
When working on a single server it's usually ok, but when you are working on multiple servers at the same time and every time you jump to do something you are in front of a locked server, again, and again. Or even better. You're running some PowerShell and waiting for a PowerShell command to complete or waiting for an update to install. Nothing more annoying to have to log in again to that server.
Today we'll stop doing it. We will show you that it will take you only 5 min to Disable Auto Lock on Windows Server via Group policy. The tool you need is Group policy console (GPO). You can invoke GPO console from the command line via “gpmc.msc” (Group Policy Management Console snap-in). I assume that you have built a Microsoft Active Directory domain (AD) in your lab. In this case, when you connect to your domain controller server, you should have the GPO console already installed.
I assume that you have built a Microsoft Active Directory domain (AD) in your lab. In this case, when you connect to your domain controller server, you should have the GPO console already installed, because for standalone servers the console might not be installed (It's a Feature which needs to be added).
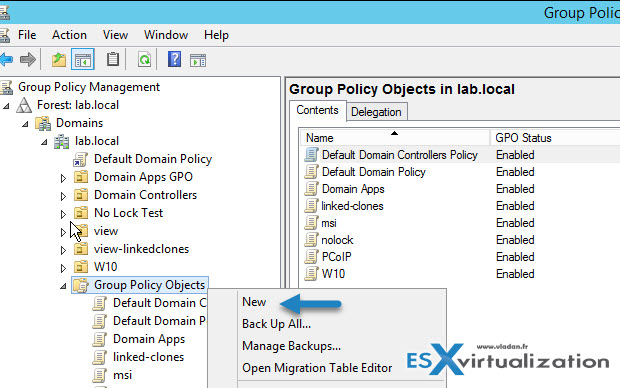
Open a command prompt > type “gpmc.msc” to open your GPO console. Then navigate to Group Policy Objects tree > right-click on the Group Policy Objects, and chose New.
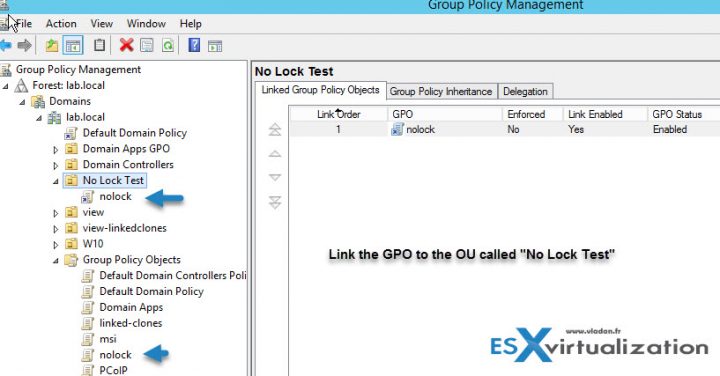
Then Link the GPO (via drag and drop) to the Organizational Unit (OU) within your AD where your lab servers are located. In my case, the OU's name is “No Lock test”. Note that if it's only a lab environment, one could consider linking this GPO to the domain, like this every computer/server joined to the domain would never get the lock screen activated.
BUT, if you still prefer your DC not being treated as an everything else, just create a separate OU and link the GPO to that OU.
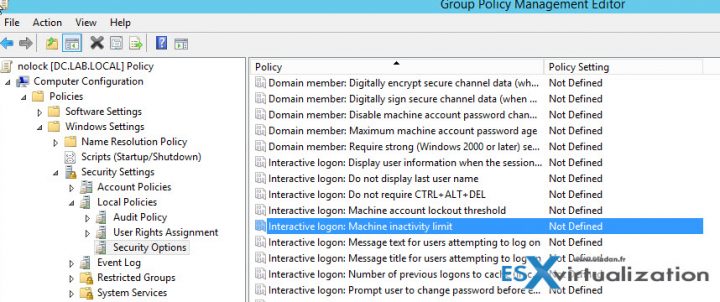
Next, Right-click the “nolock” GPO object and chose Edit. This opens a new window. Navigate to:
Navigate to:
Computer Configuration > Policies > Windows Settings > Security Settings > Local Policies > Security Options > Interactive Logon : Machine inactivity limit
There you'll see:
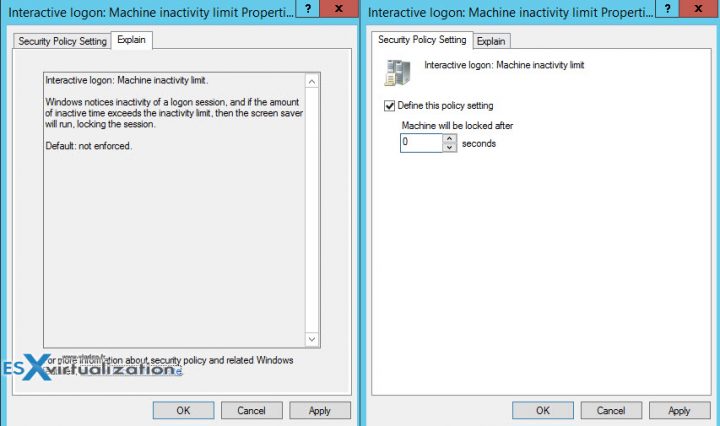
Double-click the branch and set it as follows:
- Check the Define this policy settings check box
- Put 0 seconds for the “Machine will be locked after”
How to make sure that the GPO settings are applied right now?
By default, computer Group Policy is updated in the background every 90 minutes, with a random offset of 0 to 30 minutes. In addition to background updates, Group Policy for the computer is always updated when the system starts.
Option 1: Via command line
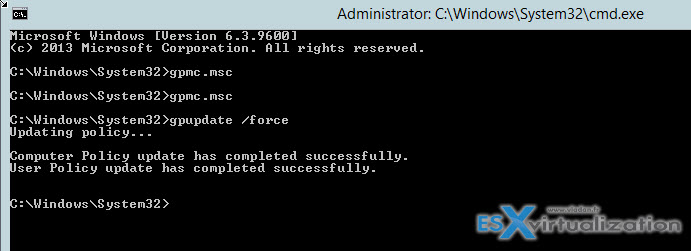
Initiate a refresh of the GPO via command line. To initiate a refresh or to force a GPO application, open a command line utility with admin privileges and type:
gpupdate /force
The policy will be applied.
Note that the systems which are inside the OU, must all refresh their GPOs. The process is usually done during restart, or at some time intervals. You can also use PowerShell cmdlets to remotely refresh Group Policy settings for all computers in an organizational unit (OU) from one central location.
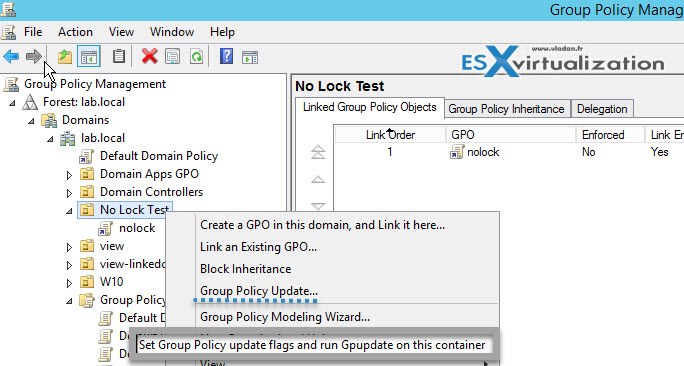
Option 2: Via GPO console
Or you can also use the same console where you were creating the GPO – The Group Policy Management Console (GPMC).
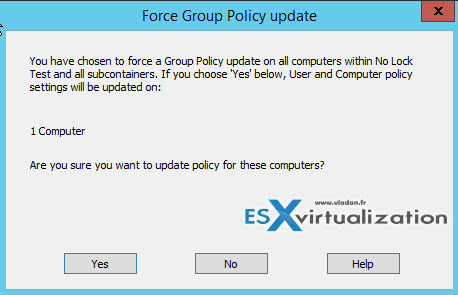
And when invoked, you'll see this confirmation screen… We only have 1 computer within this OU so the settings will be updated on 1 computer only…
Third option would possibly be Windows PowerShell. You can use the Invoke-GPUpdate Windows PowerShell cmdlet to refresh Group Policy for a set of computers.
Wrap-up:
As you can see, by simple steps you prepare your home lab for being more productive. The steps are really simple and fast. Every time you'll create a new server, new VM, within your environment, and put it in a particular OU to which you'll apply the GPO which Disable Auto Lock, you never have to type the password, except after a reboot(s).
Microsoft Technet is my source for Microsoft “stuff”. Whether you're seeking for a solution in a lab, or enterprise environment, you can find a solution either via Technet blog posts or forums. I can only highly recommend learning from those ecosystems.
You should probably leave the lock screen enabled unless you have a very good reason to disable it via GPO. When you think, it is the basic (and efficient) protection against data theft within enterprise environments. But for some situations, where the auto lock is not productive, such as lab environments, it is good to know how to disable it.
More from ESX Virtualization:
- What is VMware Storage DRS (SDRS)?
- What Is Erasure Coding?
- What is VMware Orchestrated Restart?
- What is VMware Cluster?
- What is The Difference between VMware vSphere, ESXi and vCenter
- What is VMware vSphere Hypervisor?
Stay tuned through RSS, and social media channels (Twitter, FB, YouTube)

this doesn’t work.
This article is incorrect. That policy only applies if you are using bitlocker. If you look in the explanation it clearly states that.
“The machine lockout policy is enforced only on those machines that have Bitlocker enabled for protecting OS volumes. Please ensure that appropriate recovery password backup policies are enabled.”