Before we will walk you through the process, we'd like to point out few things which should be respected when working with VMware Mirage Reference Machines. While currently up to a version of Windows marked 1607 are supported by VMware Mirage (not the Creators update just yet), there are few other guidelines, such as disabling automatic updates of Windows Store Applications and the Windows operating system on reference machines. In this post, we will explore How to Capture a VMware Mirage Application Layer.
The process of capturing App Layer is in several phases such as pre-scan of the reference machine, then only installing the applications, and finally a post-scan. We'll detail this in today's post. Before we do that let's talk a little bit about some good practices. (There is more in Admin's Guide PDF).
The reference machine for App layer capture should have the base OS installed only and then install your applications. Those applications contained within an application layer will be deployed to endpoints different ways as the traditional delivery methods such as MSI packages or auto-install via scripts. The application layer will get assigned to the endpoints via VMware Mirage web based console and those endpoints will receive all those applications contained within the application layer.
Note that you cannot use single App layer for different OS. You must capture app layers separately for Windows XP, Windows 7 32-bit, Windows 7 64-bit, Windows 8.1 32-bit, Windows 8.1 64-bit, Windows 10 (64-bit).
If you will be using an application which has a built-in auto-update feature, try to disable the auto-update before creating an App layer. Also, turn off automatic Windows Update installation
and automatic anti-virus definition updates.
Verify that the standard reference machine is similar in content to the base layers used throughout the organization, for example, with the same Windows service pack version and .NET Framework version as the base layer.
How to Capture a VMware Mirage Application Layer?
Go to your Reference machine and install VMware Mirage Client > Go to the VMware Mirage Web Console > Pending Devices > Right click The unassigned endpoint > Create Reference CVD >> App Layer.
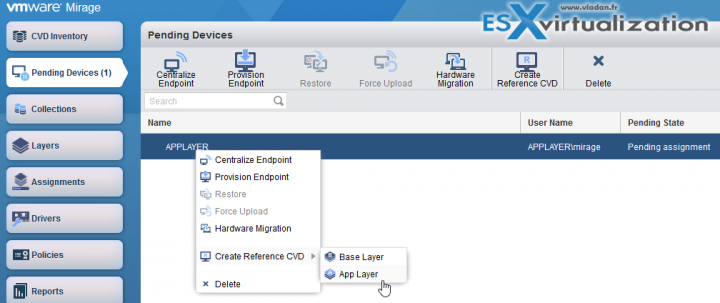
The wizard starts asking you which policy you want to use. We have only one, the default one. Click Next.

Volume choice. You can have several volumes configured within your VMware Mirage cluster, so hence the possibility to pick one of the volumes.

Validation screen checks again for any potential issues. It won't let you continue if some requirements are not met. (example domain join).

Validation finished, we can move forward. Here is a summary screen telling us that Upon clicking Finish button, the reference machine will switch into recording mode.
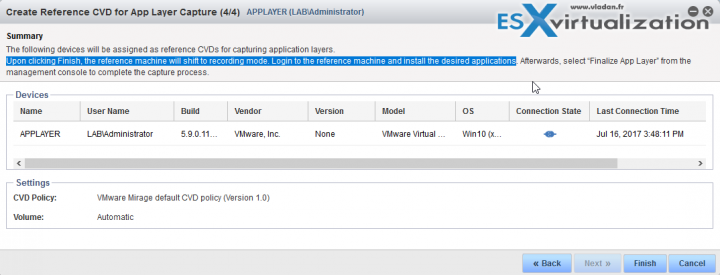
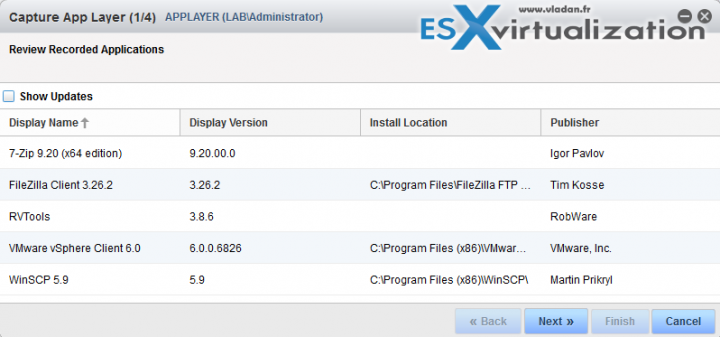
Go to the endpoint and Install your applications now. I have installed some admin applications, to my demo endpoint. Applications such as Filezilla, FileSCP, 7zip, VMware vSphere client etc…. just to have some content there.
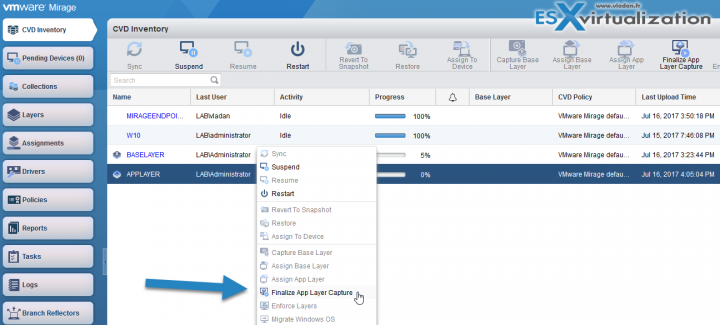
Once done, come back to the VMware Mirage console > Right click the App Layer > Finalize App Layer Capture.
We have another wizard than later on. We can review our applications…. Nice isn't it….?
The wizard continues inviting us to put a name for our App Layer. Note the possibility to have version. (The description field got filled out automatically. Neat…)
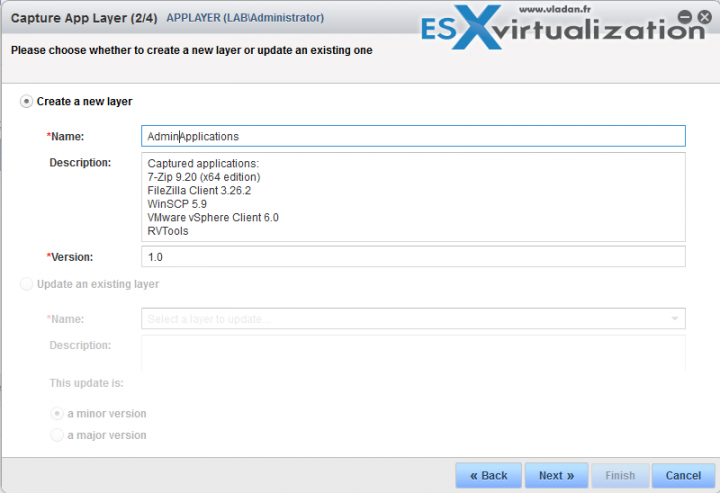
Here is a review screen. Nothing special here…

Summary screen.
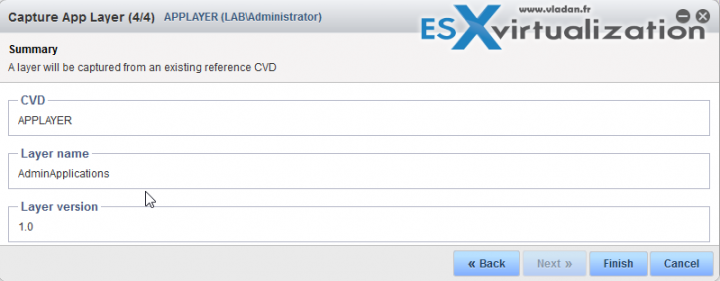
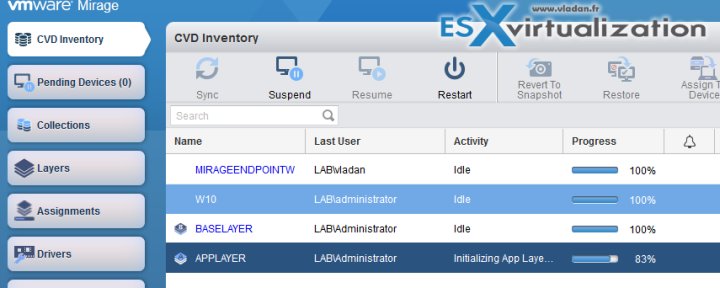
And after clicking finish, we can review the progress through the Web console.
We can also check inside the endpoint and we can see that the message has changed. Now it says “Initializing App Layer Capture”.
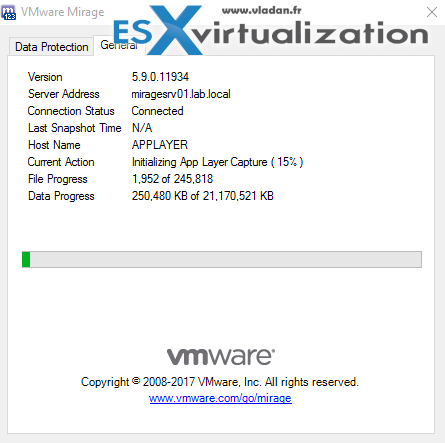
The window on the endpoint's desktop also has a progress bar ….

After the capture finishes, the Layers button show us our AdminApplication which is our App Layer. As you can see, we have our Base layer there as well.

This is it. Thanks for following this little guide.
As you can see, VMware Mirage is very smart and works similar way as ThinApp (if you know thinapp). There is a clean state recording first, and then only you are invited to install the application, followed by a post-install recording. This allows creating a snapshot of what's changed in between – The installed application.
VMware Mirage needs a little bit of time to learn, but basic things are pretty intuitive. The VMware Mirage terminology is part of the learning curve too….
VMware Mirage Guide
Server Installation and Configuration
- What is VMware Mirage?
- VMware Mirage Server Infrastructure
- VMware Mirage and Architecture Preparation Steps
- How To Install VMware Mirage Management Server, VMware Mirage File Portal, And Web Manager
- How To Install VMware Mirage Server
Image Management (through Mirage console)
- What is VMware Mirage Driver Library?
- How to Create a Reference CVD for Base Layer Capture
- How to Capture a VMware Mirage Base Layer?
- How to Capture an App Layer? – [This Post]
VMware Endpoint Management
- VMware Mirage Client Installation and Configuration
- How to Centralize a VMware Mirage Endpoint (to create a backup)
- Create VMware Mirage Bootable USB Stick
- How to Provision a New Endpoint with VMware Mirage Base Layer?
- How to Apply a VMware Mirage App Layer?
- How to Enable Branch Reflector on a device or endpoint?
- How to Migrate Windows 7 to Windows 10 using VMware Mirage?
- How to restore Individual File for VMware Mirage Client system
Next post will be actually doing the Installation of Mirage Management Server. (the biggest part).
VMware Mirage Licensing and pricing
VMware Mirage has a simple licensing system. You can buy it either as:
- Standalone VMware Mirage product
- Horizon View Advanced or Horizon Enterprise. (ex. 100 licenses of Horizon Advanced entitles you for 100 Mirage Users).
VMware Mirage standalone sells in a package of 10 licenses. (or 100 licenses). So if you buy 1 copy and it allows you to manage 10 endpoints. There is also an option only to license the Windows migration feature. In this case, you’re buying a 6-month term license focused on subscription.
More from ESX Virtualization
Stay tuned through RSS, and social media channels (Twitter, FB, YouTube)
