Since the release of WordPress 3.9 the advanced options for images are gone. It's no longer possible to use the previous options which allowed to put margins and padding, or image border. In the old version you click on an image, click advanced settings and here you go, you can edit image properties – border, vertical space, horizontal space. The image insertion dialog box does not allows that anymore. So How to Add Padding and Border to Images in WordPress?
Few months ago when Worpress 3.9 has been released I turned myself to a solution where I manually insert a code for margin when I align image in my post. If I for example align left my image and I do not want the text floating around that image not to be glued with the image, I can use this simple snippet which allows to define a margin. (margin right in my example).
style=”margin-right: 10px;”
It's not a big deal, but still you must go and look for that snippet every time you want to use an aligned image with a margin. It's not really what I want to do. So I finally looked around to see what alternatives and which options are offered to fix it.
Option 1: manual
This is the manual way as otulined above. You need to add the margin snippet every time you aligning image to righ or left. So here is an overview how the integration looks like. It's pretty obvious, but manual:
<a href=”https://www.vladan.fr/wp-content/uploads/images/vsphere5.5.jpg”><img class=”alignleft size-full wp-image-29015″ style=”margin-right: 10px;” src=”https://www.vladan.fr/wp-content/uploads/images/vsphere5.5.jpg” alt=”vSphere 5.5 Configuration Maximums” width=”300″ height=”96″ /></a>
Option 2: Additional Plugins
There are some additional plugins that you might use. I haven't tested the first one personally as I try to keep the number of plugins I'm running on a reasonable level… -:) But it seems that this plugin works pretty well.
01. Advanced Image Style
https://wordpress.org/plugins/advanced-image-styles/
02. TinyMCE Advanced
And another one which I'm using (but not only for the adjustment of images) called TinyMCE by Andrew Ozz. You can download the plugin from WordPress plugins repository here:
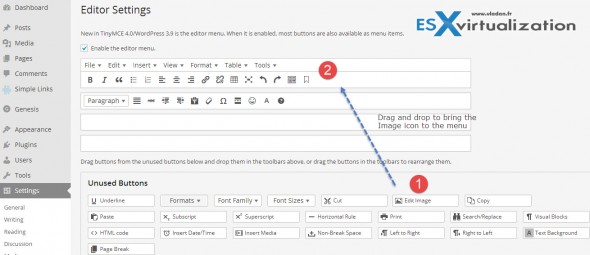
This plugin offers many more options for editing text than the default WordPress text editor and also has the options for advanced image options. (not active by default).
Then if I'd like to Insert an image with alignment to the left, I'd have to click default Add Media WordPress button as usually > Insert Image > align left > OK.
Then you need to select image and click the image icon we have added to TinyMCE menu to actually edit the image options.

So while this solves the “problem” of advanced options, TinyMCE Advanced offers tons of other options for text editing. Enjoy…-:) If you want to check other tips for WordPress you might want to have a look at my WordPress Tips page here.


.gallery-item {
/* include top padding. Consider important! if necessary
padding-top: 50px;
*/
/* Consider height of the images
height: 400px;
*/
/* Spaces between images, consider images width
width: 200px;
*/
}