Nakivo Backup and Replication is a software that helps to back up your data, and your VMs with databases, physical servers, SaaS applications (Microsoft 365), and workloads running in public clouds (Azure, Amazon EC2, and S3). You can also use Nakivo to backup file shares that is located on a physical server or in a VM. Today, we'll quickly show you how simple is to add a physical host to the Nakivo console.
One of the easy tasks when you first install the Nakivo Backup and Replication product is to add different inventory to the Nakivo console so you can start creating backup jobs. It's pretty common that you start with VM backup, but then most likely, you're still using physical servers within your organization, right?
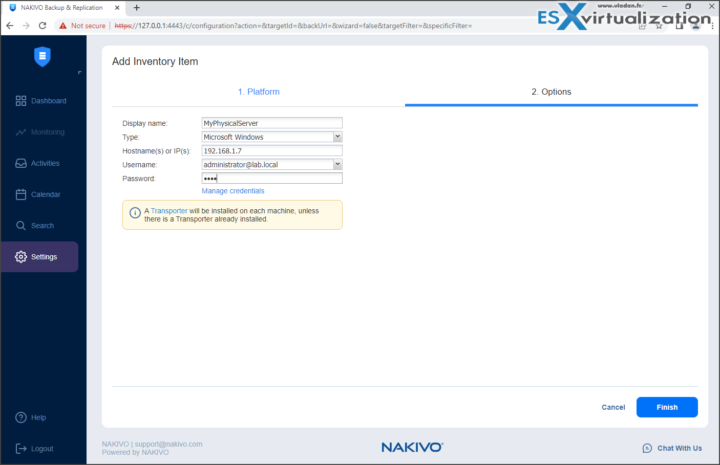
This is a very easy process where you simply go to Settings > Inventory > Add New > Physical.
You chose a display name, type (Windows or Linux), enter hostname or IP address and enter the connection credentials. Then click Finish to install Nakivo Transporter on the remote machine.
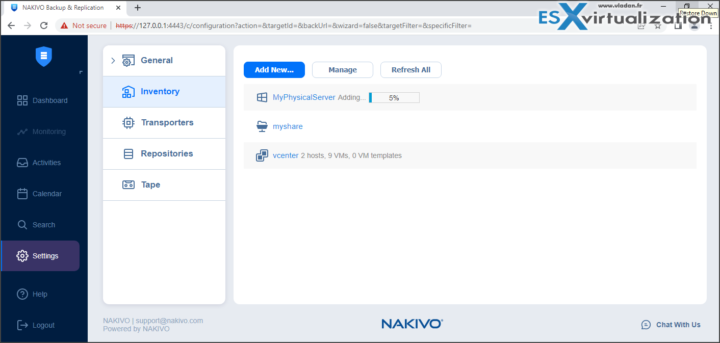
You can follow the progress bar during which, a Nakivo agent is remotely deployed to the remote system. It usually takes only a couple of minutes.
Once you have that in place and added to the console, you can start creating first job. (Note that if you don't add the system to the console first, the option is grayed out).
How to create physical server backup job?
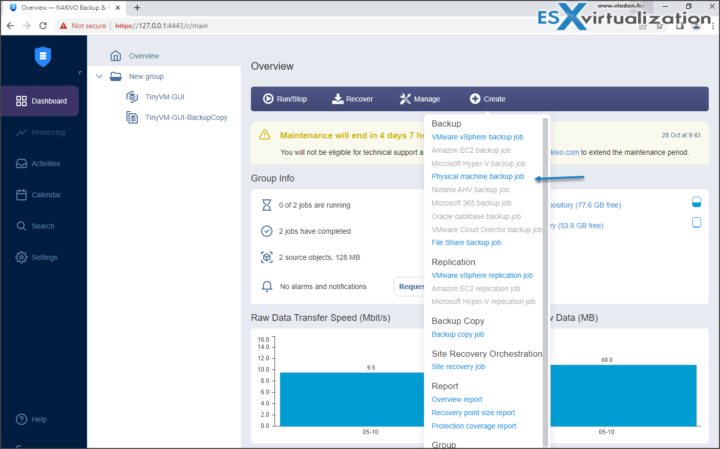
Simply go to the dashboard > Create (Plus sign) > Physical machine backup job.
Then follow the typical Nakivo backup wizard that will guide you through the process of job creation.
We won't detail the whole process here as it is just so simple to do. You'll basically just need to:
- Select the destination – pick a repository where you'll store the backup files.
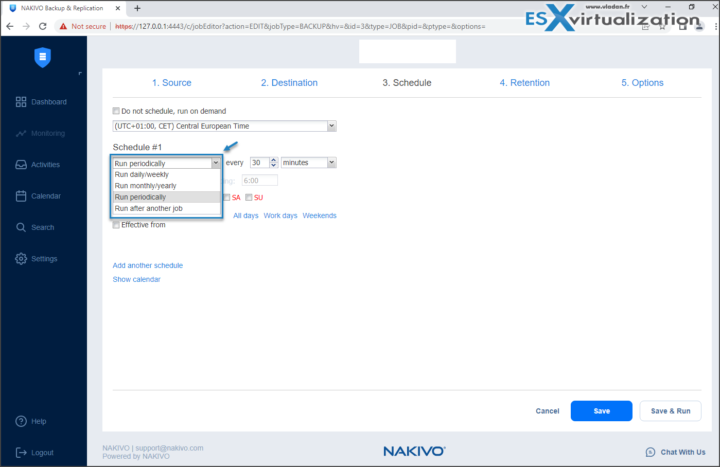
- Configure Schedule – how often you want to backups to run (daily, twice a day, 3 times a day, every 30 min?… ). Up to you, depending on your needs.
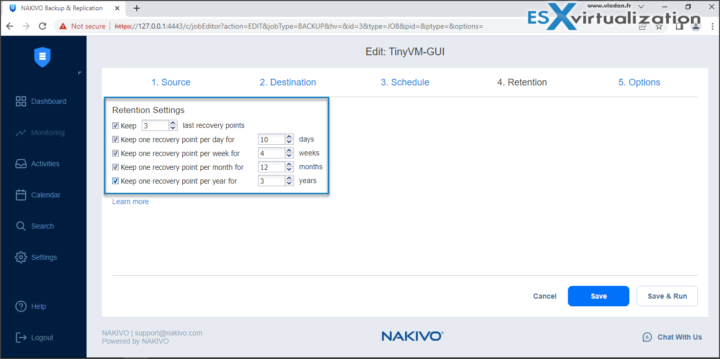
- Retention – how many backups you want to keep. There is many options where you can for example, keep one backup per year for 3 years. (useful for compliance purposes indeed).
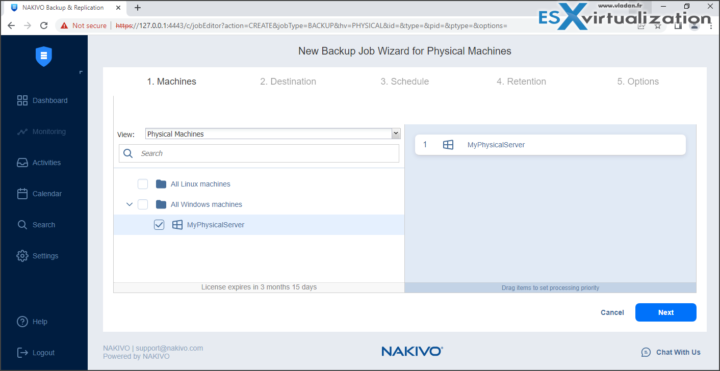
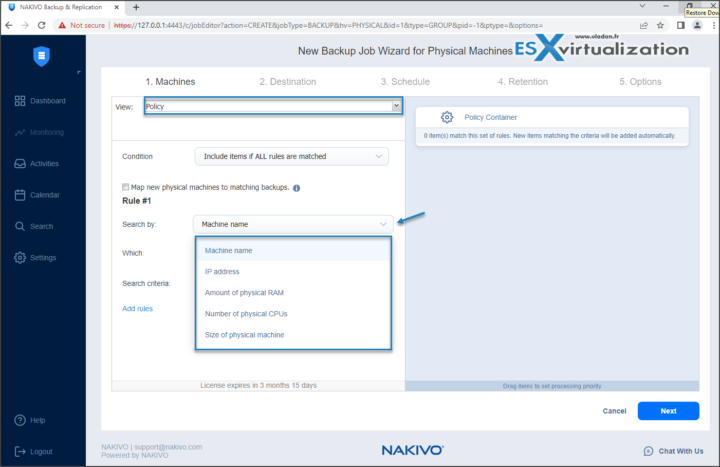
One note. When you first start the backup wizard, you'll have an option to add multiple machines to the backup job. This is particularly useful when you have good naming convention and for example, all your physical servers (this apply also to the VM backup) have some sort of common part within the naming convention. Someting like “vladan-server” as an example would be one of them.
You could have “vladan-server-01”, “vladan-server-02” or so. The possibilities are endless and it really depends on the naming convention within your organization.
If no naming convention exists and you're likely have an IP addresses and XLS sheet, than you can also have IP address, Amount of Physical RAM, Number of Physical CPUs, Size of physical machine. Simply change the view into Policy to see the options.
This is it.
Check out the Nakivo Trial here.
Wrap Up
Nakivo physical server backup is an elegant solution allowing you to manage your backups from within a single web-based console. As I wrote several times, the software is very quick to respond (no lagging) so the work within the solution is easy and fast to do. The possibilities of the installation of Nakivo are numerous. You can install Nakivo on a physical server that can run Windows or Linux, deploy it as a VM or even install it on selected NAS devices.
More and more features are added every time I look at a new release, so the dynamic behind the software keeps going. More an more solutions are supported to better fit the customer's needs.
One of the latest features added was NAS backup. Your file share can now be protected by Nakivo backup on a daily basis. You can store your backups pretty much everywhere, even on a highly secured Linux host with immutability –How to configure immutable backups with Nakivo.
You can back up file shares or specific folders within file shares on NAS devices and recover the entire share or specific files. The feature supports the backup and recovery of file shares using the NFS and SMB (CIFS) protocols on NAS as well as Windows and Linux file servers.
More about Nakivo on ESX Virtualization
- Security Tips for Nakivo Backup and Replication users – (New)
- Nakivo 10.7 New Features
- Backup a file share with Nakivo Backup and Replication
- NAS Backup with Nakivo Backup and Replication 10.6
- Nakivo Backup and Replication FREE Edition Features and Limitations
- How to configure immutable backups with Nakivo
- Nakivo Backup 10.3 adds features for MSPs
- SharePoint Online Backup with Nakivo Backup and Replication
- Nakivo Backup and Ransomware Recovery
- Nakivo Backup and Replication 10.2 Released with SharePoint Online backup and S3 Object Lock
- Nakivo Backup and Replication 10 Released adding compatibility to vSphere 7
More posts from ESX Virtualization:
- vSphere 8.0 Page (NEW)
- Patch your ESXi 7.x again
- VMware vCenter Server 7.03 U3g – Download and patch
- Upgrade VMware ESXi to 7.0 U3 via command line
- VMware vCenter Server 7.0 U3e released – another maintenance release fixing vSphere with Tanzu
- VMware vCenter Converter Discontinued – what’s your options?
- How to upgrade VMware VCSA 7 Offline via patch ISO
- vSphere 7.0 U3C Released
- vSphere 7.0 Page[All details about vSphere and related products here]
- VMware vSphere 7.0 Announced – vCenter Server Details
- VMware vSphere 7.0 DRS Improvements – What's New
- How to Patch vCenter Server Appliance (VCSA) – [Guide]
- What is The Difference between VMware vSphere, ESXi and vCenter
- How to Configure VMware High Availability (HA) Cluster
Stay tuned through RSS, and social media channels (Twitter, FB, YouTube)

