Hornetsecurity VM Backup V9 is a powerful and reliable data protection solution designed for virtualized environments running VMware vSphere (or individual ESXi hosts without vCenter), and Microsoft Hyper-V. The software offers a range of features that enable efficient and effective backup and recovery of virtual machines (VMs). In this review, we will take a closer look at the key features of Hornetsecurity VM Backup v9, including its backup and restore capabilities, monitoring, ransomware protection, and different backup options.
Hornetsecurity is not unknown to our readers as we know that VM Backup comes from Altaro's acquisition and that Altaro has been active in the service provider's market for a long time, before transitioning into an end user market too. VM Backup software was previously called Altaro VM Backup.
The software vendor has more than one software that you might be interest in. Hornetsecurity Total Protection for Microsoft 365 that we have reviewed in the past, is an all-in-one suite (security, backup, and compliance) that protects your organization’s M365 workloads against spam, ransomware or data loss.
One of the key features of Hornetsecurity VM Backup V9 is its backup and restore capabilities. The software uses incremental backups to capture changes made to virtual machines since the last backup, reducing backup times and minimizing the amount of data that needs to be transferred. After first full backup, only changes made to the VMs are transferred to the backup location.
VM Backup V9 uses VMware's vSphere APIs for Data Protection (VADP) to ensure that backups are consistent and reliable. VADP is an API framework that enables third-party backup software to integrate with VMware vSphere and ESXi APIs, ensuring that backups are efficient, reliable, and consistent.
VM Backup V9 System Requirements
VMware vSphere is fully supported from v5.5 all the way up to v8.0 and Microsoft Hyper-V from Windows Server (WS) 2008 R2 SP1 all the way up to WS 2022, as well as Azure Stack HCI.
The software needs a Windows Server OS to be installed on. My lab installation was inside a VM, but it is best practice to install VM Backup onto a dedicated physical server with lots of storage and high performance NICs. You can use WS 2008SP1 up to WS 2022.
Client OSes such as W10/11 aren't supported to hold VM Backup full installation, but you can use those systems to install the management tools that can be found on the download page, as a separate download. While there, you can also download the Offsite Backup Server application allowing you to set up a remote site which is used for replication of your backups and maintain a second copy in case of disaster.
Installation and Configuration
While the initial setup is very easy, you can also go ahead and very granularly configure individual backup jobs with advanced options in order to match the protected workloads. You won't be using the same settings for backing up a standard VM compared to an MS Exchange or SQL Server, right? Additional options concerning VSS, Continuous Data Protection (CDP) or security can be configured on a per-VM or per-job basis.
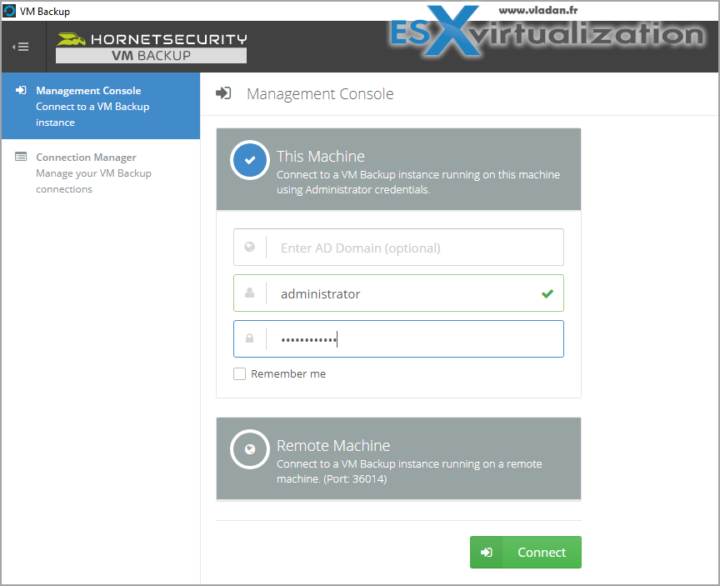
The software Installs via an MSI file. After installation, you'll see a standard management console asking you to connect locally (or remotely) to the server that has the software installed.
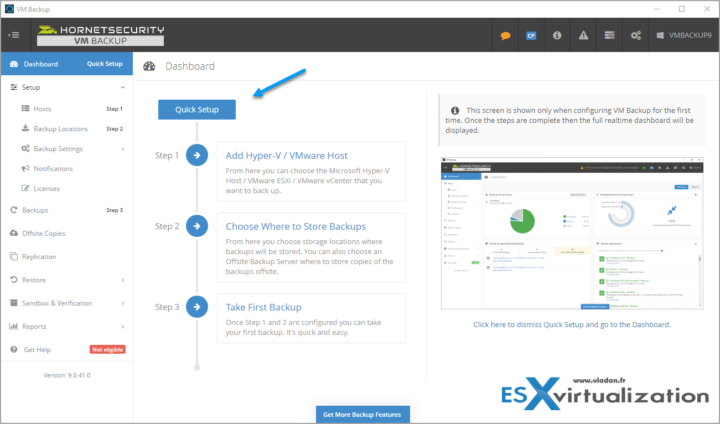
After the connection, you'll see a Quick Setup page that outlines the steps you must accomplish:
- Add Hyper-V or VMware Hosts ( or vCenter)
- Configure storage location for your backups
- Take the first backup
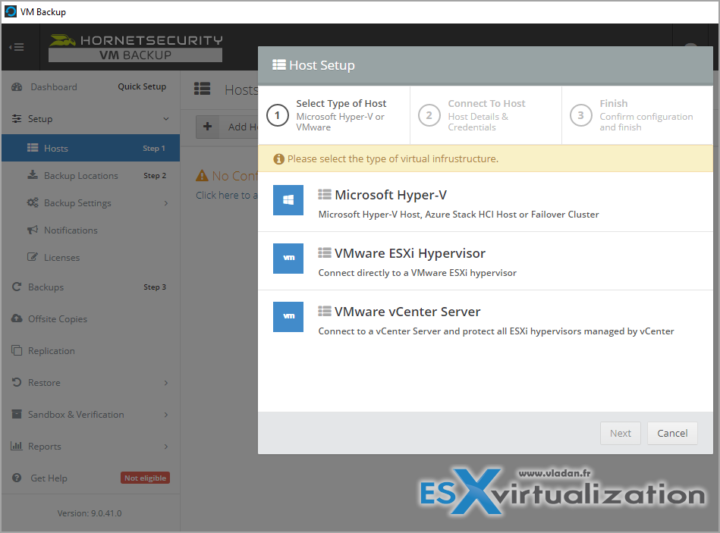
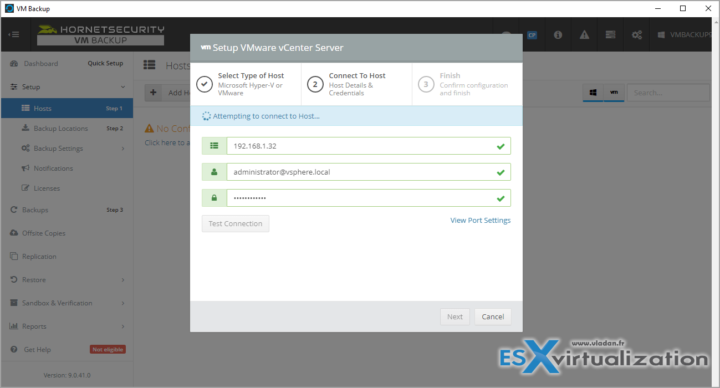
In my lab I only run a couple of VMware hosts managed by vCenter server, so my setup is fairly simple. Adding vCenter server. You can perfectly run couple of hosts without the need for vCenter server. Simply add them here, one by one.
The connection screen for vCenter server allows you to test connectivity before adding those credentials. Simple and efficient, with nice green checks.
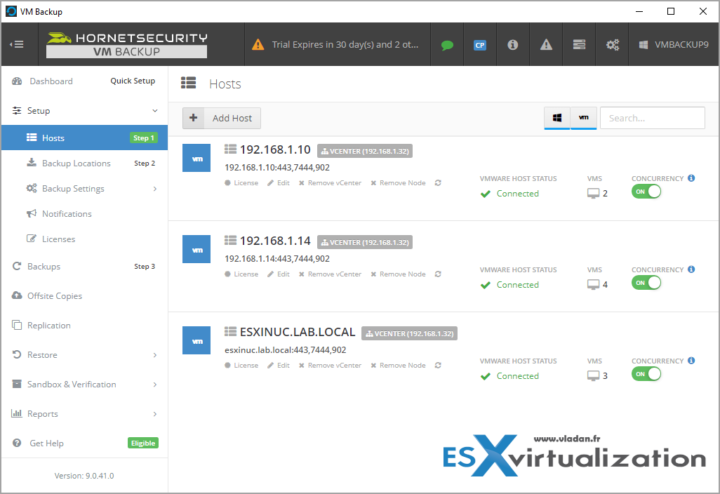
After validation and clicking the next button, my infrastructure shows up. As you can see on the right the concurrency button (On by default) allowing you to disable or enable the concurrent backups on per-host basis. This is useful when you have hosts that you have workloads running and you want to limit how many VMs are backed up at the same time.
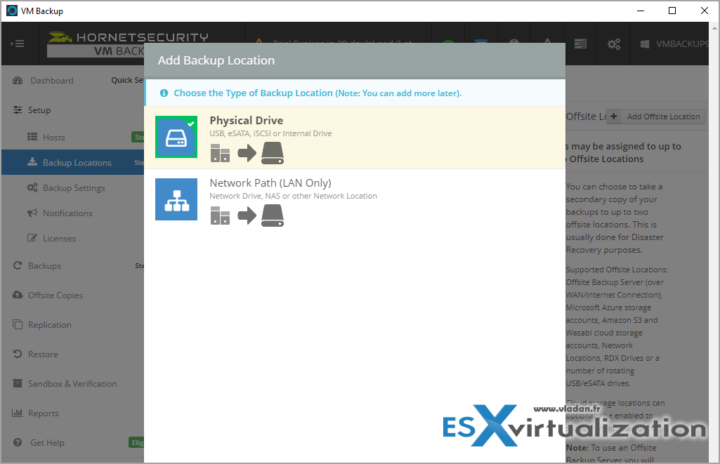
Next, we need to setup a storage location for your backup. You'd want to have this to have them locally on the internal disks, or backup to a network location. Depending on your environment you'll choose one or the other.
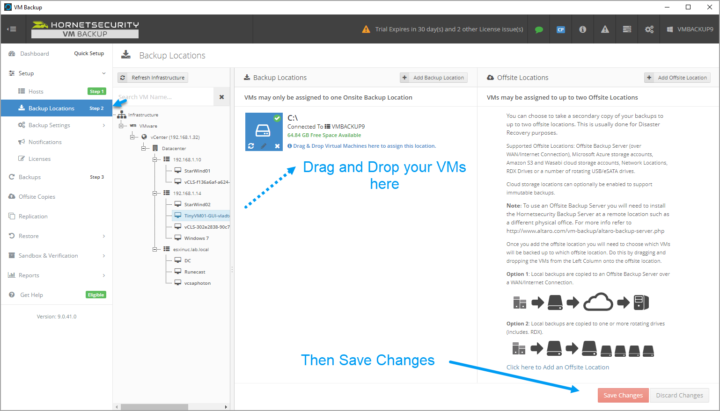
The following screen shows you that we can drag-and-drop some VMs from my lab to that storage location so they'll be backed up there. The “Save Changes” button needs to be clicked every time you make a change on every screen.
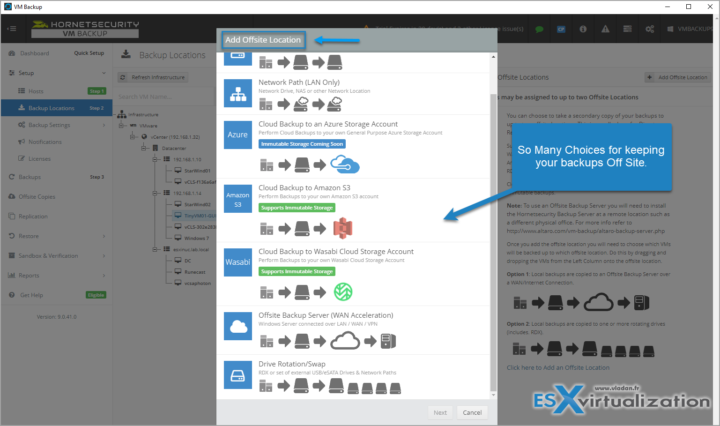
Offsite location can be added (or not) on the next screen. You can see that several options offer an immutability feature which allows you to send backups there which nobody can delete during a certain period of time. Just perfect to protect them against ransomware.
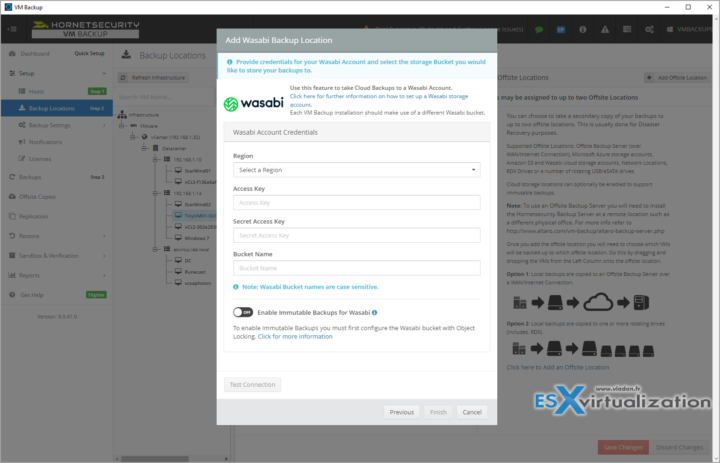
Immutability to fight Ransomware – As an example, Wasabi storage connection allows you to select the region, you'll need to provide an Access key (that you'll find at Wasabi when creating your storage bucket).
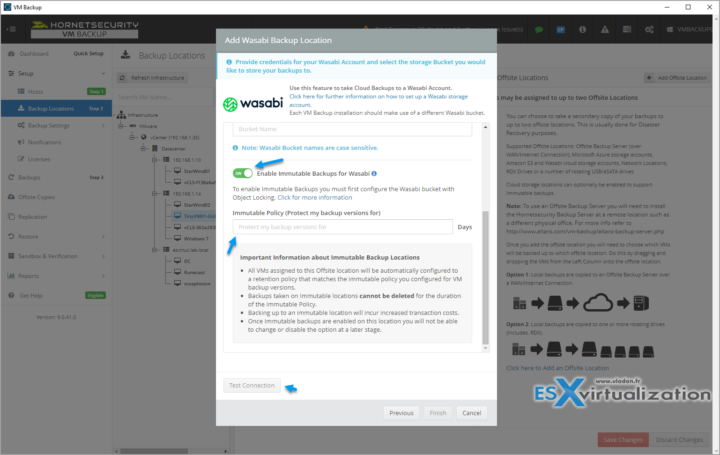
Below, you can see the Wasabi object storage where you can enable the immutability during certain period of time (days). The reason that immutability is so important is the fact that the when you, let's say set this for 30 days, it means that those files will be protected and undeletable during this period. Absolutely nobody (including you or your co-worker admin) will NOT be able to delete those backups.
Imagine you have a ransomware spread on your local network and this ransomware just encrypts or deletes everything that it finds on the local or remote networks. Great, right? However, it will not be able to delete those backups protected by immutability.
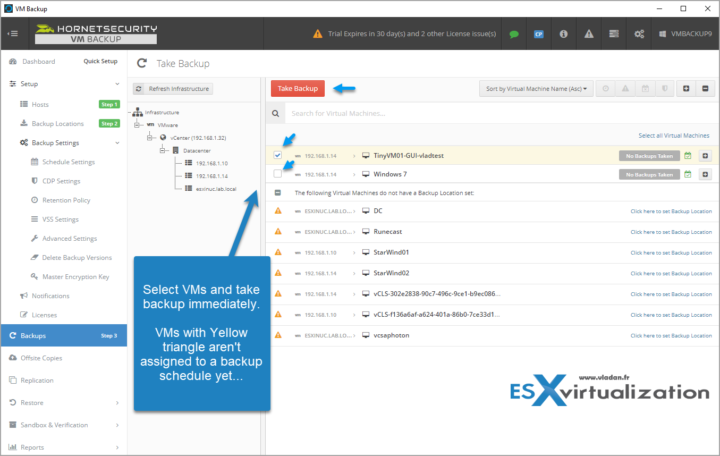
On the next screen, we have checkboxes next to our VMs, as well as a big red “Take Backup” button. You can go and quickly backup some VMs you want to do immediately, but usually, you first need to configure things such as backup schedule, retention policy etc…..
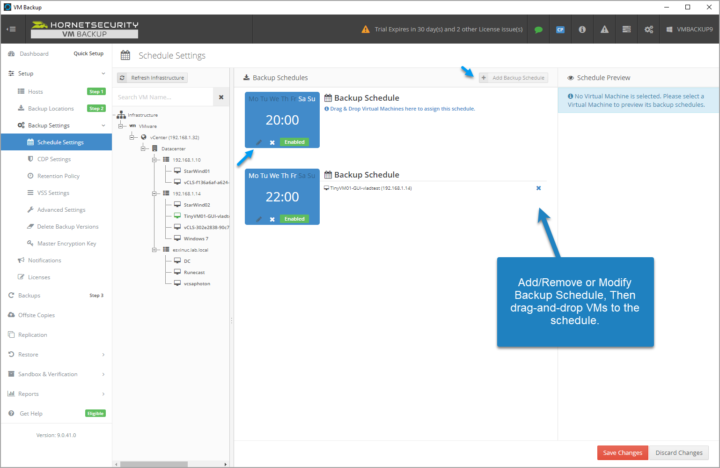
Backup Schedule – And that's what we will do here. We have 2 schedules that comes pre-configured. You can modify the existing schedules, add new ones, it is up to you. Again, drag-and-drop is your friend here. Simply pick your VMs that you want to assign a schedule to, and drag them to the desired schedule.
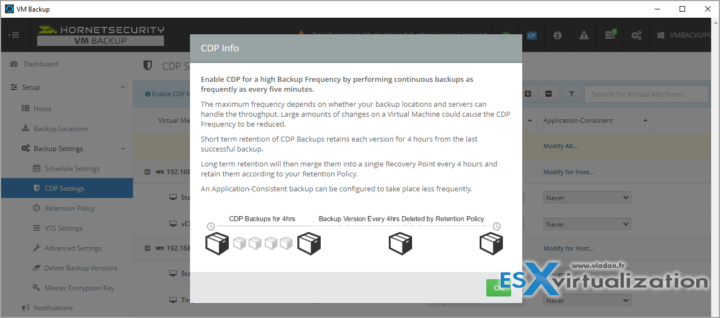
CDP Information – After setting the schedule, if I continue to explore the menu by going further down, we have CDP Settings. CDP allows you to have the lowest RTO, but also consumes more storage for your backups and puts more pressure on your underlying storage infrastructure. So use it with caution and sparingly.
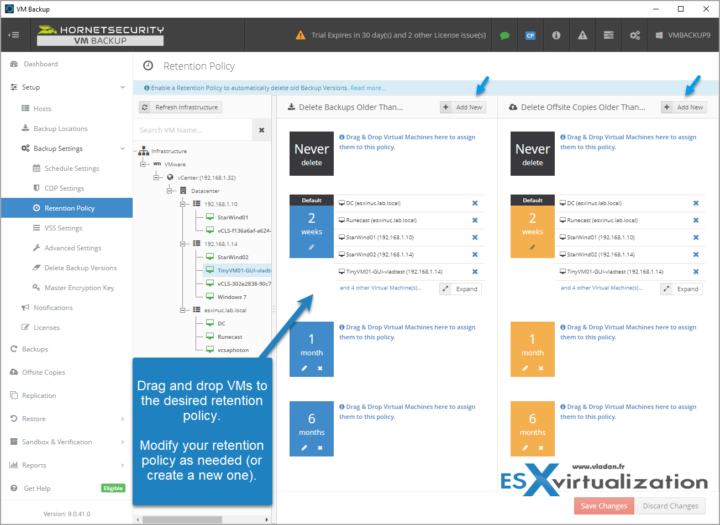
Retention Policy – this is where you set for how long you want to keep your backup file. You can set this for your main storage location as well as for your Offsite storage location. Again, predefined retention policies will simplify your choice, but if that's not enough, you can modify them or create new ones.
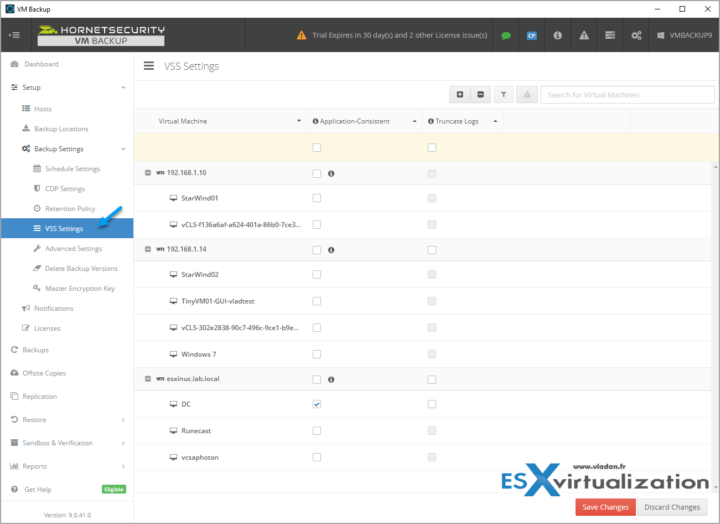
VSS Settings – A VSS allows you to make sure that your application running inside of your VM, will be consistent, after a restore. You certainly don't want your database to be corrupted after restoring your VM. You want data consistency, which means that the information for the application or file is complete and not corrupted so that when it is restored from a backup, it works as expected.
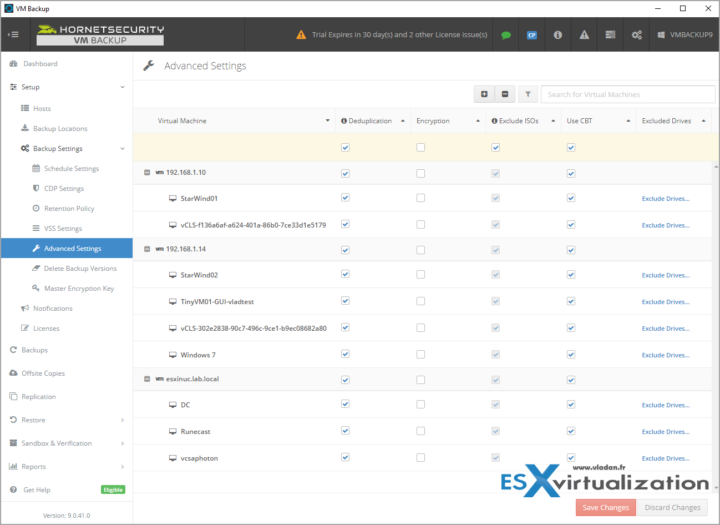
Advanced Settings – this section allows you to set Deduplication, encryption, exclude attached ISOs and use CBT (checked by default). Deduplication allows you to save some significant storage space (checked by default). Exclude Drives (last column) allows you to skip backup of certain virtual disks which might be useful for particular situations.
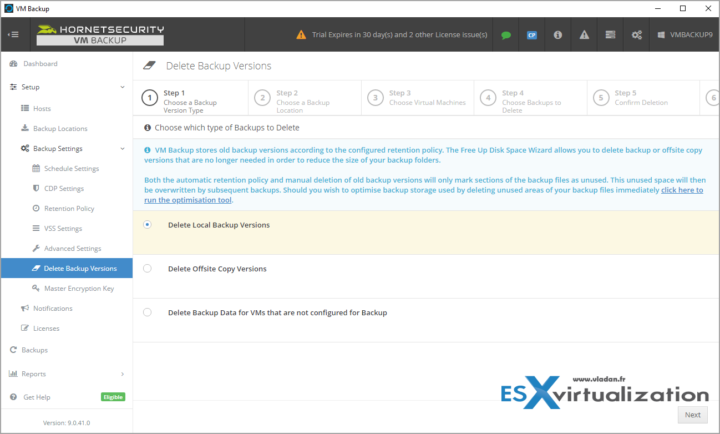
Delete Backup Versions – this setting will allows you to accomplish some maintenance tasks allowing you to free your backup storage by deleting some local or offsite copy backup files that are no longer needed.
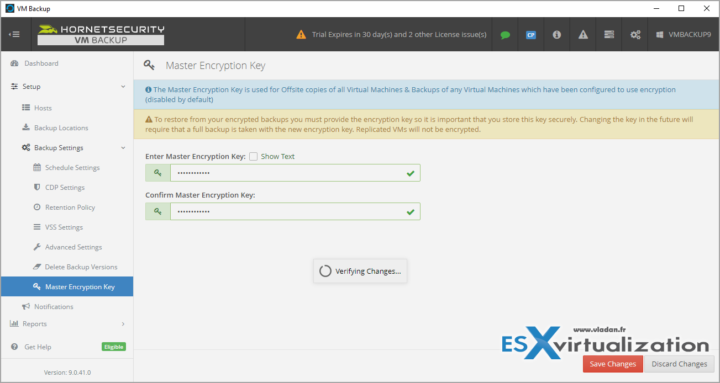
Encryption Key – If you want to use encryption, you'll need to setup a master encryption key. By default, this is disabled. After enabling, note that you will need to provide the encryption key in order to restore from your backups.
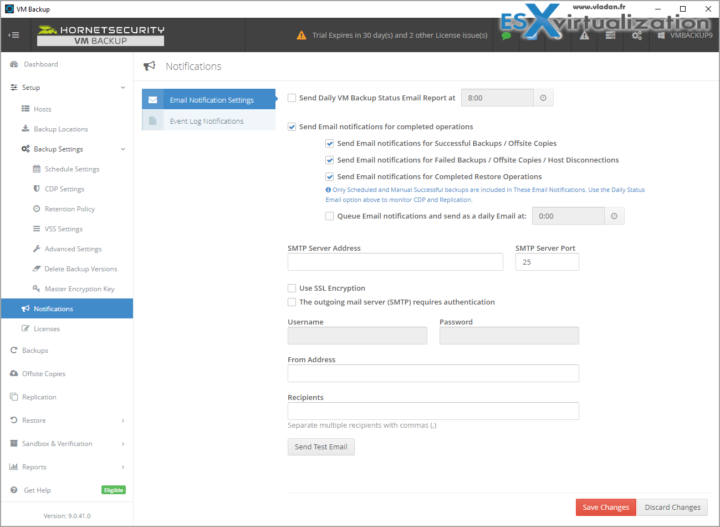
That's it for the backup job configuration itself. Next section allows you to configure notifications via email. You can also get a daily VM backup status email that sums up the activity of the day before.
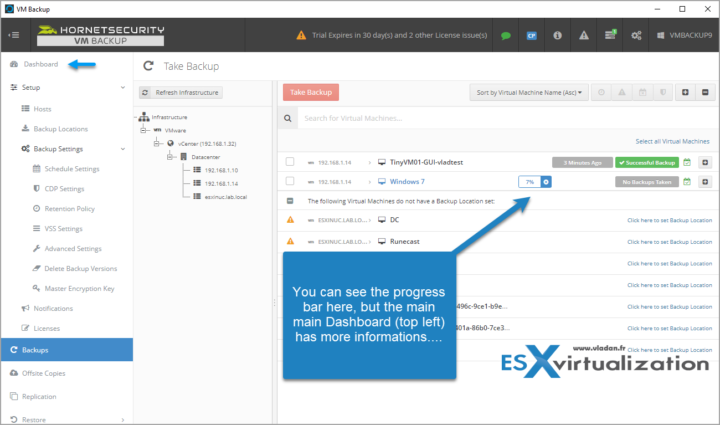
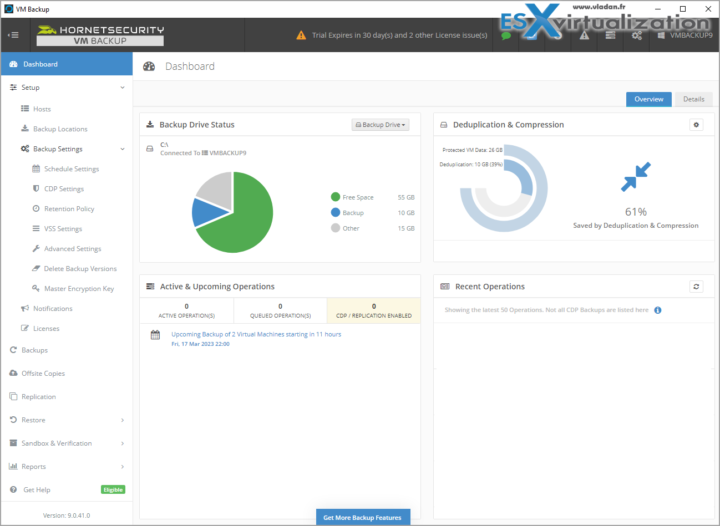
Monitoring and Activity – You can monitor your backup progress from multiple locations. One of them is from the Backups section menu. You can see which VMs have been backed up or which are backed up right now. But the best for this is probably the main Dashboard.
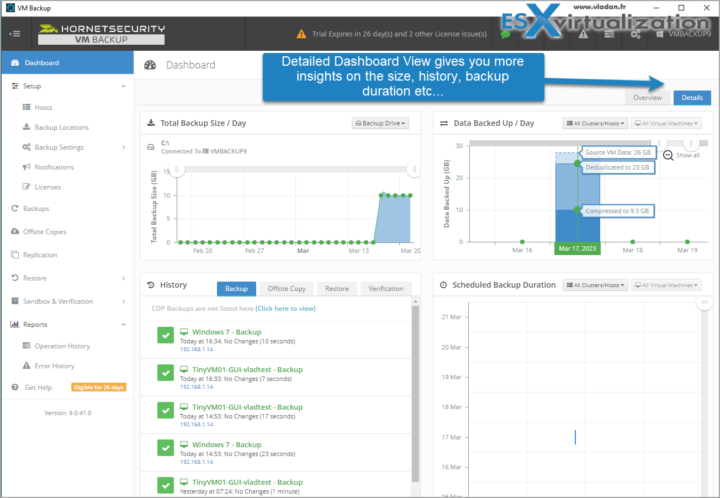
The Dashboard – the main dashboard has all the activities. You can see the space you have in your principal storage, how much of the storage has been saved by deduplication. You can also see the active and upcoming operations, as well as a history of backups or replications. We'll come back to the dashboard as there is more cool way to explore the details.
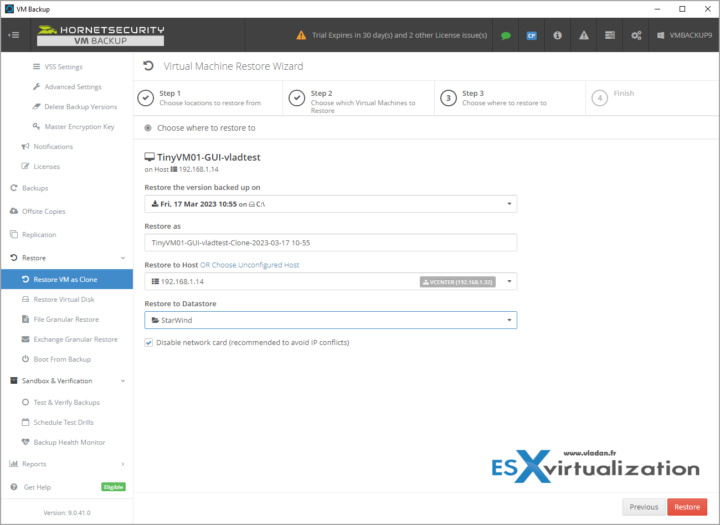
Restore Options – you can restore your VMs as clone. Useful when you want to keep your original (possibly infected VM or VM which does not start properly) still within your infrastructure. VM Backup software will restore this VM with a different name (usually by adding “clone-year-day-time” section after the VMs name). Simple, efficient.
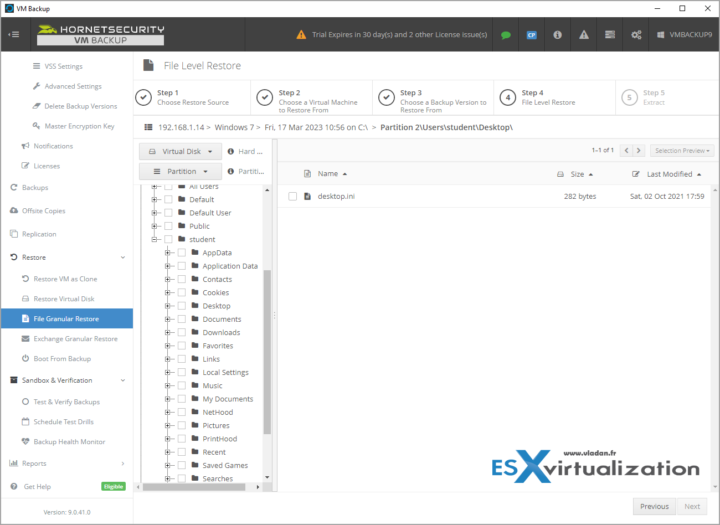
File Level Restore – if you just need restore some folder full of files or individual files that has been deleted by accident, you can of course use the File Granular Restore menu. The system allows you to select the VM's virtual disk from which you want to restore those files and then you can pick the location to where you want those files to be restored to.
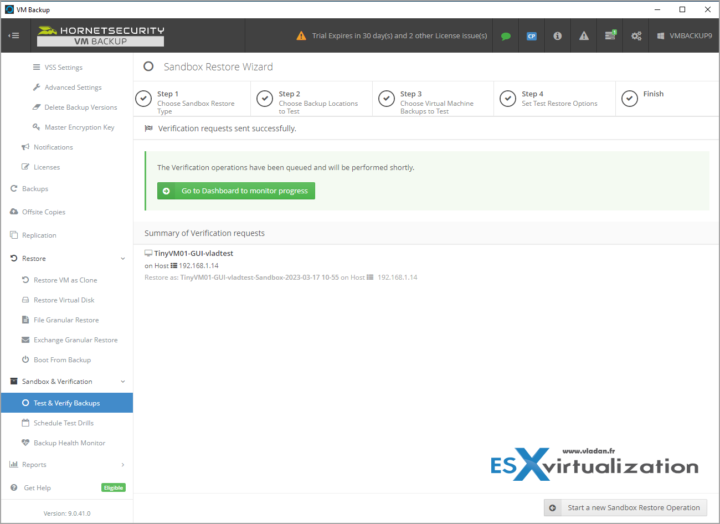
Test and verify Backups – you can test and verify your backups and schedule this feature on let's say, daily basis. That's great for checking up if what you backing are up is actually recoverable, right?
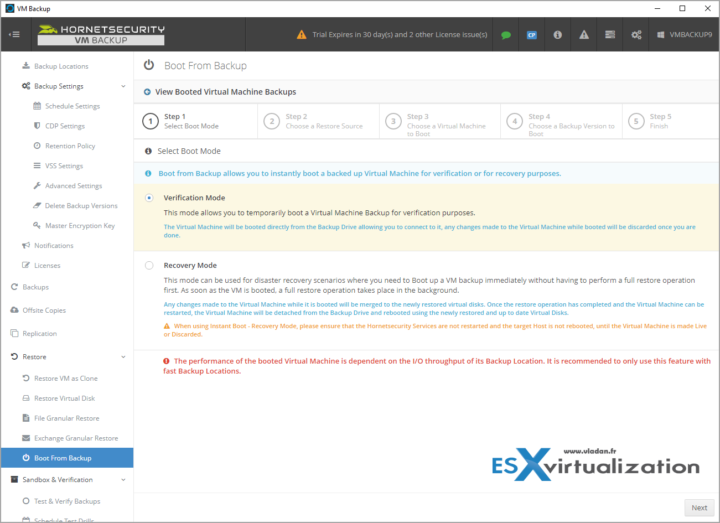
The verification options provide the possibility to recover and boot the VM in:
- Verification Mode – VM is booted after restore.
- Recovery Mode – the VM is booted from backup without restoring it first. (good for large VMs that take a long time to restore).
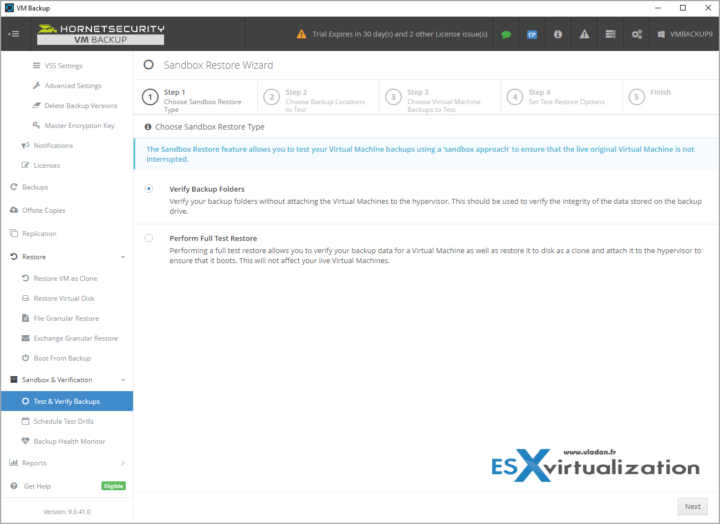
Sandbox restore type allows two options:
- Verify backup folders – the system simply checks the integrity of the data that is stored within the backup files
- Perform Full test restore – this option does a full restore that verify all data of the VM and restores the VM as clone and boot it up.
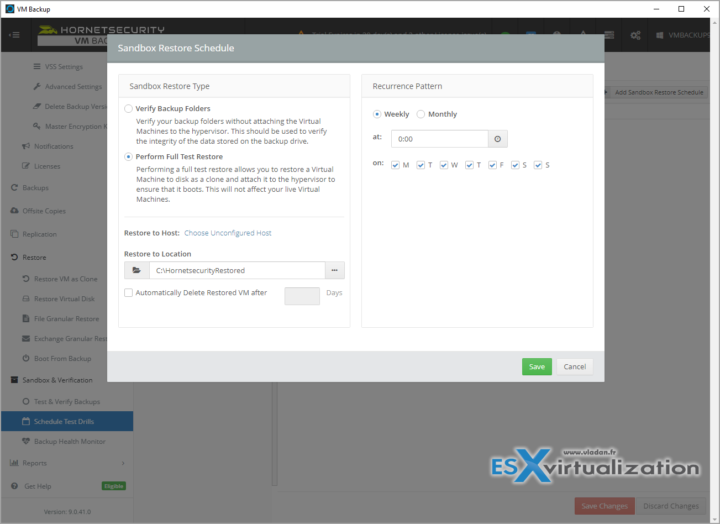
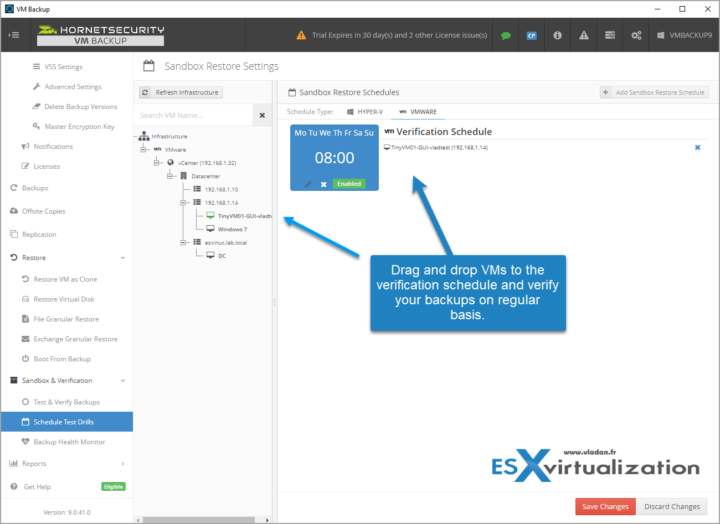
Sandbox Restore Schedule – this option will allow you to set a schedule for testing your restores on a regular basis. This is actually pretty good as you can check the box “automatically delete restored VMs after “x” days.
You can keep let’s say 2-3 days your restored VMs and still do a manual test if needed. Remember that you’ll have the email reports that will notify you how the restores went anyways.
And again our drag-and-drop to schedule allows quickly set things up. I’d recommend this to test first on small number of VMs, to see how this works, if it’s useful, before going “all-in” and being completely buried with tons of emails on verification jobs.
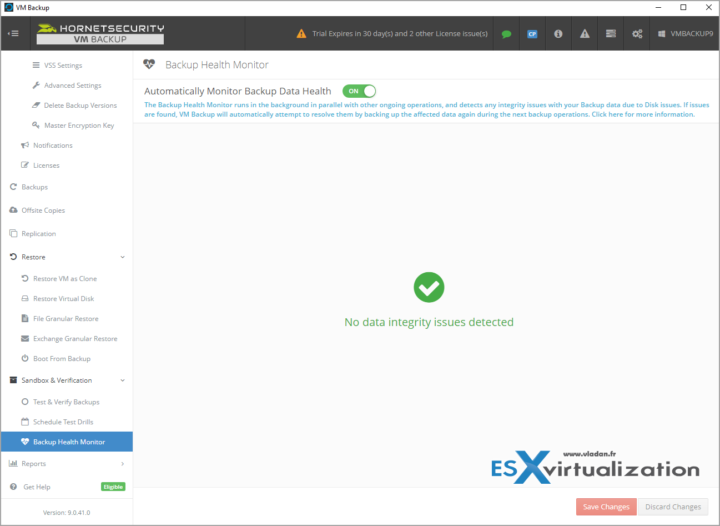
Backup health monitor simply sets a service that inspect the data and verifies in a background, the integrity of your backups. By default, this feature is ON.
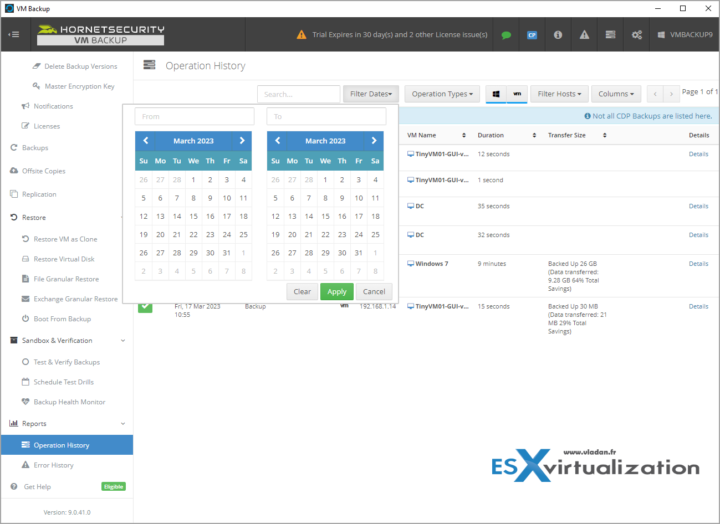
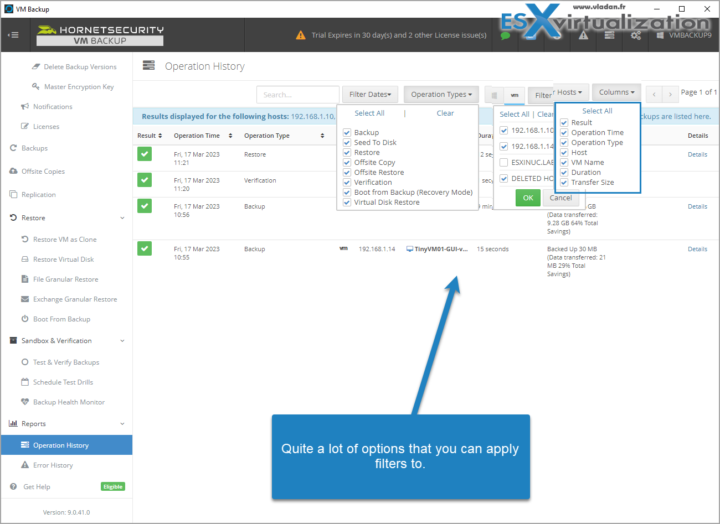
Reports and Operations History – this section allows you to look for a particular job, particular VM or particular operation during a certain period of time. You can select the infrastructure, the operation type, filter by host(s) or result.
Those filters are really powerful and fast. Check the image below for different selections with checkboxes.
Main Dashboard details – as I mentioned above when talking about the dashboard, we have a more cool way of exploring the backups and what happens within our infrastructure. Simply switch to Details, and you can see some cool sliders and overlay graphs.
When you put your mouse across the chart, it shows you more detail on what's the source VM backup size, and how much is the deduplication and compression saving of your storage space. How cool is that!
The left section allows you to explore the storage repository occupation. Note that in my case, I don't have much data to show you as I only installed the trial today, so not much history, but you get the picture.
When you download VM Backup v9, you have 30 days of trial you can play with so quite a lot of time. Just make sure that your server has enough local storage so you can actually really test the performance and overall efficiency of the deduplication and compression.
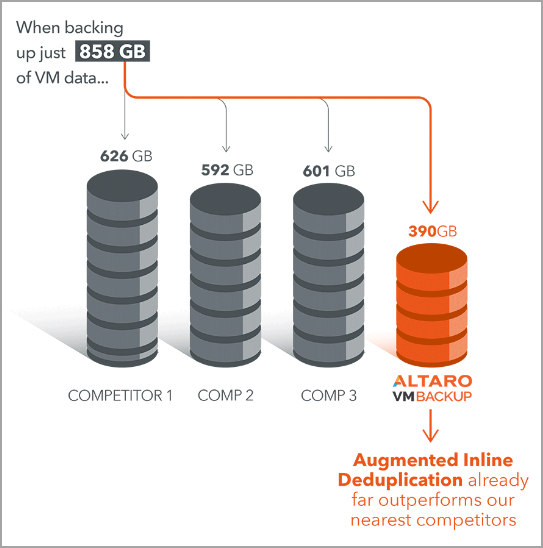
Hornetsecurity VM Backup V9 and Augmented Inline Deduplication – The deduplication runs across all backup jobs, you don’t need to group virtual machines together (no use of post-processing).
Augmented Inline Deduplication means that common data is only transferred once. This process happens inline and not as a post-process like many other backup vendors.
Only changed data blocks are sent to your backup repository rather than removing the identical data after the transfer. As a result, the speed of backups is superior (you transfer less data to the repository), reduced backup time, and also reduced backup size.
This picture that I like a lot is from Hornetsecurity. It shows the main difference in size of backups.
Final Words
User Interface The user interface of Hornetsecurity VM Backup V9 is intuitive and easy to navigate. The software is designed to be user-friendly, making it easy for even non-technical users to perform backups and restores. The dashboard provides an overview of all backup jobs and their status, making it easy to monitor the progress of backups and ensure that everything is running smoothly.
The user interface also includes a range of customization options, enabling users to configure backup schedules, retention policies, and backup storage options. This level of customization is particularly useful for organizations with complex backup requirements, enabling them to tailor the software to their specific needs.
HornetSecurity VM Backup v9 is competitively priced, with a range of pricing plans to choose from. The software is available as a perpetual license or as a subscription, depending on the needs of the organization. The perpetual license provides a one-time payment for the software, while the subscription model enables organizations to pay for the software on a recurring basis.
The software is also available in different editions, with each edition providing different features and functionality. This enables organizations to choose the edition that best meets their backup requirements and budget. You can use the online calculator to see the best option for your environment. Hornetsecurity VM Backup v9 comes with a range of support options, including phone and email support, a knowledge base, and online documentation.
My conclusion is that Hornetsecurity VM Backup V9 is a powerful and reliable backup solution designed specifically for VMware vSphere and Microsoft Hyper-V platforms. The software offers a range of backup and restore capabilities, including incremental backups, individual file and folder restores, and full VM restores. The user interface is intuitive and easy to navigate, with a range of customization options and reporting capabilities.
More posts from ESX Virtualization:
- Homelab v 8.0 (NEW)
- vSphere 8.0 Page (NEW)
- Veeam Bare Metal Recovery Without using USB Stick (TIP)
- ESXi 7.x to 8.x upgrade scenarios
- A really FREE VPN that doesn’t suck
- Patch your ESXi 7.x again
- VMware vCenter Server 7.03 U3g – Download and patch
- Upgrade VMware ESXi to 7.0 U3 via command line
- VMware vCenter Server 7.0 U3e released – another maintenance release fixing vSphere with Tanzu
- What is The Difference between VMware vSphere, ESXi and vCenter
- How to Configure VMware High Availability (HA) Cluster
Stay tuned through RSS, and social media channels (Twitter, FB, YouTube)

