If you haven't read my series about Ravello, you should start here – How to create a simple VM in Ravello? Ravello allows not only build an environment from scratch, but you can also upload your own VMs to Ravello so you don't have to create everything (by using a VM Import Tool). Today we'll show a quick tip on how to Add an RDP connection to your VM. RDP is usually not necessary because there is the Ravello web-based console, but some people prefer RDP.
Ravello offers a cost-effective way to build your own lab without buying costly hardware is the way to learn new technologies. Ravello allows not only build traditional VMs which are manageable through the proprietary web-based console but as every cloud service, you can also simply configure RDP connection to your VM to get you started. You're billed only when your VMs are On. If you don't configure your VMs to run forever, they just stop after 2 hours. considering that the environment is up there and just needs to be started when you want to progress through your learning, it's enough to log in 10 min before starting your training so everything can boot up correctly. The billing is quite cheap, a couple of bucks, depending on how many VMs and which resources you're asking for.
How to configure RDP for your VM in Ravello Cloud
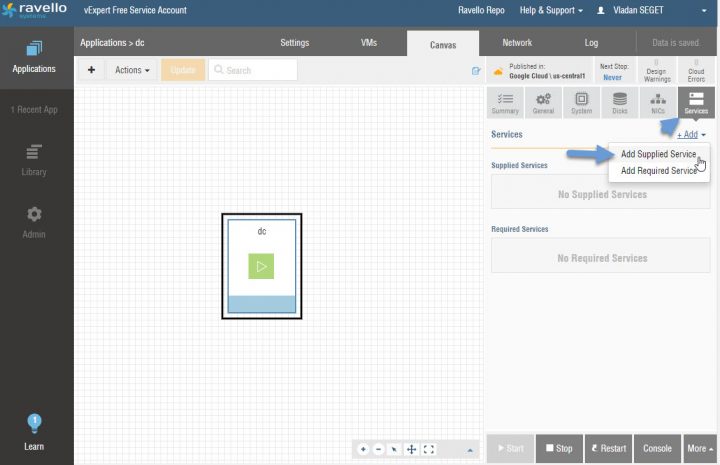
Ravello has a system of supplied services that can be configured for each VM. Those services can be After login to the console. By default, there are no supplied services. You can add one by going and click the Services button > Add Supplied service.
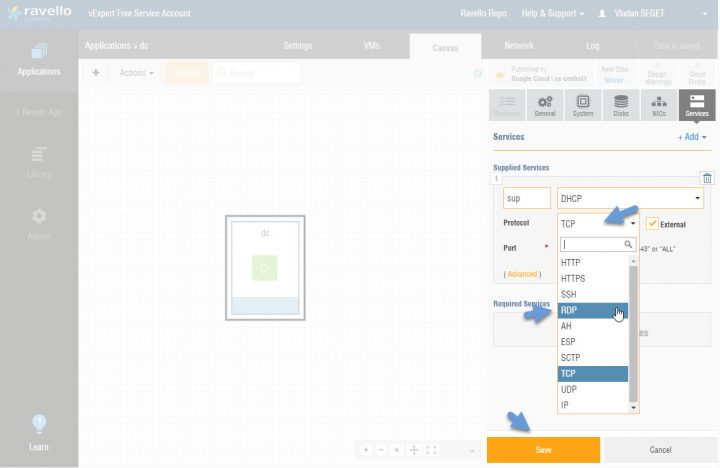
This Brings an overlay window allowing you to chose a service from a drop-down menu. Pick a service (in our case it's RDP, but there are many others). As you can see, all the design grays out. This is something that you have to deal with whenever you do a change to your VM. You'll have to hit the Save button.
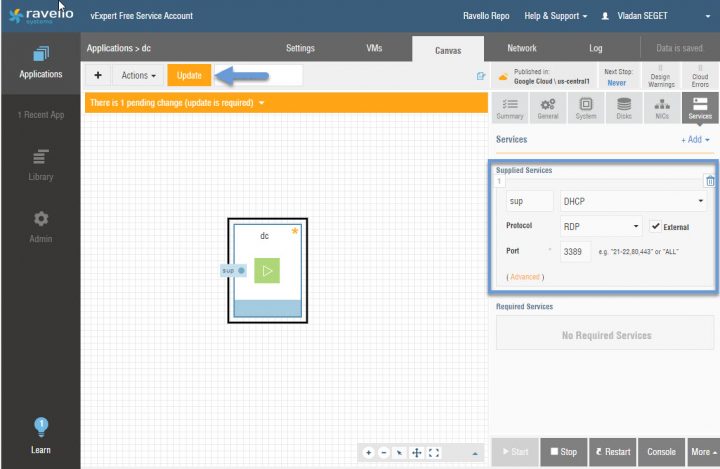
And then also the Update button. This is, as you can imagine, the way the configuration files are getting changed and updated. It works the similar way as within a vSphere client where you can change the VM's content (add a vNIC or Add a new disk) you have to validate too. Through Ravello, it's done via Two buttons (Save and Update).
Enable the RDP Service in your VM
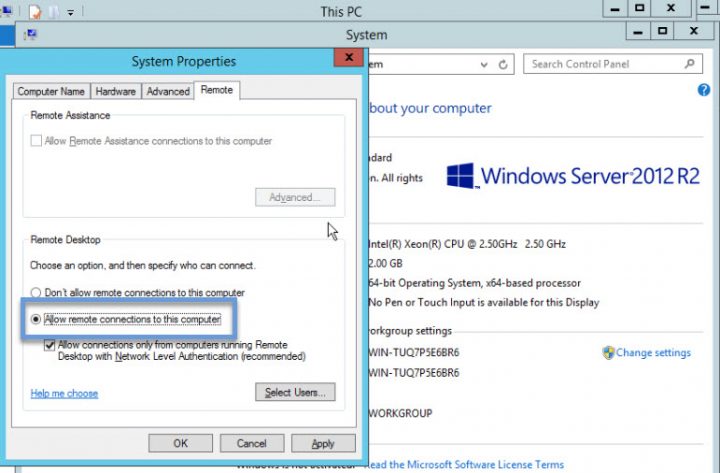
Now, this is just the first part. The second part is to enable remote desktop service in your VM. I guess you know where it is….. Depending on your OS, but for example for Windows Server OS it's in the System properties > Remote tab. Simple, right. I'm sure 9-year-old boy knows it…
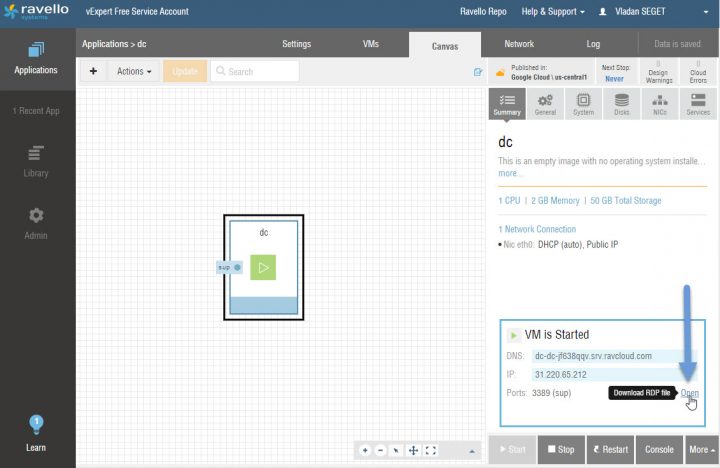
See below to download the RDP connection file.
Now that we have configure both sides we can now connect via RDP. Simply download the RDP file to your computer (to your desktop for example) and then execute it. You should connect directly to the VM.
Quick tip on cursor lag
If you're using the Ravello console, you might experience a cursor lag problems. If you haven't done yet, install VMware tools in the VM.
Quick tip on best performance
By default, the networking is e1000 and the IDE disk drives. (depending on a type of VM). In order to get the best performance, you can change it to use para-virtualized drivers (VMXNet3 for the network and LSI Logic SAS or PVSCSI). You can “trick” the via two steps:
- First – Add small second hard disk to your VM and configure it with PVSCSI adapter. Bring it online and format, as usually. The System detects the new Hard drive and installs the driver.
- Second – Stop the VM and change the adapter from IDE to PVSCSI. The VM should see the disk and boot normally.
And new update:
Update: New Post – Ravello Bare-Metal Option for VMware VMs
Ravello serie:
- How to create a simple VM in Ravello?
- How to Get Started with Ravello Systems – VM Import Tool
- Run Nested ESXi in AWS or Google with RavelloSystems
- How-to Install VMware Tools on VM which runs in Ravello Cloud?
- How-to Assign a Public IP Which Persist Across Reboots for Ravello VMs
- How to configure RDP for your VM in Ravello Cloud – (This post)
- How to create a multi VM application In Ravello
- How to Hot-Clone a VM and upload to Ravello Cloud
Enjoy.. -:) Stay tuned through RSS, and social media channels (Twitter, FB, YouTube)

