VMware has productized one of their best Flings – VMware OS Optimization Tool (OSOT). If you have been around a long time enough you certainly remember this tool as a Fling, but no more. VMware has officially made it available within the Customer Connect portal. I think this tool is one of the Best Desktop Performance Optimization Utilities.
While VMware builds this tool in the first place for VMware Horizon as an optimization utility for VDI, you can also use it to optimize your desktop or laptop systems. It's easy to use and you can revert back to the original state if you need to. Also, you can copy the built-in template and edit the copy so it fits your needs. Really handy.
You can optimize Windows 11, Windows 10, Windows Server 2019 or Windows Server 2022. Windows OS Optimization Tool for Horizon optimizes virtual desktops and RDSH servers for Horizon, and Horizon Cloud.
Quote:
This Fling has been replaced by an official product release with the Windows OS Optimization Tool for VMware Horizon. Version 1.0 (2111) can be downloaded from VMware Customer Connect. VMware will not be responding to comments any longer because this Fling is no longer being updated.
Note: The official release does not support Windows 7. But there are good news. If you're still using Windows 7 within your environment on desktops or laptops, you can still download an older version from VMthe ware Fling site.
The Windows OS Optimization Tool for Horizon is not compatible with Windows 7, 8.1, Server 2012, Server 2012 R2, and Server 2016. An older version of the OS Optimization Tool (b1130) is available to download from the VMware Flings site to use on these OS versions.
There is no Installer
Yes, it's only a single executable file you have when working with this tool. This is handy as you don't have to mess with installation/uninstallation or updates. After copying to your test system, just execute it.
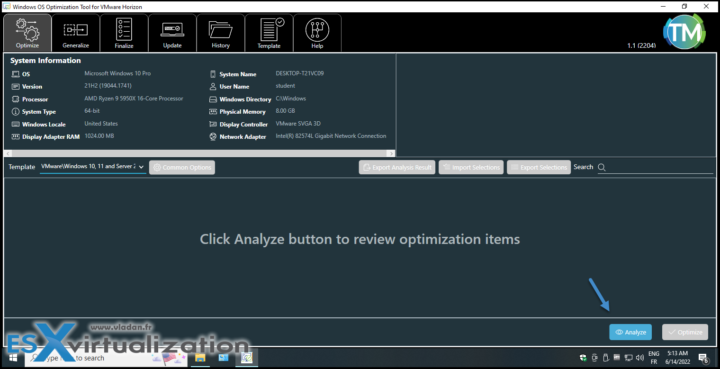
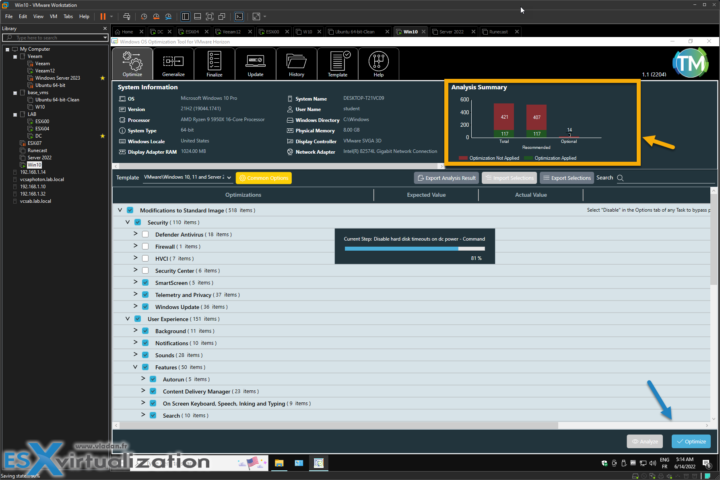
The optimization process can be done in 3 phases:
Analyze
Optimize
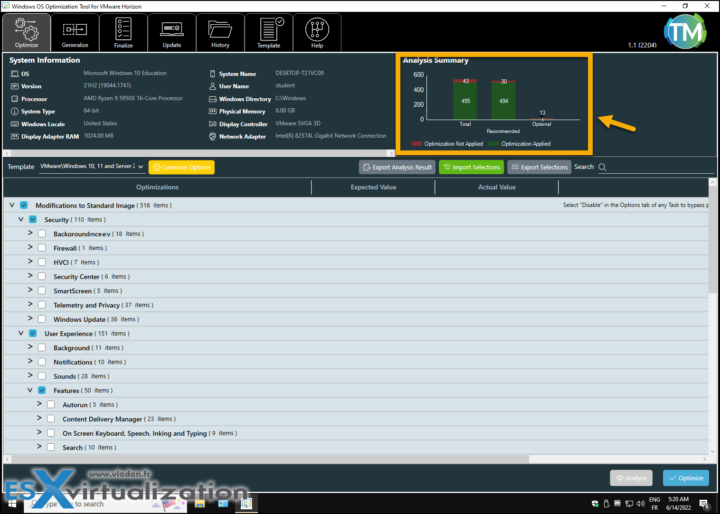
Reboot and click once more the Analyze button. Then check your optimization results…. You'll see an a difference within the summary window showing you how many services and registry entries has been optimized.
In the end, your system runs smoother because it's “lighter” without unneeded services and applications. It uninstalls Microsoft store applications by default too. The Operating system then consumes less CPU and memory, as well as takes less space on the disk (when you optimize physical systems) and your VMDKs are smaller.
Advantages of Performance Optimizations
From my own experience and also what VMware says about this tool, I can say that it is a must-have utility. You will see some signifficant time savings for user logon time.
Quote from VMware
User Logon Time Savings – When a user logs on, the portion of logon time devoted to creating a standard user profile can take up to 30 seconds, but when optimized, this portion of logon time could be reduced to 3.5–10.5 seconds.
Host Memory Savings – A default deployment can use up to 2 GB of active memory, but with optimization, memory requirements can be reduced significantly (up to 50 percent).
Host CPU Savings – An optimized deployment can reduce CPU usage by up to 40 percent, allowing for up to a 40-percent increase in VM density on the physical vSphere host.
Storage and IOPS Savings – Because of the earlier-mentioned disk-space savings, you realize cache-usage improvements as well. Deactivating unneeded features and compressing the OS files means a larger portion can fit in the cache, which can reduce the amount of IOPS required by up to 250 percent.
As you can see, this is pretty signifficant.
Things to know
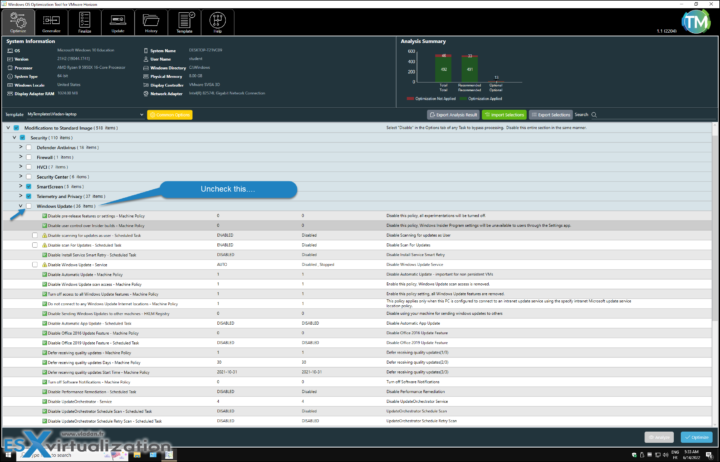
Out of the box, the default template will stop Windows Update. It's in purpose because you don't want to have your virtual desktops to to its updates as they wish, but you want to be in control and rather update your golden image and re-deploy. Right?
So if you're optimize your physical systems such as laptops/destops for you or your coworkers, just keep this setting unchecked. The best is to clone/copy the VMware default template and adjust it to fit it to your needs.
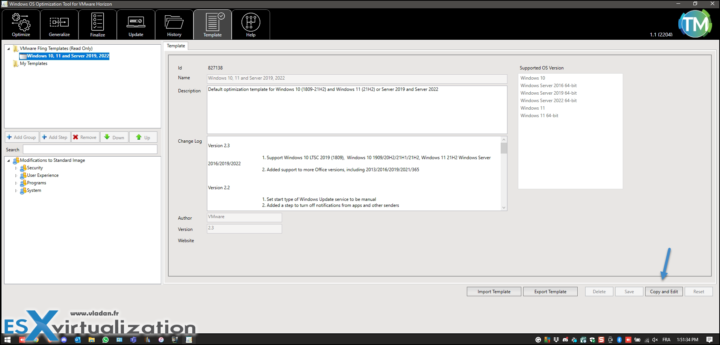
So in my lab example I just created a “vladan-laptop” template by “Copy And Edit” action button.
Then you can select the template and uncheck the checkbox next to Windows Update to keep the Windows update available for you. If not, it will be disabled by this default template.
If you're for optimization of your VDI, you can also use other tools with OSOT.
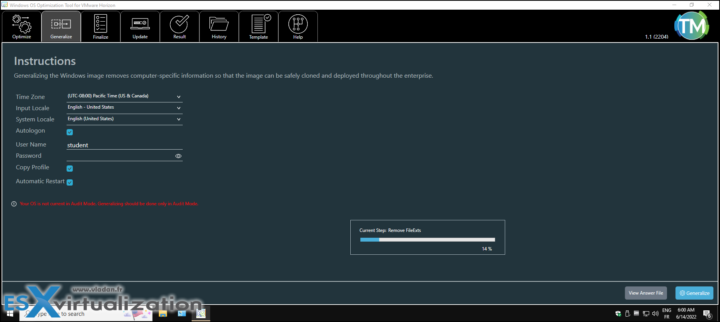
The Generalize Tab is used for running sysprep
Use the Generalize tab of the OSOT to run the system preparation tool (Sysprep) with a supplied and editable unattend.xml answer file.
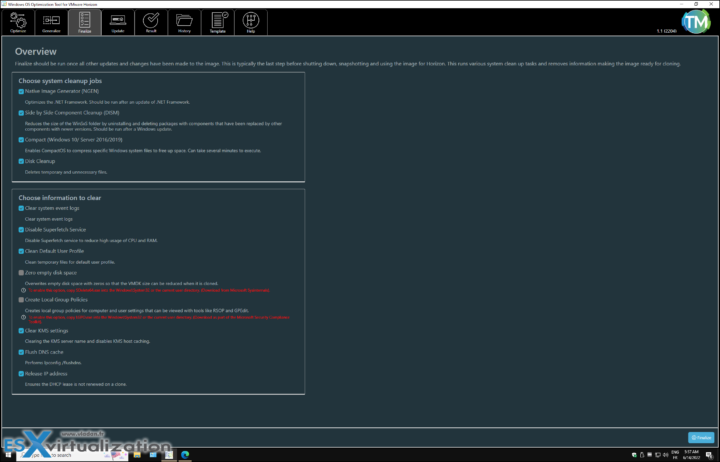
With the OSOT, you can also use the Finalize tab to run the following tools:
- Native Image Generator (Ngen.exe) – Improves the performance of managed applications.
- NTFS Compression (compact.exe) – Saves space on the Windows image by running the operating system and other system files from compressed files. This strategy reduces the number of IOPS required for storage with cache and has a negligible impact on the CPU.
- Deployment Image Servicing Management (DISM.exe) – Cleans unused files from the Side by Side component store.
- Local Group Policy Object Utility (LGPO.exe) – Manages local group policy.
- Secure Delete (sdelete64.exe) – Provides the ability to overwrite empty space with zeros.
The best if you're using VDI within your environment, is to check VMware documentation on that matter as this blog post has limited possibilities of covering all here.
Using Automation
VMware recommends using automation, when building your Golden Images.
Follow this guide to:
- Download Windows Assessment and Deployment Kit (ADK)
- Select the features you want to install
- Download the Windows Preinstallation Environment (PE) ADK Add-on
- Install Microsoft SQL Server (basic installation type)
- Install Install the Microsoft Deployment Toolkit (MDT)
- Install Windows Deployment Services
and configure the whole package …. Yes, the setup is a bit time consuming as you see, but if you're re-building larger infrastructures or planning to use it on regular basis, you might want to go this way.
Final Words
I really like this optimization tool as it is very fast, easy to use and has the revert back option which works. It allows quickly optimize a selected system without installing any software (can carry it with you on an USB stick for example). So any IT admin, technician or IT enthousiast should use it because it helps to optimize the performance of the desktop or server operating system. As being said, the tool can not only optimize Windows 10, but also Widnows 11 which is more “heavy”. The chances are that you're trying to run W11 and see the perfomance sinking because Microsoft had “loaded” a lot of fancy stuff you don't need. So Why not optimize it?
If you're just optimizing a physical system you won't use the Generalize and Finalize Tabs at all. You can even enable (or re-enable) Windows update via the Update TAB that has been made with a purpose to quickly enable Windows update > run it and update the OS > disable it again without messing with the templates at all. I think it's a must-have tool so I'm adding it to my Free VMware Tools page.
More posts from ESX Virtualization:
- VMware vCenter Server 7.0 U3e released – another maintenance release fixing vSphere with Tanzu
- VMware vCenter Converter Discontinued – what’s your options?
- How to upgrade VMware VCSA 7 Offline via patch ISO
- vSphere 7.0 U3C Released
- vSphere 7.0 Page[All details about vSphere and related products here]
- VMware vSphere 7.0 Announced – vCenter Server Details
- VMware vSphere 7.0 DRS Improvements – What's New
- How to Patch vCenter Server Appliance (VCSA) – [Guide]
- What is The Difference between VMware vSphere, ESXi and vCenter
- How to Configure VMware High Availability (HA) Cluster
Stay tuned through RSS, and social media channels (Twitter, FB, YouTube)

