Altaro is a young company which since recently in addition to Hyper-V backup they also have Backup for VMware environments – Altaro VM Backup 6 for VMware And Hyper-V Released. You can backup environments with (or without) vCenter. Today's post will show How to setup an Altaro Offsite Server which allows to have a second copy of your backups on another location. So it makes copy of your existing backup.
I already reported when testing their sandbox functionality allowing to schedule a restore into a sandbox environment on daily/weekly basis, automatically – Altaro Full Test Restore in a Sandbox. Today we'll have a closer loo at their management console. Yes, they have an independent management console which can be installed on your laptop for example.
How to setup an Altaro Offsite Server – What's needed?
The Altaro Offsite Server can reside on remote machine reachable through WAN or LAN. You'll need to download an add-on called Altaro Offsite Server – go to the download page. This page has not only this component, but also another component which is the management console we have mentioned above.
You'll need a Windows server machine to install the component there. In my case I quickly deployed a Windows Server 2012R2 on another host, on another cluster than the main Altaro backup server.
Step 1 – Run the altarovmbackupsetup_backupserver.exe file to start the installation.
Step 2 – Click the Connect button to connect to the local server…
Step 3 – Add Account by clicking the Configure Accounts menu
then click the Add a New account.
The Display name is a name which will appear in the main server UI so put a meaningful name there.
Step 4 – chose location on the machine for the backups. The VM in my case has only one disk…. Still, I created a separate folder for storing the backups. In case you're using Windows Server 2012R2 physical host you would probably use the built-in deduplication feature in order to maximize some storage space savings.
You can also specify UNC network path…
Now let's go back to our main Altaro server. Connect to your console and after the dashboard opens, we need to go to the Backup Locations > Add Offsite Location
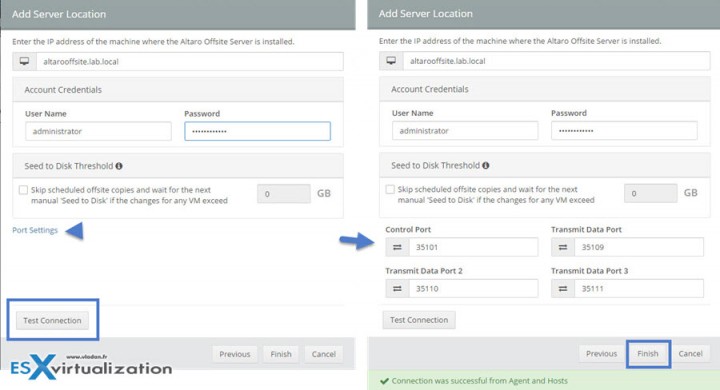
When clicking the button you'll have a layered pop-up window allowing you to specify not only the location of the Altaro offsite server but there are also other options:
- Physical drive – USB, eSATA, iSCSI or other internal drive
- Drive Rotation/swap – this can be set of external USB drives which will allows you to periodically rotate and send them to remote secured location
- Network path – this can be a NAS device or other network locations
- Altaro Offsite Server – this is the last option, the one we'll talking in this post
On the next page you'll need to provide:
- IP address or DNS name of the remote system
- login and password information
Very useful Test Connection button there….Note that you can change the default ports (if needed)
Note that you can change the default ports (if needed)
And the final screeen shows that the location we just configured has been added to the dashboard (when you're looking at the backup locations)
One last step – Yes there is one last step and this is that you have to specify which copies you want to have at this remote location. Just drag and drop a VM(s) that you want to store at the Altaro Offsite Server location. Do a drag-and-drop…. and then hit the red button Save changes.
Immediately after you'll get a prompt asking you to setup a new encryption key. So There is one more step actually.
Done.
Now if you already have some backup jobs you can just go to Virtual Machines > Take Offsite Copy and hit the Take Offsite copy button.
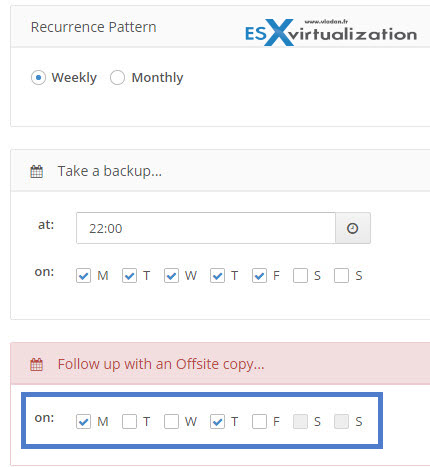
You can ofcourse schedulle those offsite copies by going to Setup > Schedules > Add a new backup schedule. Or
Or, even better because you certainly already have a weekly schedule so by editing existing schedule you can Follow up with an Offsite copy…
Now by curiosity let's go back to the Altaro Offsite Server as when we installed this there was a dashboard. Let's see what we can see there.
Nice. All details there. Note that the offsite backups can also be seeded. It means that you can manually copy and send the backups to the remote location and seed those backups from an USB drive for example. This in case that you don't have enough bandwidth between the main site and the remote site
Wrap-up:
The feature works as expected and we haven't found any problems during our test. The main advantage for the remote Altaro Offsite server is probably the fact that the speed of transfers is optimized through WAN Acceleration.
Check out other posts about Altaro:


