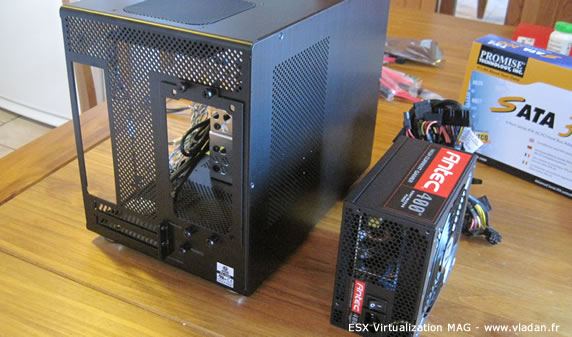
Pieces showed up with the UPS shipping, so …let's mount it !In the introductory part I wrote few days ago I presented you with the choices I took and why I went the way DIY (Do It Yourself) for my home lab for my shared storage for VMware vSphere Lab. Today I received all the parts I ordered on line and the transporter delivered to my house, so I can start to build my low cost shared storage for vSphere lab.
I started first to check if everything was in good shape at arrival, and then I started the unboxing all the parts. As I said in the previous post, at the moment I do not know what will be the power consumption or the performances of such a built device, but today I'll see if I can mount all the pieces together and if I did not took a wrong one etc… I'm not a genius either.. everyone does mistakes… -:)
The Mini Box has got 6 spare 3.5 bays, so If you want, you can go and have RAID 5 spindle with 6 Drives, which will give you more IOPS than having RAID 5 only with 4 Drives. But I went for 4 drives in purpose, since I wanted to reuse my 128 Gb SSD from Crucial I bought some time ago and which was mounted in my ESXi 4.1 Whitebox. The cooling will be done by 2 fans: the front large fan and the top Fan.
There is space for standard power supply inside, so I went for the Antec HCG 400 fits in without trouble. The Antec has got a large 135 mm fan, so there should not be a trouble with some additional noise.
The CD drive will be used only for installing the linux distribution onto the USB thumb flash device (Kingston 2 Gigs) and will be taken off afterwards. This also saves some watts… -:)
I downloaded both, Ubuntu Server and FreeNas. I don't know which one I'll keep, but I would like to test the performance for both, since as I said in previous article, the Ubuntu server has apparently twice better performance in writing…. To install the NAS with Ubuntu or FreeNAS just burn the ISO to a CD and boot the NAS from it.
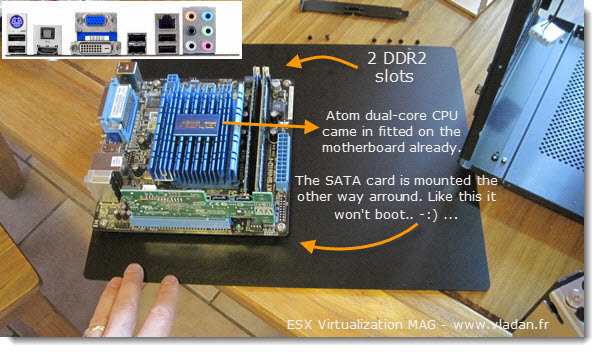
The box is quite small to work with and I don't really know which parts to mount at first. Finally I took off both side covers and started by mounting the Mini-ITX motherboard with CPU. You have a place for 2 DDR2 memory modules, one PCI slot. I took the PCI slot for my SATA extention card which gave me 4 more SATA connections. So I'm able to build software RAID 5 with 4 drives and have 2 more slots free. I'll probably use one of them for my 128 Gb SSD from Crucial, so I'll be able to have 2 different storage spaces. One high speed on the SSD and one one the SATA Raid 5.
The whole mounting took me maybee 2-3 hours, since there is not much space, I did not know which part to put in first. If the SATA drives or the motherboard. One thing was clear. I have to mount int the PSU as a last one.. -:), because if you put in the full size PSU you don't have any place for your hands to reach through in behind if you need to. Even to reconnect a single cable… So during the mounting process I ended up mounting/dismounting the PSU 3-4 times…. Sure, next time I'll do better.. -:).
Read the rest of the article on next page


Your NAS rocks mate!
Looking forward your IOmeter tests 🙂
BTW you should really consider Nexenta (free edition) to take advantage of your SSD disk for caching…
Rgds,
Didier
Just out of curiosity – did you considered using OpenSolaris or NexentaStor with ZFS…? this systems can take advantage of your SSD as log/caching device…
Also, AFAIK, FreeNAS supports ZFS too.
Tomasz,
thx for the info. That’s probbably has to be tested too…. -:)
Thanks for this setup. you gave an idea on how i will setup my nas