Installation and configuration of PHD Virtual Backup 5.1 for VMware vSphere.
PHD Virtual's product was not previously reviewed on my website. I'll walk you through the installation process which is very easy to follow and then I'll show you how to configure the product and eventually guide you to how-to restore a full VM or individual files.
In my small lab which I have at the moment I'm running ESXi 4.1 Update 1 on one whitebox with 12Gigs of RAM and SSD's and SATA local disks. No shared storage? Well, I do some magic with some storage virtual appliances before I make the move and buy myself a real NAS product (Synology, QNAP….?). But I'll blog about all this another time.
We better start with the installation of PHD Virtual Backup 5.1. The product is compatible VMware vSphere 4.x and also Citrix Xen Server, which makes it's usage interesting in companies which needs a backup product which can handle both environments.
So at first I went and downloaded a 14 days trial at PHD Virtual's website here. I would prefer them to propose 30 day's trials though, since 14 days is really short for evaluating, especially when you have a daily job like me.
The downloaded ZIP package is quite big (over 500 Mb) and after unzipping to your local hard drive you'll end up with an OVF deployment file and MSI package which is the vCenter Plugin.
Yes there is very neat plugin for vCenter which makes the integration of the product really pleasant to work with, because from within vCenter console you manage all your needs for vSphere.
As you can see, all necessary documentation concerning the installation and configuration of the product can be found after unzipping the file in the same directory. So the next step for me was to 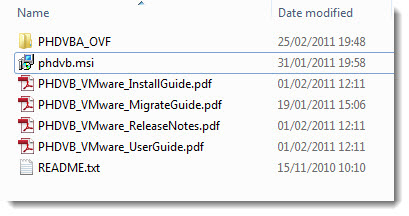
Well I have a vCenter running in a virtual machine and vSphere Client is installed on my laptop so I went and first installed the MSI package located in the folder where I first unzipped all files. The MSI package installs the management console to my laptop.
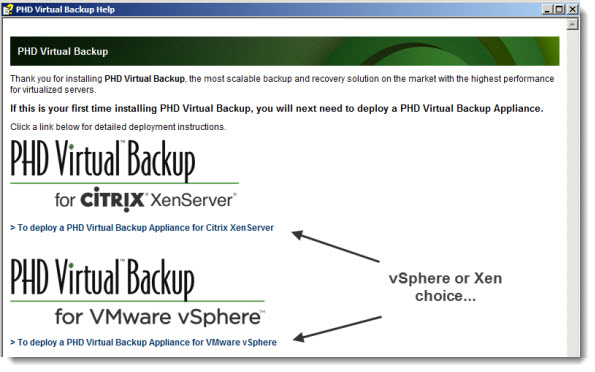
Right at the end of the installation I had a window showing me the possibility to choose between Citrix or VMware. Since I'm only running VMware vSphere at my lab, I went the second way.
So you can directly go and click on the link there or if you close this window you can go and in your vSphere Client from the file menu you deploy the OVF file which is located in the PHDVBA_OVF folder. It's a straightforward process.
By following the deployment assistant for the OVF package, you're asked about some further details concerning the name of the Virtual Appliance. I kept the default. This name – PHDVBA – will appear afterwards in your Virtual infrastructure while managing via the vSphere client.
Next screen was asking about the destination datastore, and also the format for the disk which will be created for the virtual appliance. And that was it for the OVF deployment assistant.
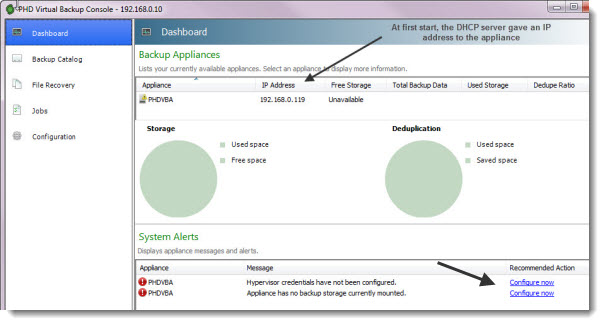
So we now have the appliance deployed and we need to start and configure the product. When I first started the product and accessed it from within right click menu in through the vSphere client, it showed me a screen where I could see what I needed to do.
But it's just for telling you that I did not run into any difficulties during the configuration process.
As you can see, the appliance took an IP address from my DHCP server, and at the bottom of the window you can see that it's complaining about not having the vCenter (ESXi) credentials and backup destination. Those 2 links were just asking for clicking them…
So I went and clicked one of those links. This open for you the configuration page with the General Tab. What were the options there? As you can see on the image below you must fill in the vCenter or ESX(i) hosts credentials there first, otherwise the appliance cannot function.
That was all concerning the General TAB. In the other tabs you'll need to go and configure the destination for your backups.
When I went and clicked on the Storage tab for example I could see that there was no destination for my backups and as you can see on the image below the appliance (through this console) was actually telling me.. Hey, you didn't configure the destination for your backups……
Now I knew what I have to do next. Go and create new virtual disk for my appliance. Now, normally you should to do it while the appliance is stopped but I knew that we can hot-add a disk to Windows Server 2008 VM, so I wanted to test if for example we can hot-add a backup destination in my case. So wait and read more……

This brings you a Virtual Machine Properties page where on the hardware tab you can add a new hard disk.
Since I'm installing this product only for testing I went and added a new 50 Gigs thin provisioned disk which I put on one of my SSD's where I had place. You can of course add much more and it's recommended to provision about the same space for the destination as your VMs needs for running.
If for example your production VMs needs 200 Gigs of space you go and create a backup storage at least with 200 Gigs of space. Because even if there is a deduplication process involved there which saves a lot of space, you must think of the retention policies which stores older backups there too….
You can see it on the image below the adding of the new virtual disk to the PHD virtual backup appliance. And this disk will be the destination of my backups.
So after I added the storage destination to the PHD Virtual Backup (PVB) appliance and then when I went back to the storage tab I could see that the color of the red message went green now… -:) The appliance has detected the destination disk and as you can see, now it's using the attached 50 Gigs disk. Easy.
The rest of the configuration was concerning the Fixed IP (if you want) and configuration of e-mail reporting.
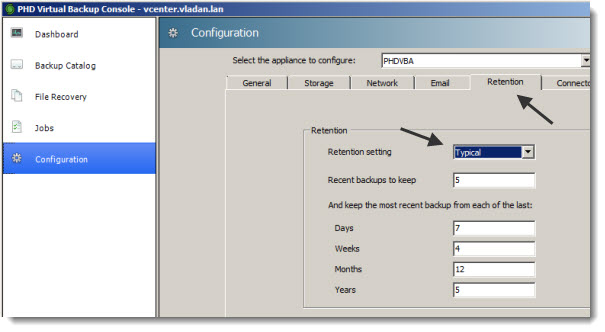
On the Retention TAB you have the possibility to configure how many backups to keep by choosing one of the pre-configured retention policies or you can enter your values there.
As I said, while all this step-by-step might seems quite long for you as a reader, please keep in mind that in reality it takes you no more than 5 min to complete those steps….
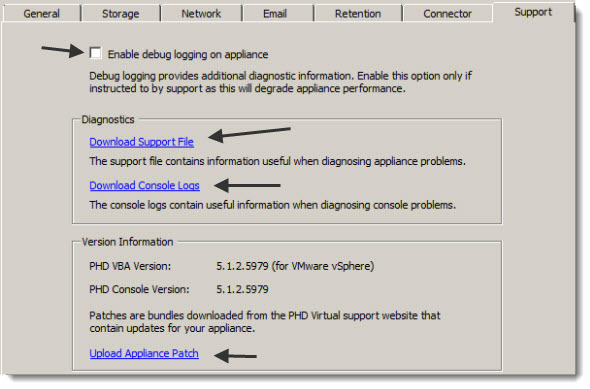
The Support TAB gives you a possibility to debug easily by providing you the links where you can click and download a support file or console logs. You're able to patch the appliance there too.
Let's configure some backups…..
Ok, now we went through the installation process and it's time to configure some backups. I deployed a freshly new Windows 2008 R2 server VM and we'll see how the backup performs…
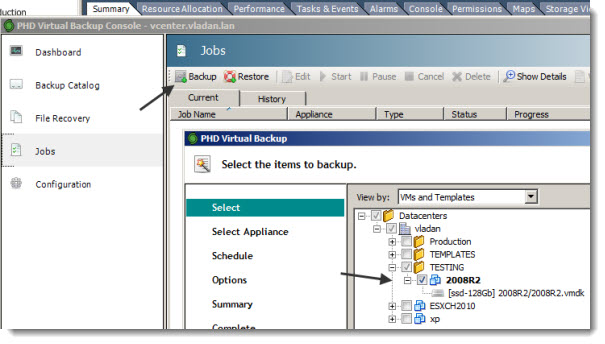
To be able to configure a backup job, you open the backup console of PHD virtual and choose the Jobs menu on your left. There you click the button Backup as you can see on the picture below.
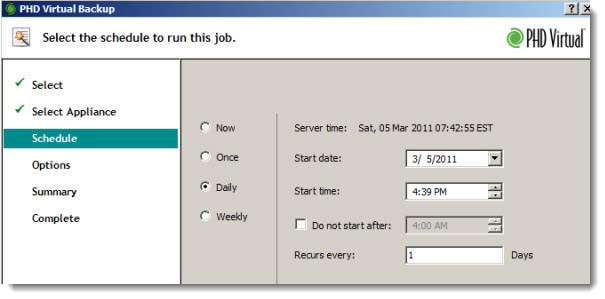
Other options are concerning the schedule where you can choose when the backups will run, how many times a week, month etc..
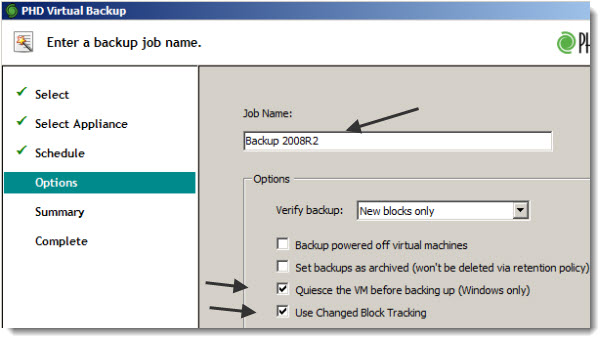
On another screen you have the possibility to use quiescing mechanism in windows VMs and also if you want to use CBT – changed block tracking – feature introduced in vSphere 4.0 which permits you to backup only blocks which changed since last backup. Please keep in mind that you must use a virtual hardware version 7 for this feature to work.
File level Recovery.
After the backup finished I wanted to test FLR feature. File level restore. You'll more often need this feature over the Full VM restore, since users more often are committing errors and deleting their files than a full healthy VM gets corrupted……
Now to be able to restore an individual file, first you must make sure that your system has the Microsoft iSCSI initiator installed. It's the case for Windows 7 and Windows Server 2008. If not, you can download for free the latest version from Microsoft here. If your system does have the initiator already installed, you go to the Start >Administrative tools > iSCSI initiator. Now why would you need to do this? Because the backup of my VM 2008 R2 will be opened as an iSCSI target, so I'll be able to see the system disk of that VM in the Disk Management console on my backup server (in my case it's my vCenter VM).
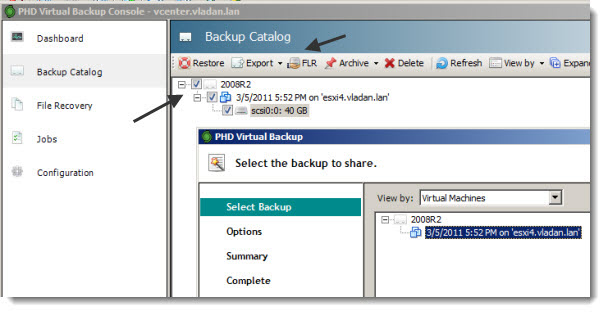
So here you go, as you can see, the Backup Catalog menu on the left shows you the current backups available for restoration. In my case I have only one.
By looking at the File Recovery menu I saw the iSCSI Target which I had the possibility to mount as an iSCSI disk. Note that if you did not install the iSCSI initiator and the iSCSI service isn't running you might end up with an error or you won't see that screen at all.
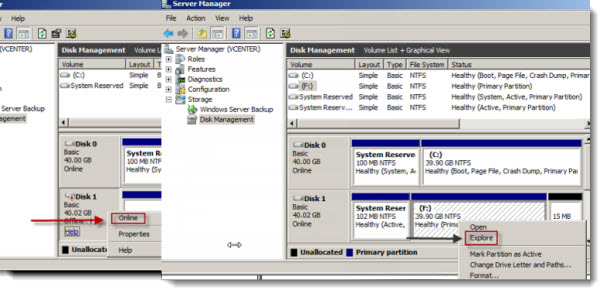
In my case I had to go to the disk Management snap-in and bring the disk Online before it got assigned a letter. Once done, you don't have much left before possibly recovering your lost file.
In my case I had to go to Storage Management console and put the iSCSI disk Online. Then I saw my newly mounted disk with letter F:
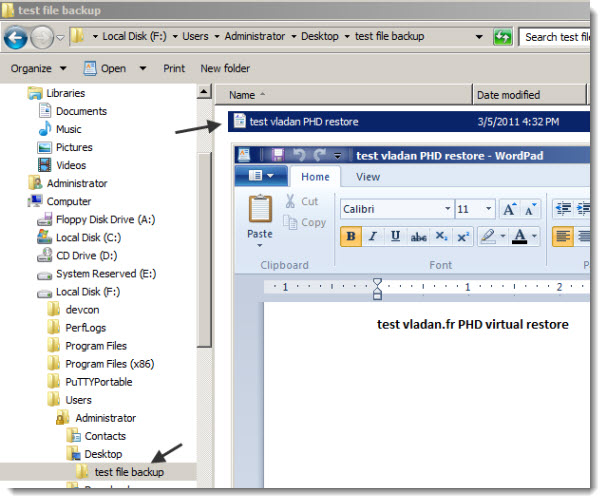
By browsing the file structure I was able to locate my file I wanted to recover by simply copy-paste as you can see.
Full VM recovery.
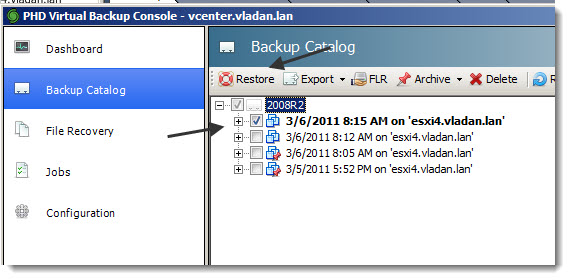
Full VM recovery is usually needed when your VM gets corrupted by a virus or you're having BSOD or so…. To be able to do a full restore you must go to Backup Catalog and choose one of your restore points from the catalog.
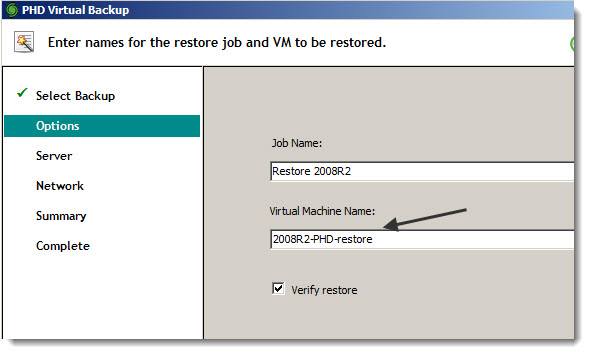
Once done and you click on the Restore button, it brings you an assistant window which guides you through the restore process. In my case I changed the name for the VM so I won't end up with 2 VMs with the same name in my infrastructure.
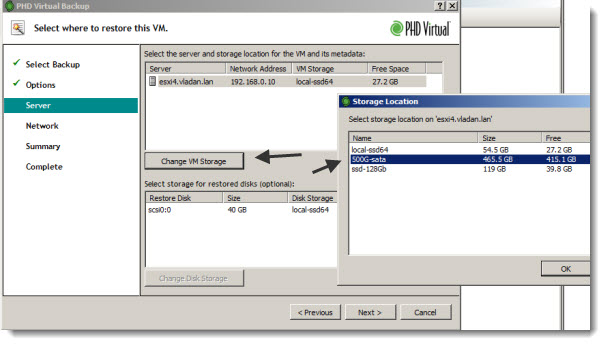
The next window during the restoration process brings the question with the restore destination. I choose my large SATA drive with 500 gigs of space.
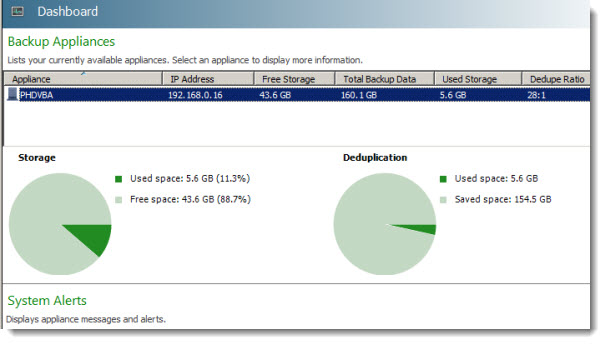
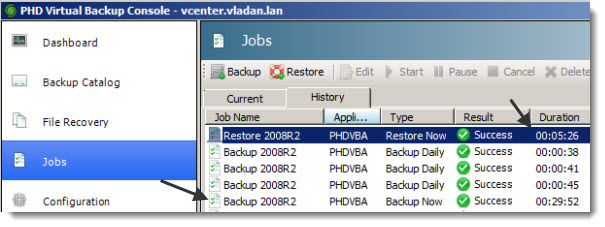
While I thought that the restore time will be the same as the backup time, I was wrong. I think that there is some deduplication magic involved there since the time to restore the whole VM took only 5 and a half minutes. The backup of the whole VM the day before took about half an hour.
Well this brings us to the end of this review, which was enjoyable to do. I was able to manage the essentials that an administrator working with VMware vSphere environment needs.
– File level restore
– Full VM restore
The configuration is a snap. You don't need Linux skills to manage this Linux appliance and the GUI console is very nicely designed and performed well.
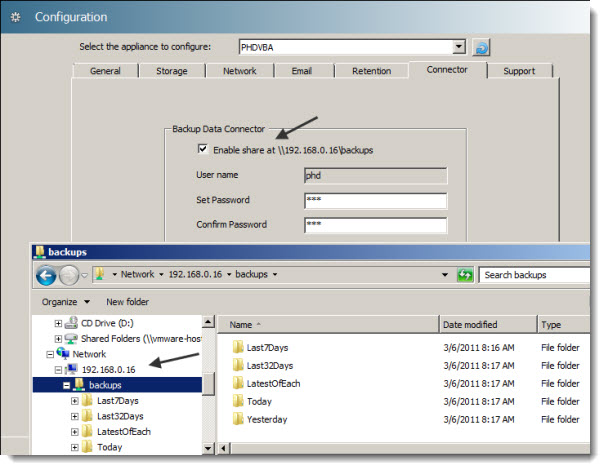
There are other possibilities from within the GUI of the console like having the possibility to export the backup as a VMDK disk or Archiving the Backup forever. Also the possibility of activating a network share through the console. This would allow you to archive the backups via third party backup software which has the possibility to archive to tape. The network share is available through the network and as you can see the backups are well organized in folders for easy archiving…
I hope that you enjoyed this article and if you're not already one of our regular readers, you take the time and grab our RSS feed here. If you don't know what is RSS, please have a look at our page which explain how you can save a tons of your time.
Note that this review was sponsored by PHD Virtual at www.phdvirtual.com






First I think you mean the download is over 500 MB not GB…..
I must admit I use PHD everyday at work and I really enjoy it. The only minor flaw, is that currently the Retention policy can only be set per appliance, not per backup job like VDR. I will also say that the retention policy is a little tricky to understand at first. For Instance if you set the retention policy for 2 weeks, it will hold onto today’s backup, which is this week’s, and sunday’s backup which is last weeks(their weeks start on Monday, and assuming daily backups). Once you think about it though its not bad, just tricky 🙂
I also must say that the experiences I have had with their support have been great! They make you submit most tickets online, but they are pretty quick to respond and Super Helpful.
Anyway just thought I would add a couple extra details
Conrad,
Thanks for the comments. I appreciate your return from your experience.
correctet the download details about the appliance… -:)
Ammesiah,
sure, as I said in the review, I would recommend 30 days trial….
Thanks for your commens.
Very nice article.
14 days to try it seems to be a little short though :p
i am evaluating this tool for our esxi farm. i am having issues chaging the network setting for PHD appliance. My console screen is totally blank and i do not see anything even after i press ctrl-N. i have ensured that their are no resource contention on the box.
……..any advice is appreciated
Hit Alt+F1 and see if it is currently working on something else…. For instance after you first attached the drive you will use for backups it might take several minutes to configure that drive. You can also just reset the appliance, wait for it to reconfigure/connect to the backup drive and try again.
Depending on how far along in the process you are you may even be able to configure it through the PHD vCenter Plugin….
Hope this helps.
Nice one thanks for great help…