VMware vSphere Autodeploy is another cool feature which is not so cool when you want to implement, because it needs some knowledge to setup and takes some time to get all the pieces work together. Yes it might seems complex and if you're just a SMB it might not be your interest but stateless images might have their advantages even for an SMB. Well, server without internal disks might be cheaper as AutoDeploy automatically boots ESXi sever on the fly using a PXE boot. But to assure HA you would probably need to have a management cluster with vCenter, AD, DNS, DHCP and use Autodeploy only to deploy hosts in a separate cluster. Because if not, you might just create a single point of failure…
The image is loaded in memory, so there are no local disks in the server. The host's resources with the help of vMware vSphere host profiles, gets added into an existing pool or resources at the cluster level. The autodeploy will provide the Image to boot the host, but It's the host profile who will configure the server.
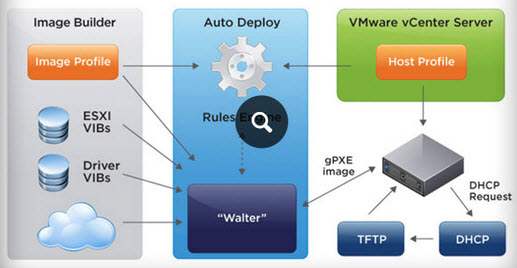
Here is an image from VMware showing the autodeploy architecture.

Autodeploy is designed to work with vSphere host profiles and also with vSphere ESXi image builder, since this tool allows to build custom images with drivers integrated into the installation ISO or bundle. The whole process should looks like this:
Image builder > Host Profiles > Autodeploy
Autodeploy is not simple, but we'll try to go step-by-step so we'll get all pieces working together. AutoDeploy is also VCP/VCAP topic so it might be useful if you studying towards those exams. We will start with a prerequisites, and the initial configuration first, because if you don't meet the prerequisites you won't be able to implement and fail:
- A DHCP server – you'll need to be enable options 66 and 67 so beware that not every DHCP server allows that. The one in your ISB box probbably don't…
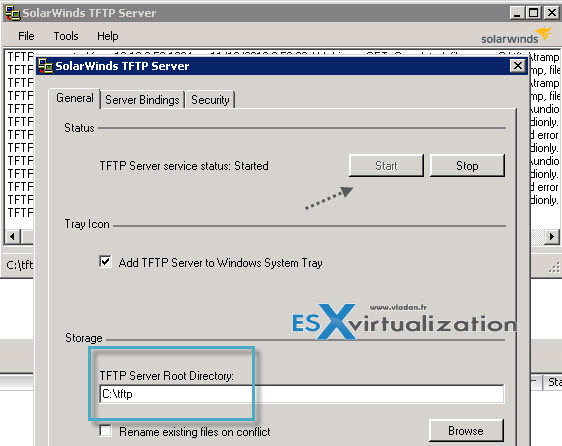
- TFTP server – there is many free TFTP servers on the market. In my lab I'm using Solarwind's free TFTP.
- PowerCLI and vSphere LAB ready – I'm assuming that you have already followed the post with Image Builder and you know that PowerCLI commands are a must.
How to get Started with Autodeploy?
 Go and install the AutoDeploy component which is part of the VMware vCenter Server Installation package. You'll need Windows Server 2008 or later. In my case, for this lab, I'm using Windows vCenter server, and so the Autodeploy component will get deployed there together with all the other vCenter server components. But you can also use VCSA and install autodeploy on a separate W2008 VM. The installation process don't asks you anything fancy, so just go next > next. You should end up with a nice new icon in your vSphere client….
Install TFTP Server
As I told you in this lab I'm using Windows based vCenter server, so I've installed TFTP server there. The installer creates a default directory which can be changed. I changed mine to c:tftp to keep it simple. You can configure the option by going to File > Configure menu. While there, make sure that you start the service. (Note: you can also go to Windows services to make the TFTP service start automatically during the boot as by default it has manual start only).

That's it for TFTP server. There is nothing else to play with and we can move on.
DHCP Server Options.
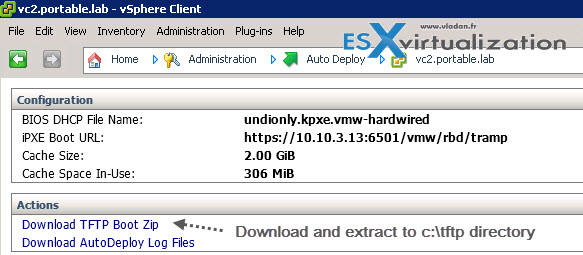
Next I'll show you the options you need to configure on your DHCP server. There are just two options which needs to be configured at the scope level. When you click on the Autodeploy icon in vSphere client, you'll end up on this page where you can see some strange name of file. But this exact name will be needed for setting up options in our DHCP server! It's the undionly.kpxe.vmw-hardwired.

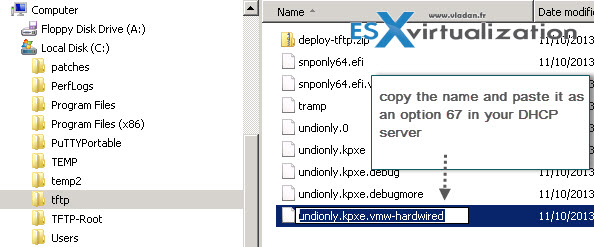
So next step is to click and download the TFTP boot zip files to the c:tftp directory that we created and set up on our TFTP server. Unzip the file into the same directory You should have a view like this:

Once done, we can copy this name of the file (undionly.kpxe.vmw-hardwired) as an option 67 in our DHCP server. In my case I have Windows DHCP server which sits on my domain controller. The second option is my vCenter server, where I installed the Autodeploy add-on. You can click to enlarge.
This is it for the actual setup. We'll move forward with options for creating some AutoDeploy rules in next post. To prepare you for some AutoDeploy commandlets, we will need those commands to remember:
New-DeployRule
Add-DeployRule
If you have PowerCLI installed on your system, you can already get some examples by typing:
Get-help New DeployRule -examples
or
Get-help New DeployRule -detailed
Things might seems to be a bit blur at the moment, but don't worry. We will show some easy options in next post. Stay tuned -:).
The whole serie so far:
- VMware vSphere AutoDeploy – Run some PowerCLI and you’re the Boss
- VCAP Diary – VMware vSphere ESXi Image Builder
- VMware vSphere AutoDeploy – Install and configure (this post)
- VCAP Diary – VMware vSphere Host Profiles
- VMware vSphere Host Profiles – options and troubleshooting
Here is quick video from VMware showing how AutoDeploy works:
The article was published first at ESX Virtualization website. Feel free to subscribe via RSS or by e-mail to get the latest news to be delivered via weekly newsletter. The latest 200 articles of daily updates can be found on our daily archives page.


Excellent article, it suits me for the VCAP-DCA exam I’m preparing.
Thank you!
The same for me. VCAP … -:)
Hello,
Thanks for the article, I followed the same instructions and deployed auto deploy server but I’m stuck at PXE boot file download to zero bytes. I found the below error message on TFTP log.
Failed to download file from server. Client returned User aborted the transfer.
Am I missing something in my configuration?
Many thanks