 PHD Virtual has updated their backup product PHD Virtual backup & Replication, to enable IT administrators leverage cloud storage directly as backup destination. PHD Virtual CloudHook is the latest update. The newest feature allows to setup cloud storage as a backup destination, directly from within the UI. The product is able to backup VMs directly to the cloud storage from Amazon, Google or Rackspace. With a powerful feature introduced in the 6.1 release, called rollback recovery (restores only changes) there is a possibility to restore a full VM with very fast RTOs directly from the cloud. The GA of the product is scheduled for March 2013

It will be quite challenging to do a test in my lab, since my internet access at my home lab has quite slow upload speed (download is ok).
While the Cloud is just one of the many backup destinations, the product can backup to usual destinations as virtual disks attached to the backup appliance, NFS or CIFS shares. One could imagine an enterprise setup with two backup appliances:
First appliance creates backups of VMs to a local storage (VMDKs attached to the VM) with job configuration as “Virtual Full” or network storage (NFS, CIFS or target-side deduplication device.) with job configuration as “Full/Incremental”. It depends what the possibility in your environment.
Second appliance creates backups of VMs to cloud storage as a destination with job configured as “Virtual Full” which is recommended for cloud storage.
Note that in both cases, the first time the job runs, its full backup only. Following backups are always incremental.
Both jobs would have to be staggered to prevent running at the same time, but it can be easily done with the job scheduler. Why this is important having backups on both places?
The importance of having backups in both places, if you choose to back up the same VMs by both VBAs, is to have an offsite copy of your data. You can also choose to have different retention policies to keep longer-term retention in the cloud.
Another great use case is to leverage local storage for critical VM backups – to ensure fast recovery, and to use cloud storage for less critical VM backups – when RTOs are not as strict. Rollback recovery still gives you fast recovery from the cloud in most circumstances, which allows you to save on local storage.
PHD Virtual CloudHook supports several cloud storage providers as a backup destination:
- Amazon S3
- Google Cloud Storage
- Swift/OpenStack
- RackSpace CloudFiles
PHD Virtual Backup 6.2 CloudHook Setup
For those of you who do not know PHD Virtual, the product itself is a Virtual Appliance (a virtual machine ), this means that you don't need an additional physical hardware to install and use the product, since the OVF file gets deployed into your virtual infrastructure (or single ESXi host) by using the vSphere Client through File > Deploy OVF Template menu.
When finished, close the vSphere client and install the PHD Virtual Client software – it's located in the zip file download. The client file is the PHDVirtualBackup_Client_Install.exe. Then start the VMware vSphere Client (the Windows client) and open a console of the PHD Virtual CloudHook.
I strongly recommend setting up fixed IP address. Just make sure that before you do it, you create proper DNS records in your Forward and reverse DNS zones. Then when you first start the appliance, go to the console and hit Ctrl-N to enter the Network Configuration menu. Select Static and enter the IP address, netmask, GW, primary and secondary DNS. Note that both DNS servers has to be entered. In my case I had only one on my network, so I entered both the same DNS.

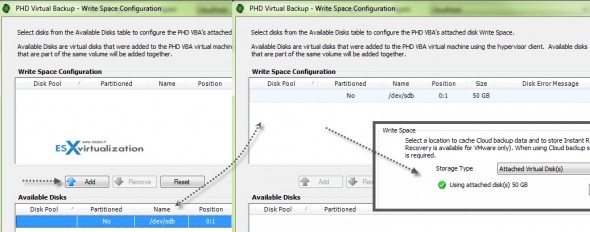
Then restart the appliance. The next thing we need is to set up is a Write Space, which is a kind of cache for cloud backups and also for storing the Instant VM recovery changes. First Add an additional virtual hard dist to the VM – through VMware vSphere Client by going to the menu VM > Edit Settings > Add > hard disk. When done, select Configuration > Write Space, and select the Attached Virtual Disk drop down menu. Then click the Configure button. You can click to see high-res image.
When validated, you're asked to restart the appliance.
Continue reading on next page –>

