Today's objective is VCP6.5-DCV Objective 8.1 – Configure Auto Deploy for ESXi Hosts. Auto deploy is cool. It allows you to boot an ESXi image from the network. Auto Deploy can provision hundreds of physical hosts with ESXi software. You can specify the image to deploy and the hosts to provision with the image. Coupled with host profiles you can apply to the hosts, and vCenter server folder or cluster for each host.
The VCP6.5-DCV Study Guide page is starting to fill up with topics from the Exam Preparation Guide (previously called Exam Blueprint). I highly recommend getting the full vSphere 6.5 documentation set and the latest exam preparation guide (PDF) as well when preparing for the exam. I'm not linking directly in purpose as those PDFs can change URL, but you can find those easily through Google search.
You have a choice to study towards the VCP6-DCV – Exam Number: 2V0-621, ( it has 28 Objectives) or going for the VCP6.5-DCV (Exam Code: 2V0-622) which is few chapters longer (it has 32 Objectives). Both exams are valid for two years, then you have to renew. You can also go further and pass VCAP exam, then VCDX.
Update: VMware released new “bridge” upgrade path. Any VCP who is two versions behind the most current available version in the same solution track can upgrade to the latest by only taking one exam. Previously, you would first have to earn the VCP6-DCV (by passing the delta exam) and then upgrade to the VCP6.5-DCV (again, through the delta exam.) Now you can go straight from VCP5 to VCP6.5. Note that this is only for current VCP holders. Not expired VCP certifications.
Exam Price: $250 USD, there are 70 Questions (single and multiple answers), passing score 300, and you have 105 min to complete the test.
Check our VCP6.5-DCV Study Guide Page.
You can download your free copy via this link – Download Free VCP6.5-DCV Study Guide at Nakivo.
VCP6.5-DCV Objective 8.1 – Configure Auto Deploy for ESXi Hosts
- Describe the components and architecture of an Auto Deploy environment
- Implement Host Profiles with an Auto Deploy of an ESXi host
- Install and configure Auto Deploy
- Deploy multiple ESXi hosts using Auto Deploy
- Explain the Auto Deploy deployment model needed to meet a business requirement
Describe the components and architecture of an Auto Deploy environment
Auto Deploy uses a PXE boot infrastructure in conjunction with vSphere host profiles to provision and customize that host. No state is stored on the host itself, instead, the Auto Deploy server manages state information for each host.
Auto Deploy Server – provides images and host profiles.
vSphere Auto Deploy rules engine – Sends information to the vSphere Auto Deploy server which image profile and which host profile to serve to which host. Administrators use vSphere Auto Deploy to define the rules that assign image profiles and host profiles to hosts.
Image profiles – Define the set of VIBs to boot ESXi hosts with.
-
VMware and VMware partners make image profiles and VIBs available in public depots. Use vSphere ESXi Image Builder to examine the depot and use the vSphere Auto Deploy rules engine to specify which image profile to assign to which host.
-
VMware customers can create a custom image profile based on the public image profiles and VIBs in the depot and apply that image profile to the host.
Host profiles – Define machine-specific configuration such as networking or storage setup. Use the host profile UI to create host profiles. You can create a host profile for a reference host and apply that host profile to other hosts in your environment for a consistent configuration.
Host customization – Stores information that the user provides when host profiles are applied to the host. Host customization might contain an IP address or other information that the user supplied for that host.
Auto Deploy provides an intuitive way for setting up ESXi hosts easily and consistently. It's very useful for large environment deployment and also for web scaling infrastructure provided by solutions like hyper-converged infrastructure (HCI).
Implement Host Profiles with an Auto Deploy of an ESXi host
You can also use vSphere Auto Deploy to install an ESXi host, and set up a host profile that causes the host to store the ESXi image and configuration on the local disk, a remote disk, or a USB drive. Subsequently, the ESXi host boots from this local image and vSphere Auto Deploy no longer provisions the host. This process is similar to performing a scripted installation.
Rules and Rule Sets – You specify the behavior of the vSphere Auto Deploy server by using a set of rules. The vSphere Auto Deploy rules engine checks the rule set for matching host paĴerns to decide which items (image profile, host profile, vCenter Server location, or script object) to provision each host with.
For hosts that have not yet been added to a vCenter Server system, the vSphere Auto Deploy server checks with the rules engine before serving image profile, host profile, and inventory location information to hosts. For hosts that are managed by a vCenter Server system, the image profile, host profile, and inventory location that vCenter Server has stored in the host object is used.
The rules engine includes rules and rule sets.
Rules – can assign image profiles and host profiles to a set of hosts, or specify the location (folder or cluster) of a host on the target vCenter Server system. A rule can identify target hosts by boot MAC address, SMBIOS information, BIOS UUID, Vendor, Model, or fixed DHCP IP address.
You can specify the following parameters in a rule:
- Name of the rule, specified with the -Name parameter
- Item One or more items, specified with the -Item parameter. An item can be an image profile, a host profile, a vCenter Server inventory location (datacenter, folder, cluster) for the target host, or a custom script.
- Pattern – The pattern specifies the host or group of hosts to which the rule applies.
Img from “vSphere Installation and Setup” PDF.
- Active Rule Set – When a newly started host contacts the vSphere Auto Deploy server with a request for an image profile, the vSphere Auto Deploy server checks the active rule set for matching rules. The image profile, host profile, vCenter Server inventory location, and script object that are mapped by matching rules are then used to boot the host. If more than one item of the same type is mapped by the rules, the vSphere Auto Deploy server uses the item that is first in the rule set.
- Working Rule Set – The working rule set allows you to test changes to rules before making the changes active. For example, you can use vSphere Auto Deploy cmdlets for testing compliance with the working rule set. The test verifies that hosts managed by a vCenter Server system are following the rules in the working rule set. By default, cmdlets add the rule to the working rule set and activate the rules. Use the NoActivate parameter to add a rule only to the working rule set.
You can find the auto-deploy rules within the AutoDeploy UI. Previous releases of vSphere had to use PowerCLI. Before you can manage vSphere Auto Deploy with rules that you create with PowerCLI cmdlets, you must install PowerCLI.
Install and configure Auto Deploy
Autodeploy is preinstalled with vCenter server management node (VCSA or Windows).
Requirements:
- Hardware requirements for ESXi – See ESXi Hardware Requirements.
- Network connectivity to vCenter server and check ports requirements. – Required Ports for vCenter Server and Platform Services Controller.
- You must install prerequisite software and set up the DHCP and TFTP servers that vSphere Auto Deploy interacts with.
- Allocate 2 GB to have enough room for four image profiles and some extra space. Each image profile requires approximately 350 MB. Determine how much space to reserve for the vSphere Auto Deploy repository by considering how many image profiles you expect to use.
- You can use a DHCP server already in your environment, or install a DHCP server. For your vSphere Auto Deploy setup, replace the gpxelinux.0 file name with snponly64.efi.vmw-hardwired for UEFI or undionly.kpxe.vmw-hardwired for BIOS.
- Set up a remote Syslog server.
- Install ESXi Dump Collector, set up your first host so that all core dumps are directed to ESXi Dump Collector, and apply the host profile from that host to all other hosts.
- If the hosts that you plan to provision with vSphere Auto Deploy are with legacy BIOS, verify that the vSphere Auto Deploy server has an IPv4 address. PXE booting with legacy BIOS firmware is possible only over IPv4. PXE booting with UEFI firmware is possible with either IPv4 or IPv6.
- If you want to use VLANs in your vSphere Auto Deploy environment, you must set up the end to end networking properly. When the host is PXE booting, the firmware driver must be set up to tag the frames with proper VLAN IDs. You must do this set up manually by making the correct changes in the UEFI/BIOS interface. You must also correctly configure the ESXi port groups with the correct VLAN IDs
The Steps:
Install vCenter Server or deploy the vCenter Server Appliance. The vSphere Auto Deploy server is included with the management node.
vSphere Web client > Administration > System Configuration > Services > AutoDeploy > Actions > Edit Startup type.
- On Windows, the vSphere Auto Deploy service is disabled. In the Edit Startup Type window, select Manual or Automatic to enable vSphere Auto Deploy.
- On the vCenter Server Appliance, the vSphere Auto Deploy service by default is set to Manual. If you want the vSphere Auto Deploy service to start automatically upon OS startup, select Automatic.
- Configure the TFTP server. In a vSphere Web Client connected to the vCenter Server system, go to the inventory list and select the vCenter Server system. Click the Manage tab, select Settings, and click Auto Deploy.
- Click Download TFTP Boot Zip to download the TFTP configuration file and unzip the file to the directory in which your TFTP server stores files.
- Set up your DHCP server to point to the TFTP server on which the TFTP ZIP file is located.Specify the TFTP Server's IP address in DHCP option 66, frequently called next-server.
- Specify the boot file name, which is snponly64.efi.vmw-hardwired for UEFI or undionly.kpxe.vmw-hardwired for BIOS in the DHCP option 67, frequently called boot-filename.
- Set each host you want to provision with vSphere Auto Deploy to network boot or PXE boot, following the manufacturer's instructions.
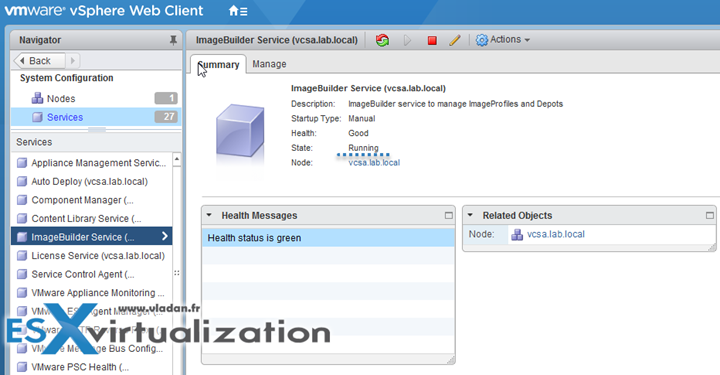
For the Auto Deploy GUI to be visible in vSphere Web Client, both the Image Builder and Auto Deploy services must be running. You should have the ImageBuilder Service up and ruuning…
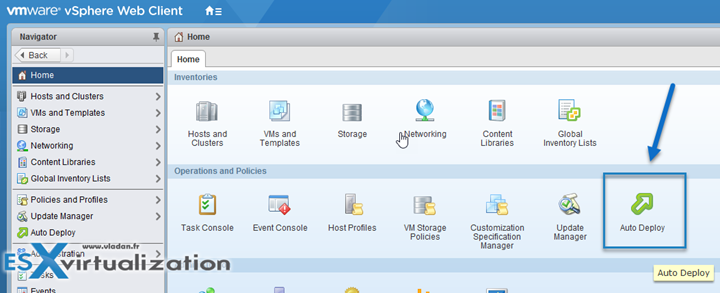
If you want to use vSphere ESXi Image Builder with thevSphere Web Client, log out of the vSphere Web Client and log in again. The Auto Deploy icon is then visible on the home page of the vSphere Web Client. (by default it isn’t).
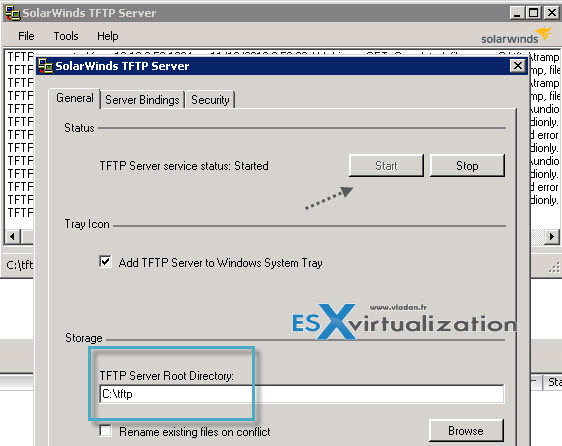
Install TFTP server next. We'll need a windows machine. (usually, we can use DHCP server, if it's Windows DC, which has also a role of DHCP). I usually use the Free TFTP server from Solarwinds.
The installer creates a default directory which can be changed. I changed mine to c:tftp to keep it simple. You can configure the option by going to File > Configure menu. While there, make sure that you start the service. (Note: you can also go to Windows services to make the TFTP service start automatically during the boot as by default it has manual start only).

That’s it for TFTP server. There is nothing else to play with and we can move on.
DHCP Server Options
Next, I’ll show you the options you need to configure on your DHCP server. There are just two options which need to be configured at the scope level of the DHCP server. When you click on the Autodeploy icon in vSphere client, you’ll end up on this page where you can see some strange name of file.
But this exact name will be needed for setting up options in our DHCP server! It’s the undionly.kpxe.vmw-hardwired.
Note that vSphere 6.5 supports UEFI for TFTP as well. PXE booting with UEFI firmware is possible with either IPv4 or IPv6.
So next step is to click and download the TFTP boot zip files to the c:tftp directory that we created and set up on our TFTP server. Unzip the file into the same directory You should have a view like this:
Once done, we can copy this name of the file (undionly.kpxe.vmw-hardwired) as an option 67 in our DHCP server. In my case I have Windows DHCP server which sits on my domain controller.
Now you should configure each of your ESXi host’s BIOS to boot from network.
Deploy multiple ESXi hosts using Auto Deploy
See above topics.
Explain the Auto Deploy deployment model needed to meet a business requirement
Please use PDF called “vSphere ESXi vCenter Server 6.5 installation and setup” for the study of this topic. the PDF is really good and detailed.
You'll be able to learn also to set up a vSphere Auto Deploy reference host which is used in cases where no state is stored on the host. In this case, the reference host helps you set up multiple hosts with the same config. You simply configure the reference host with the logging, coredump, and other settings you want to have, save the host profile and write a rule that applies the host profile to other hosts as needed.
Last but not least, one must think “availability” as Autodeploy server is also a single point of failure (SPOF). It's important to make autodeploy highly available within management cluster (yes, it's recommended to have a separate management cluster).
More from ESX Virtualization
- VCP6.5-DCV Study Guide
- vSphere 6.5
- Configuration Maximums
- What is Veeam Proxy?
- Increase Inactivity Timeout on VMware ESXi Host Client
- V2V Migration with VMware – 5 Top Tips
- How to Install latest ESXi VMware Patch – [Guide]
Stay tuned through RSS, and social media channels (Twitter, FB, YouTube)


