We continue to fill our VCP6.5-DCV Study guide page with one objective per day. Today's chapter is VCP6.5-DCV Objective 3.4 – Perform VMFS and NFS configurations and upgrades. Each chapter is a single blog post with a maximum of screenshots. Our previous study guide covering VCP6-DCV exam was, as we heard, very much appreciated.
If you're not yet VMware certified and looking to do so, I highly recommend to download the whole vSphere 6.5 PDF documentation set. We're providing content on all topics, but obviously, we cannot cover everything. But, as not many guides are online so far, to have some guidance is always good.
You still have a choice to pass VCP6-DCV, but I think the moment is for the majority of new VCP candidates, to go for the VCP6.5-DCV. The VCP6-DCV has few topics less to study.
Exam Price: $250 USD, there are 70 Questions (single and multiple answers), passing score 300, and you have 105 min to complete the test.
It is a very large chapter again today. We provide a “local” link-based content, so you can jump directly to the section you willing to study. Check our VCP6.5-DCV Study Guide Page which has all the topics for the exam.
You can download your free copy via this link – Download Free VCP6.5-DCV Study Guide at Nakivo.
VCP6.5-DCV Objective 3.4 – Perform VMFS and NFS configurations and upgrades
- Perform VMFS v5 and v6 configurations
- Describe VAAI primitives for block devices and NAS
- Differentiate VMware file system technologies
- Migrate from VMFS5 to VMFS6
- Differentiate Physical Mode RDMs and Virtual Mode RDMs
- Create a Virtual/Physical Mode RDM
- Differentiate NFS 3.x and 4.1 capabilities
- Compare and contrast VMFS and NFS datastore properties
- Configure Bus Sharing
- Configure Multi-writer locking
- Connect an NFS 4.1 datastore using Kerberos
- Create/Rename/Delete/Unmount VMFS datastores
- Mount/Unmount an NFS datastore
- Extend/Expand VMFS datastores
- Place a VMFS datastore in Maintenance Mode
- Select the Preferred Path/Disable a Path to a VMFS datastore
- Enable/Disable vStorage API for Array Integration (VAAI)
- Determine a proper use case for multiple VMFS/NFS datastores
Perform VMFS v5 and v6 configurations
It's possible to create VMFS datastore on any SCSI based storage available to your ESX host. Basically, you need to configure any adapters (iSCSI, FC..) then discover the new storage by rescaning the adapter.
VMFS6 – This option is a default for 512e storage devices. The ESXi hosts of version 6.0 or earlier cannot recognize the VMFS6 datastore. If your cluster includes ESXi 6.0 and ESXi 6.5 hosts that share the datastore, this version might not be appropriate.
VMFS5 – This option is a default for 512n storage devices. VMFS5 datastore supports access by the ESXi hosts of version 6.5 or earlier.
Define configuration details for the datastore. Specify partition configuration.
Check “Create/Rename/Delete/Unmount VMFS datastores” chapter for visuals.
Describe VAAI primitives for block devices and NAS
VAAI is a method for offloading specific storage operations from the ESXi Host to the storage array, so it lowers CPU load and accelerates the operations.
VAAI has three built-in capabilities:
- Full Copy
- Block Zeroing
- Hardware-assisted locking
For NAS, an additional plugin needs to be installed to help perform the offloading. VAAI defines a set of storage primitives, which replace select SCSI operations with VAAI operations that are performed on the storage array instead of the ESXi Host.
Part of the today's topic which is VCP6.5-DCV Objective 3.4 – Perform VMFS and NFS configurations and upgrades, is also a recap of all those VMware File system technologies such as VMFS, NFS, VSAN or VVOLs.
Differentiate VMware file system technologies
- VMFS (version 3, 5, and 6) – Datastores that you deploy on block storage devices use the vSphere Virtual Machine File System format, a special high-performance file system format that is optimized for storing virtual machines.
- NFS (version 3 and 4.1) – An NFS client built into ESXi uses the Network File System (NFS) protocol over TCP/IP to access a designated NFS volume that is located on a NAS server. The ESXi host mounts the volume as an NFS datastore, and uses it for storage needs. ESXi supports versions 3 and 4.1 of the NFS protocol.
- Virtual SAN – Virtual SAN aggregates all local capacity devices available on the hosts into a single datastore shared by all hosts in the Virtual SAN cluster.
- Virtual Volumes (VVOLs) – Virtual Volumes datastore represents a storage container in vCenter Server and vSphere Web Client.
Migrate from VMFS5 to VMFS6
Online upgrade process allows VMFS datastores to be upgraded without disrupting hosts or virtual machines. New VMFS datastores are created with the GPT format.
An upgraded VMFS datastore will continue to use the MBR format until it is expanded beyond 2TB. Once expanded beyond 2TB the MGS format is converted to GPT. Supports up to 256 VMFS datastores per host.
VMFS5 upgrade is a one-way process. Once upgraded to VMFS5 the datastore cannot be reverted back to the previous VMFS format. VMFS3 to VMFS5 datastore upgrade can be performed while the data store is in use.
Differentiate Physical Mode RDMs and Virtual Mode RDMs
RDM allows a VM directly access a LUN. Think of an RDM as a symbolic link from a VMFS volume to a raw LUN.
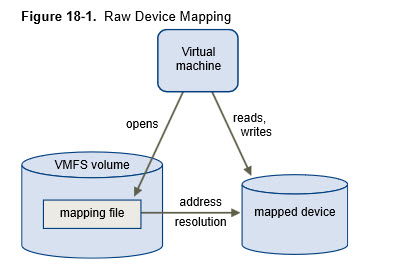
An RDM is a mapping file in a separate VMFS volume that acts as a proxy for a raw physical storage device. The RDM allows a virtual machine to directly access and use the storage device. The RDM contains metadata for managing and redirecting disk access to the physical device.
When to use RDM?
- When SAN snapshot or other layered applications run in the virtual machine. The RDM better enables scalable backup offloading systems by using features inherent to the SAN.
- In any MSCS clustering scenario that spans physical hosts — virtual-to-virtual clusters as well as physical-to-virtual clusters. In this case, cluster data and quorum disks should be configured as RDMs rather than as virtual disks on a shared VMFS.
If RDM is used in physical compatibility mode – no snapshots of VMs… Virtual machine snapshots are available for RDMs with virtual compatibility mode.
Physical Compatibility Mode – VMkernel passes all SCSI commands to the device, with one exception: the REPORT LUNs command is virtualized so that the VMkernel can isolate the LUN to the owning virtual machine. If not, all physical characteristics of the underlying hardware are exposed. It does allow the guest operating system to access the hardware directly. VM with physical compatibility RDM has limits like that you cannot clone such a VM or turn it into a template. Also, sVMotion or cold migration is not possible.
Virtual Compatibility Mode – VMkernel sends only READ and WRITE to the mapped device. The mapped device appears to the guest operating system exactly the same as a virtual disk file in a VMFS volume. The real hardware characteristics are hidden. If you are using a raw disk in virtual mode, you can realize the benefits of VMFS such as advanced file locking for data protection and snapshots for streamlining development processes. Virtual mode is also more portable across storage hardware than the physical mode, presenting the same behavior as a virtual disk file. (VMDK). You can use snapshots, clones template. When an RDM disk in virtual compatibility mode is cloned or a template is created out of it, the contents of the LUN are copied into a .vmdk virtual disk file.
Other limitations:
- You cannot map to a disk partition. RDMs require the mapped device to be a whole LUN.
- VFRC – Flash Read Cache does not support RDMs in physical compatibility (virtual compatibility is compatible).
- If you use vMotion to migrate virtual machines with RDMs, make sure to maintain consistent LUN IDs for RDMs across all participating ESXi hosts
Create a Virtual/Physical Mode RDM
After giving your VM direct access to a raw SAN LUN, you create an RDM disk that resides on a VMFS datastore and points to the LUN. You can create the RDM as an initial disk for a new virtual machine or add it to an existing virtual machine. When creating the RDM, you specify the LUN to be mapped and the datastore on which to put the RDM.
Although the RDM disk file has the same.vmdk extension as a regular virtual disk file. the RDM contains only mapping information. The actual virtual disk data is stored directly on the LUN.
The process:
- Create a new VM > proceed with the steps required to create a virtual machine > Customize Hardware page, click the Virtual Hardware tab.
- To delete the default virtual hard disk that the system created for your virtual machine, move your cursor over the disk and click the Remove icon > From the New drop-down menu at the bottom of the page, select RDM Disk and click Add > From the list of SAN devices or LUNs, select a raw LUN for your virtual machine to access directly and click OK.
The system creates an RDM disk that maps your virtual machine to the target LUN. The RDM disk is shown on the list of virtual devices as a new hard disk.
- Click the New Hard Disk triangle to expand the properties for the RDM disk > Select a location for the RDM disk. You can place the RDM on the same datastore where your virtual machine configuration files reside or select a different datastore. Select a compatibility mode.
Check above chapter “Differentiate Physical Mode RDMs and Virtual Mode RDMs” for Physical Compatibility or Virtual compatibility modes.
Differentiate NFS 3.x and 4.1 capabilities
NFS v3:
- ESXi managed multipathing
- AUTH_SYS (root) authentication
- VMware proprietary file locking
- Client-side error tracking
NFS v4.1:
- Native multipathing and session trunking
- Optional Kerberos authentication
- Built-in file locking
- Server-side error tracking
Compare and contrast VMFS and NFS datastore properties
The maximum size of a VMFS datastore is 64 TB. The maximum size of an NFS datastore is 100TB.
Another difference:
- VMFS uses SCSI queuing and has a default queue length of 32 outstanding I/Os at a time
- NFS gives to each VM its own I/O data path.
You can run as twice as more VMs on NFS based datastores compared to VMFS ones.
Configure Bus Sharing
SCSI bus sharing for a VM means if the SCSI bus is shared. VMs can access the same VMDK simultaneously. The VM can be on the same ESXi or on different ESXi.
Where?
Right-click a VM > Edit Settings > On the Virtual Hardware tab, expand SCSI controller > Type of sharing in the SCSI Bus Sharing drop-down menu > 3 choices:
- None: Virtual disks cannot be shared by other virtual machines.
- Virtual: Virtual disks can be shared by virtual machines on the same ESXi host.
- Physical: Virtual disks can be shared by virtual machines on any ESXi host.
Configure Multi-writer locking
Useful for VMware FT, third-party cluster-aware applications or Oracle RAC VMs.
The multi-writer option allows VMFS-backed disks to be shared by multiple virtual machines. This option is used to support VMware fault tolerance, which allows a primary virtual machine and a standby virtual machine to simultaneously access a .vmdk file.
You can use this option to disable the protection for certain cluster-aware applications where the applications ensure that writes originating from two or more different virtual machines does not cause data loss. This document describes methods to set the multi-writer flag for a virtual disk.
In vSphere 6.0 and later, the GUI has the capability of setting Multi Writer flag without any need to edit .vmx file.
In the vSphere Client, power off the VM.
Select VM > Edit Settings > Options > Advanced > General > Configuration Parameters. Add rows for each of the shared disks and set their values to multi-writer
Add the Settings for each virtual disk that you want to share as below.
scsi1:0.sharing = “”multi-writer””
scsi1:1.sharing = “”multi-writer””
scsi1:2.sharing = “”multi-writer””
scsi1:3.sharing = “”multi-writer””
Connect an NFS 4.1 datastore using Kerberos
Prepare your NFS storage first.
vSphere client > Add datastore > NFS > type IP or FQDN, NFS mount and folder name > enable Kerberos and select an appropriate Kerberos model.
Two options:
- Use Kerberos for authentication only (krb5) – Supports identity verification
- Use Kerberos for authentication and data integrity (krb5i) – In addition to identity verification, provides data integrity services. These services help to protect the NFS traffic from tampering by checking data packets for any potential modifications.
Create/Rename/Delete/Unmount VMFS datastores
Create Datastore – vSphere Web Client > Hosts and Clusters > Select Host> Actions > Storage > New Datastore
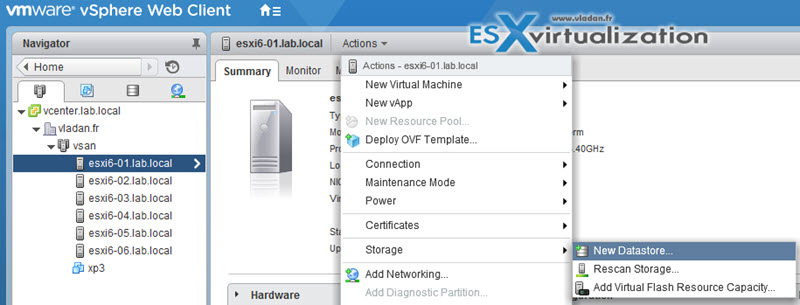
And you have a nice assistant which you follow…

The datastore can be created also via vSphere C# client.
To rename datastore > Home > Storage > Right click datastore > Rename
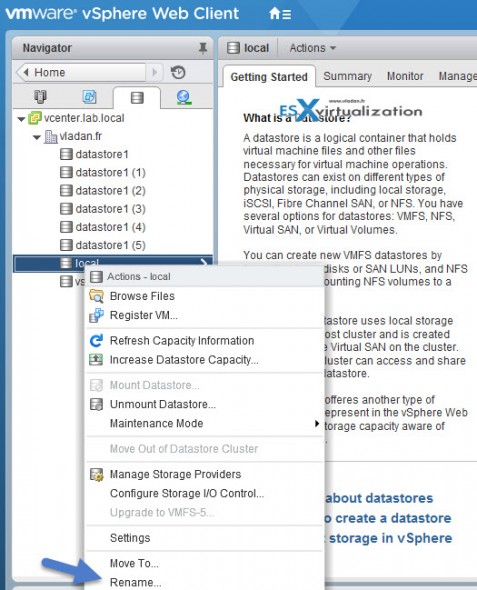
As you can see you can also unmount or delete datastore via the same right click.
Make sure that:
- There are NO VMs on that datastore you want to unmount.
- If HA configured, make sure that the datastore is not used for HA heartbeats
- Check that the datastore is not managed by Storage DRS
- Verify also that Storage IO control (SIOC) is disabled on the datastore
Mount/Unmount an NFS datastore
Create NFS mount. Similar way as above Right click datacenter > Storage > Add Storage.

You can use NFS 3 or NFS 4.1 (note the limitations of NFS 4.1 for FT or SIOC). Enter the Name, Folder, and Server (IP or FQDN)
To Mount/unmout NFS datastore…

And then choose the host(s) to which you want this datastore to mount…

Extend/Expand VMFS datastores
It’s possible to expand existing datastore by using extent OR by growing an expandable datastore to fill the available capacity.
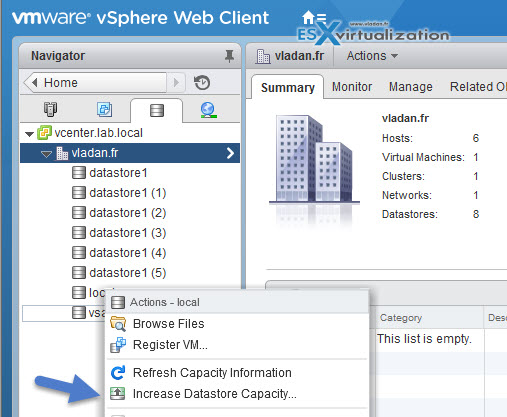
and then you just select the device..
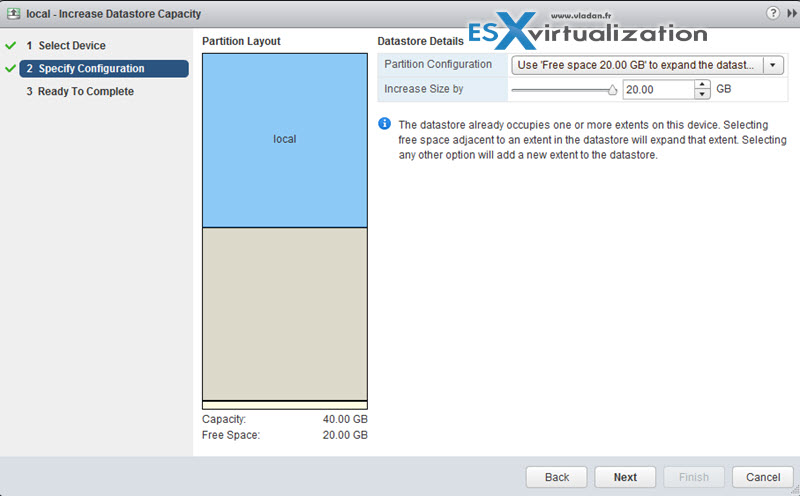
You can also Add a new extent. Which means that datastore can span over up to 32 extents and appear as a single volume…. But in reality, not many VMware admins likes to use extents….
Place a VMFS datastore in Maintenance Mode
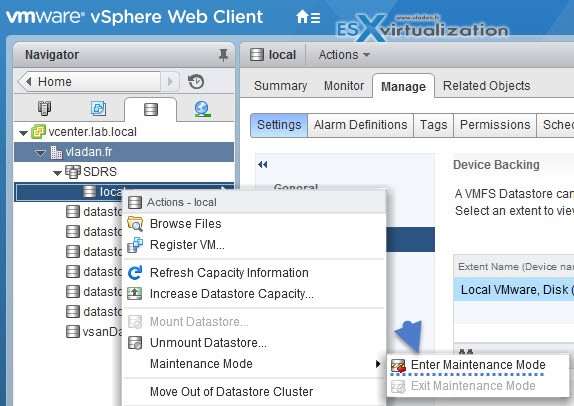
Maintenance mode for datastore is available if the datastore takes part in Storage DRS cluster. (SDRS). Regular datastore cannot be placed in maintenance mode. So if you want to activate SDRS you must first create SDRS cluster by Right click Datacenter > Storage > New Datastore Cluster.
then only you can put the datastore in maintenance mode…
Select the Preferred Path/Disable a Path to a VMFS datastore
For each storage device, the ESXi host sets the path selection policy based on the claim rules. The different path policies we treated in our earlier chapter here – Configure vSphere Storage Multi-pathing and Failover.
Now if you want just to select a preferred path, you can do so. If you want the host to use a particular preferred path, specify it manually.
Fixed – (VMW_PSP_FIXED) the host uses designated preferred path if configured. If not it uses first working path discovered. The preffered path needs to be configured manually.

Enable/Disable vStorage API for Array Integration (VAAI)
Tip: Check our How-to, tutorials, videos on a dedicated vSphere 6.5 Page.
You need to have hardware that supports the offloading storage operations like:
- Cloning VMs
- Storage vMotion migrations
- Deploying VMs from templates
- VMFS locking and metadata operations
- Provisioning thick disks
- Enabling FT protected VMs
How to disable? or enable?
Enable = 1
Disable = 0
vSphere Web Client > Manage tab > Settings > System, click Advanced System Settings > Change the value for any of the options to 0 (disabled):
- VMFS3.HardwareAcceleratedLocking
- DataMover.HardwareAcceleratedMove
- DataMover.HardwareAcceleratedInit
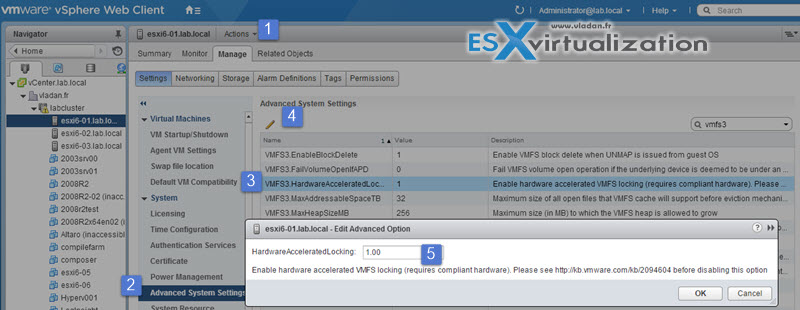
you can check the status of the hardware via CLI (via esxcli storage core device vaai status get)
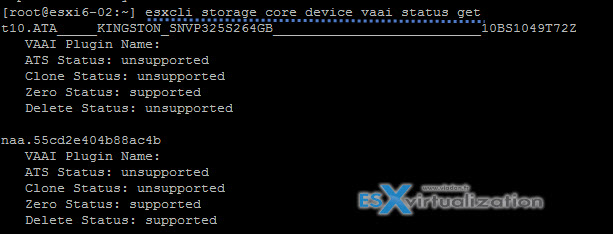
or on the NAS devices with (esxcli storage nfs list).
Via vSphere web client you can also see if a datastore has hardware acceleration support…
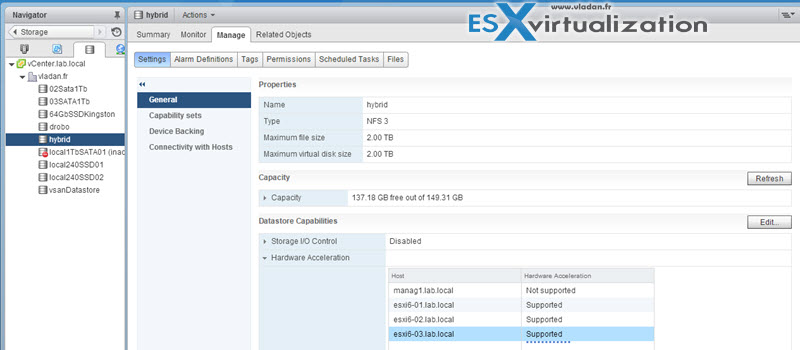
Determine a proper use case for multiple VMFS/NFS datastores
Usually, the choice for multiple VMFS/NFS datastores is based on performance, capacity and data protection.
Separate spindles – having different RAID groups to help provide better performance. Then you can have multiple VMs, executing applications which are I/O intensive. If you make a choice with single big datastore, then you might have performance issues…
Separate RAID groups. – for certain applications, such as SQL server you may want to configure a different RAID configuration of the disks that the logs sit on and that the actual databases sit on.
Redundancy – You might want to replicate VMs to another host/cluster. You may want the replicated VMs to be stored on different disks than the production VMs. In case you have a failure on production disk system, you most likely still be running the secondary disk system just fine.
Load balancing – you can balance performance/capacity across multiple datastores.
Tiered Storage – Arrays comes often with Tier 1, Tier 2, Tier 3 and so you can place your VMs according to performance levels…
Check our VCP6.5-DCV Study Guide Page for all topics.
More from ESX Virtualization
- VMware Transparent Page Sharing (TPS) Explained
- VMware Configuration Maximums
- What is VMware vSphere Hypervisor?
- What Is VMware Virtual NVMe Device?
- VMware Virtual Hardware Performance Optimization Tips
- VMware vSphere Essentials Plus Kit Term
Stay tuned through RSS, and social media channels (Twitter, FB, YouTube)

