Today's objective is VCP6.5-DCV Objective 2.1 – Configure policies/features and verify vSphere networking. A very large networking chapter. For your study you might want to download the “vSphere 6.5 Networking Guide PDF” (link: vSphere 6.5 Networking Guide) as well. We have added a massive number of screenshots demonstrating the features and configuration options.
Our New VCP6.5-DCV Study Guide page is starting to fill up with topics from the Exam Preparation Guide (previously called Exam Blueprint).
Right now you have a choice to study towards the VCP6-DCV – Exam Number: 2V0-621, ( it has 28 Objectives) or going for the VCP6.5-DCV (Exam Code: 2V0-622) which is few chapters longer (it has 32 Objectives). Both exams are valid for two years, then you have to renew. You can also go further and pass VCAP exam (not expiring).
Exam Price: $250 USD, there are 70 Questions (single and multiple answers), passing score 300, and you have 105 min to complete the test.
You can download your free copy via this link – Download Free VCP6.5-DCV Study Guide at Nakivo.
VCP6.5-DCV Objective 2.1 – Configure policies/features and verify vSphere networking
- Create/Delete a vSphere Distributed Switch
- Add/Remove ESXi hosts from a vSphere Distributed Switch
- Add/Configure/Remove dvPort groups
- Add/Remove uplink adapters to dvUplink groups
- Configure vSphere Distributed Switch general and dvPort group settings
- Create/Configure/Remove virtual adapters
- Migrate virtual machines to/from a vSphere Distributed Switch
- Configure LACP on vDS given design parameters
- Describe vDS Security Polices/Settings
- Configure dvPort group blocking policies
- Configure load balancing and failover policies
- Configure VLAN/PVLAN settings for VMs given communication requirements
- Configure traffic shaping policies
- Enable TCP Segmentation Offload support for a virtual machine
- Enable Jumbo Frames support on appropriate components
- Recognize behavior of vDS Auto-Rollback
- Configure vDS across multiple vCenters to support [Long Distance vMotion]
- Compare and contrast vSphere Distributed Switch (vDS) capabilities
- Configure multiple VMkernel Default Gateways
- Configure ERSPAN
- Create and configure custom TCP/IP Stacks
- Configure Netflow
Note:
Some of the screenshots are from 6.0. While the differencies between 6.0 and 6.5 are quite minimal, there are some.
Create/Delete a vSphere Distributed Switch
VMware vDS allows managing networking of multiple ESXi hosts, from a single location.
vSphere Web Client > Right-Click Datacenter object > New distributed switch > Enter some meaningful name > Next > Select Version > Next > Enter number of uplinks and
Uplink ports connect the distributed switch to physical NICs on associated hosts. The number of uplink ports is the maximum number of allowed physical connections to the distributed switch per host. Select the Create a default port group check box to create a new distributed port group with default settings for this switch
Enable or disable Network I/O control via the drop-down menu.
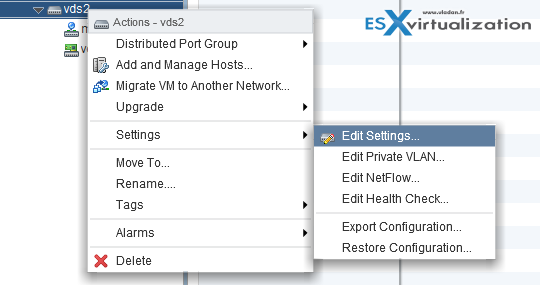
To change the settings of the distributed switch select networking > select your Distributed switch > Actions > Settings > Edit Settings.
There you can:
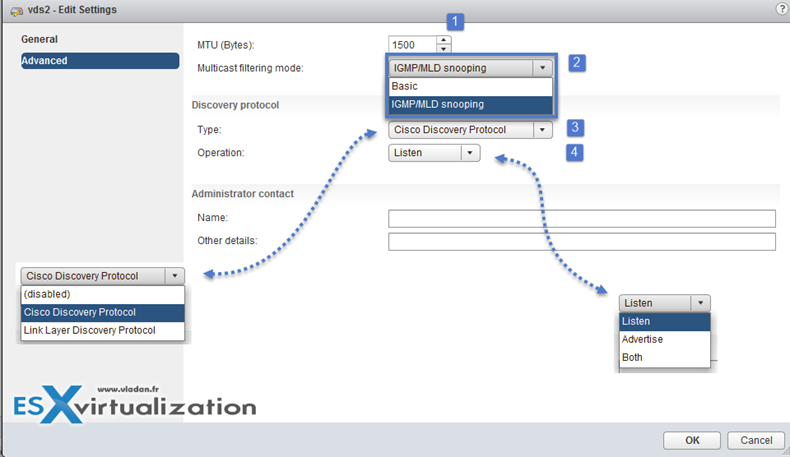
- Edit settings – change number of uplinks, change name of VDS, enable/disable Network I/O control (In Advanced: change MTU, change Multicast filtering mode, Change Cisco discovery protocol settings)
- Edit Private VLAN
- Edit Netflow
- Edit Health Check
- Export Configuration
- Restore Configuration
Add/Remove ESXi hosts from a vSphere Distributed Switch
In order to connect your host to a vSphere Distributed Switch (vDS) you should think twice and prepare ahead. You might want to before:
- Create distributed port groups for VM networking
- Create distributed port groups for VMkernel services, such as vMotion, VSAN, FT etc…
- Configure a number of uplinks on the distributed switch for all physical NICs that you want to connect to the switch
You can use the Add and Manage Hosts wizard in the vSphere Web Client to add multiple hosts at a time.
Removing Hosts from a vSphere Distributed Switch – Before you remove hosts from a distributed switch, you must migrate the network adapters that are in use to a different switch.
To add hosts to a different distributed switch, you can use the Add and Manage Hosts wizard to migrate the network adapters on the hosts to the new switch altogether. You can then remove the hosts safely from their current distributed switch.
To migrate host networking to standard switches, you must migrate the network adapters in stages. For example, remove physical NICs on the hosts from the distributed switch by leaving one physical NIC on every host connected to the switch to keep the network connectivity up. Next, attach the physical NICs to the standard switches and migrate VMkernel adapters and virtual machine network adapters to the switches. Lastly, migrate the physical NIC that you left connected to the distributed switch to the standard switches.
Add/Configure/Remove dvPort groups
Right-click on the vDS > New Distributed Port Group.

To remove a port group. Simple. Right-click on the port group > delete…
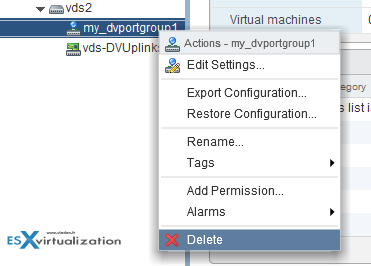
A distributed port group specifies port configuration options for each member port on a vSphere distributed switch. Distributed port groups define how a connection is made to a network.
Add/Remove uplink adapters to dvUplink groups
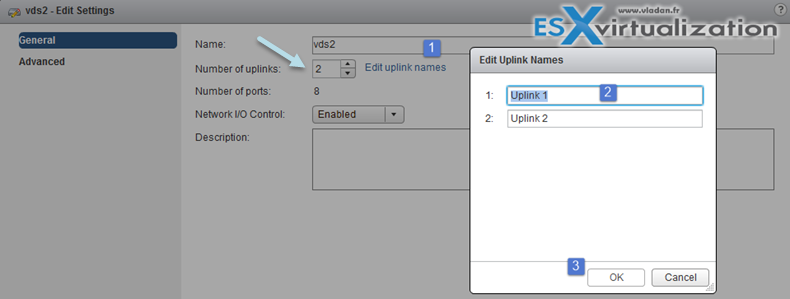
If you want to add/remove (increase or decrease) a number of uplinks you can do so by going to the properties of the vDS. For consistent networking configuration throughout all hosts, you can assign the same physical NIC on every host to the same uplink on the distributed switch.
Right-click on the vDS > Edit settings
And on the next screen, you can do that… Note that at the same time you can give different names to your uplinks…
Configure vSphere Distributed Switch general and dvPort group settings
General properties of vDS can be reached via Right-click on the vDS > Settings > Edit settings
Port binding properties (at the dvPortGroup level – Right click port group > Edit Settings)
- Static binding – Assigns a port to a VM when the virtual machine is connected to the PortGroup.
- Dynamic binding – it’s kind of deprecated. For best performance use static binding
- Ephemeral – no binding
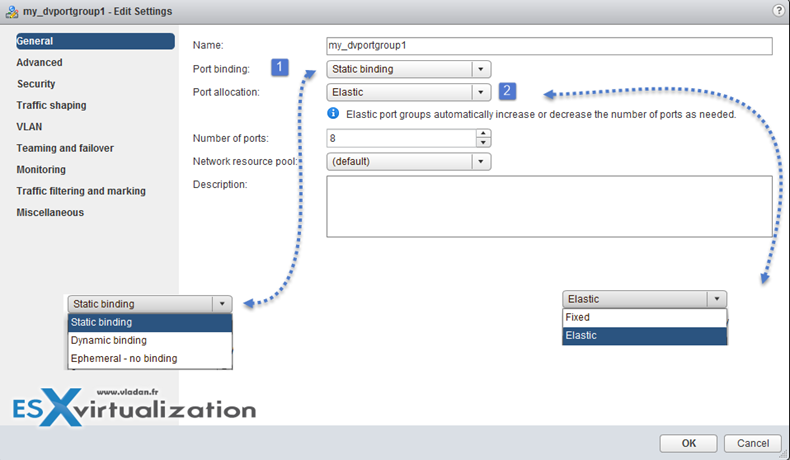
Port Binding
- Static binding – Allows assigning a port to a VM when the VM connects to the distributed port group.
- Dynamic binding – Assign a port to a virtual machine the first time the virtual machine powers on after it is connected to the distributed port group. Dynamic binding has been deprecated since ESXi 5.0.
- Ephemeral – no binding – No port binding. You can assign a virtual machine to a distributed port group with ephemeral port binding also when connected to the host.
Port allocation
- Elastic – The default number of ports is eight. When all ports are assigned, a new set of eight ports is created. This is the default.
- Fixed – The default number of ports is set to eight. No additional ports are created when all ports are assigned.
Create/Configure/Remove virtual adapters
VMkernel adapters can be add/removed at the Networking level
vSphere Web Client > Host and Clusters > Select Host > Manage > Networking > VMkernel adapters
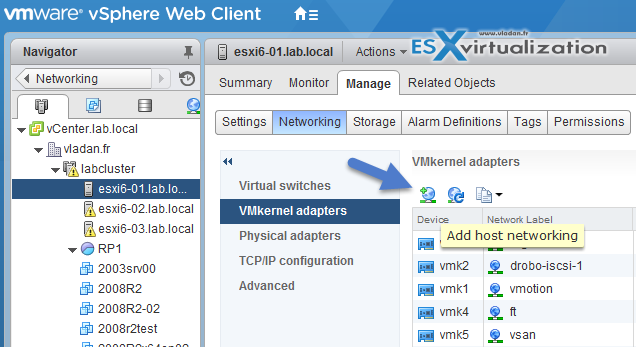
Different VMkernel Services, like :
- vMotion traffic
- Provisioning traffic
- Fault Tolerance (FT) traffic
- Management traffic
- vSphere Replication traffic
- vSphere Replication NFC traffic
- VSAN traffic
Migrate virtual machines to/from a vSphere Distributed Switch
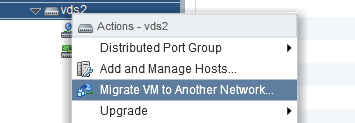
Migrate VMs to vDS. Right-click vDS > Migrate VM to another network
Make sure that you previously created a distributed port group with the same VLAN that the current VM is running… (in my case the VMs run at VLAN 7)
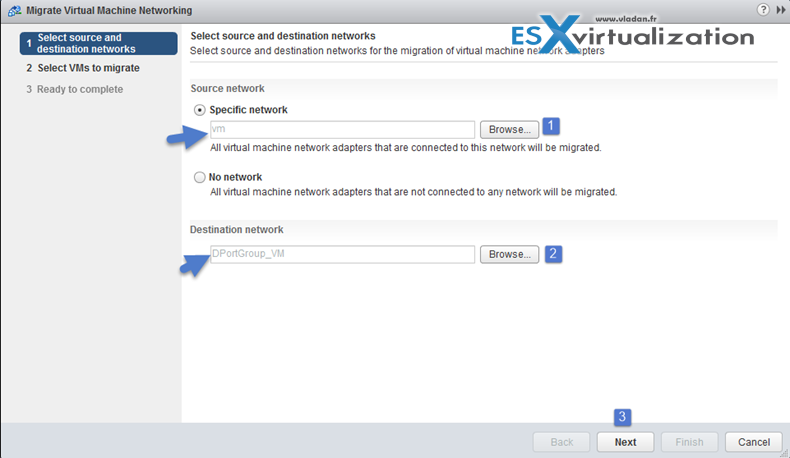
Pick a VM…

Done!
Configure LACP on vDS given design parameters
vSphere Web Client > Networking > vDS > Manage > Settings > LACP
Create Link Aggregation Groups (LAG)
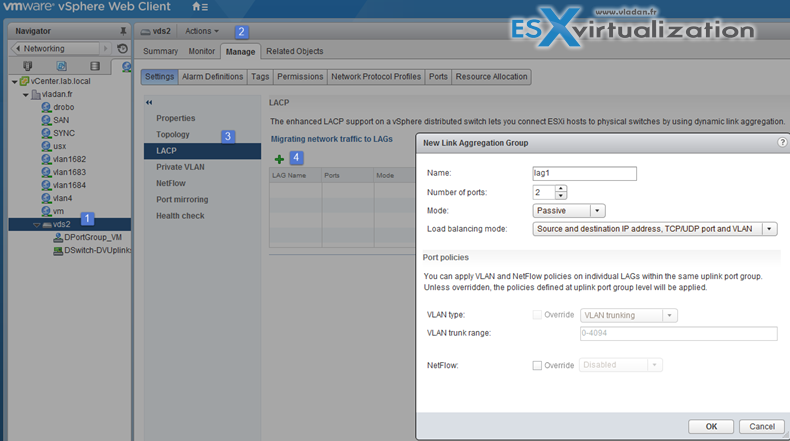
LAG Mode can be:
- Passive – where the LAG ports respond to LACP packets they receive but do not initiate LACP negotiations.
- Active – where LAG ports are in active mode and they initiate negotiations with LACP Port Channel.
LAG load balancing mode (LNB mode):
- Source and destination IP address, TCP/UDP port and VLAN
- Source and destination IP address and VLAN
- Source and destination MAC address
- Source and destination TCP/UDP port
- Source port ID
- VLAN
Note that you must configure the LNB hashing same way on both virtual and physical switch, at the LACP port channel level.
Migrate Network Traffic to Link Aggregation Groups (LAG)
Describe vDS Security Policies/Settings
Note that those security policies exist also on standard switches. There are 3 different network security policies:
- Promiscuous mode – Reject is by default. In case you set to Accept > the guest OS will receive all traffic observed on the connected vSwitch or PortGroup.
- MAC address changes – Reject is by default. In case you set to Accept > then the host will accept requests to change the effective MAC address to a different address than the initial MAC address.
- Forged transmits – Reject is by default. In case you set to Accept > then the host does not compare source and effective MAC addresses transmitted from a virtual machine.

Network security policies can be set on each vDS PortGroup.
Configure dvPort group blocking policies
Port blocking can be enabled on a port group to block all ports on the port group
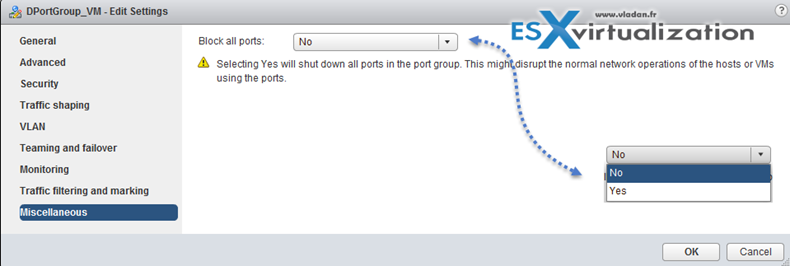
or you can configure the vDS or uplink to be blocked at the vDS level…
vSphere Web Client > Networking > vDS > Manage > Ports
And then select the port > edit settings > Miscellaneous > Override check box > set Block port to yes.

VCP6.5-DCV Objective 2.1
Configure load balancing and failover policies
vDS load balancing (LNB):
- Route based on IP hash – The virtual switch selects uplinks for virtual machines based on the source and destination IP address of each packet.
- Route based on source MAC hash – The virtual switch selects an uplink for a virtual machine based on the virtual machine MAC address. To calculate an uplink for a virtual machine, the virtual switch uses the virtual machine MAC address and the number of uplinks in the NIC team.
- Route based on originating virtual port – Each virtual machine running on an ESXi host has an associated virtual port ID on the virtual switch. To calculate an uplink for a virtual machine, the virtual switch uses the virtual machine port ID and the number of uplinks in the NIC team. After the virtual switch selects an uplink for a virtual machine, it always forwards traffic through the same uplink for this virtual machine as long as the machine runs on the same port. The virtual switch calculates uplinks for virtual machines only once, unless uplinks are added or removed from the NIC team.
- Use explicit failover order – No actual load balancing is available with this policy. The virtual switch always uses the uplink that stands first in the list of Active adapters from the failover order and that passes failover detection criteria. If no uplinks in the Active list are available, the virtual switch uses the uplinks from the Standby list.
- Route based on physical NIC load (Only available on vDS) – based on Route Based on Originating Virtual Port, where the virtual switch checks the actual load of the uplinks and takes steps to reduce it on overloaded uplinks. Available only for vSphere Distributed Switch. The distributed switch calculates uplinks for virtual machines by taking their port ID and the number of uplinks in the NIC team. The distributed switch tests the uplinks every 30 seconds, and if their load exceeds 75 percent of usage, the port ID of the virtual machine with the highest I/O is moved to a different uplink.
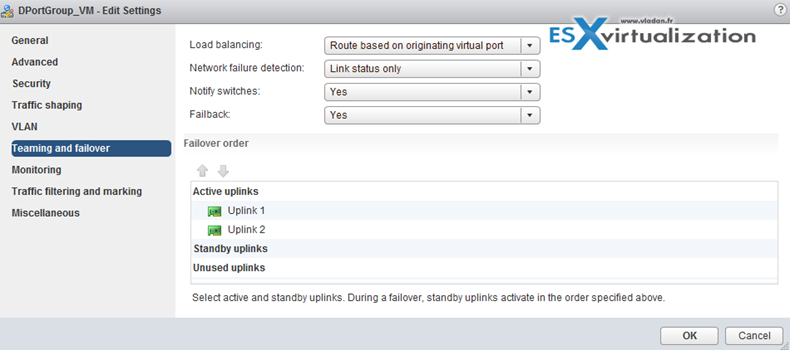
Virtual switch failover order:
- Active uplinks
- Standby uplinks
- Unused uplinks
Configure VLAN/PVLAN settings for VMs given communication requirements
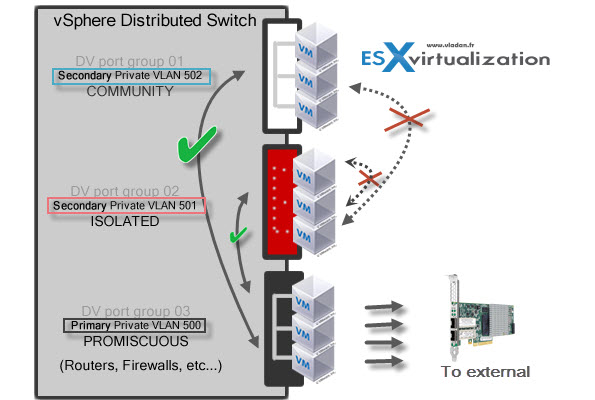
Private VLANs allows further segmentation and creation of private groups inside each of the VLAN. By using private VLANs (PVLANs) you splitting the broadcast domain into multiple isolated broadcast “subdomains”.
Private VLANs needs to be configured at the physical switch level (the switch must support PVLANs) and also on the VMware vSphere distributed switch. (Enterprise Plus is required). I’ts more expensive and takes a bit more work to set up.
There are different types of PVLANs:
Primary
- Promiscuous Primary VLAN – Imagine this VLAN as a kind of a router. All packets from the secondary VLANS go through this VLAN. Packets which also goes downstream and so this type of VLAN is used to forward packets downstream to all Secondary VLANs.
Secondary
- Isolated (Secondary) – VMs can communicate with other devices on the Promiscuous VLAN but not with other VMs on the Isolated VLAN.
- Community (Secondary) – VMs can communicate with other VMs on Promiscuous and also w those on the same community VLAN.
The graphics show it all…
Configure traffic shaping policies
vDS supports both ingress and egress traffic shaping.
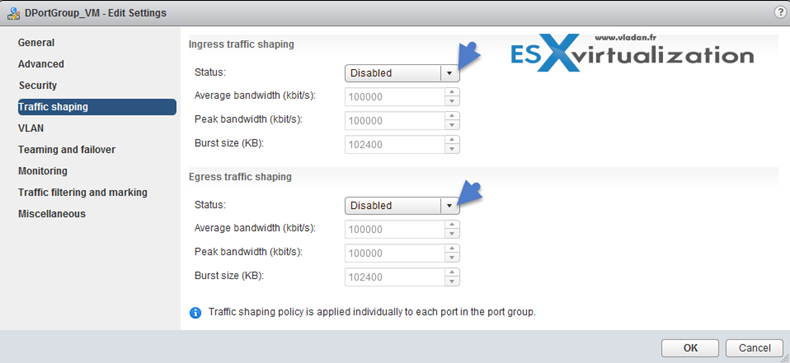
Traffic shaping policy is applied to each port in the port group. You can Enable or Disable the Ingress or egress traffic
- Average bandwidth in kbits (Kb) per second – Establishes the number of bits per second to allow across a port, averaged
over time. This number is the allowed average load.
- Peak bandwidth in kbits (Kb) per second – Maximum number of bits per second to allow across a port when it is sending or receiving a burst of traffic. This number limits the bandwidth that a port uses when it is using its burst bonus.
- Burst size in kbytes (KB) per second – Maximum number of bytes to allow in a burst. If set, a port might gain a burst bonus if it does not use all its allocated bandwidth. When the port needs more bandwidth than specified by the average bandwidth, it might be allowed to temporarily transmit data at a higher speed if a burst bonus is available
Enable TCP Segmentation Offload support for a virtual machine
Use TCP Segmentation Offload (TSO) in VMkernel network adapters and virtual machines to improve the network performance in workloads that have severe latency requirements.
When TSO is enabled, the network adapter divides larger data chunks into TCP segments instead of the CPU. The VMkernel and the guest operating system can use more CPU cycles to run
applications.
By default, TSO is enabled in the VMkernel of the ESXi host, and in the VMXNET 2 and VMXNET 3 virtual machine adapters
Enable Jumbo Frames support on appropriate components
here are many places where you can enable Jumbo frames and you should enable jumbo frames end-to-end. If not the performance will not increase, but rather the opposite. Jumbo Frames can be enabled on a vSwitch, vDS, and VMkernel Adapter.
Jumbo frames maximum value = 9000.

Recognize behavior of vDS Auto-Rollback
By rolling configuration changes back, vSphere protects hosts from losing connection to vCenter Server as a result of misconfiguration of the management network.
VMware recognizes Host networking rollback and vDS rollback.
Host networking rollback – Host networking rollbacks can happen when an invalid change is made to the networking configuration for the connection with vCenter Server. Every network change that disconnects a host also triggers a rollback. The following examples of changes to the host networking configuration might trigger a rollback:
- Updating the speed or duplex of a physical NIC.
- Updating DNS and routing settings
- Updating teaming and failover policies or traffic shaping policies of a standard port group that contains the management VMkernel network adapter.
- Updating the VLAN of a standard port group that contains the management VMkernel network adapter.
- Increasing the MTU of management VMkernel network adapter and its switch to values not supported by the physical infrastructure.
- Changing the IP settings of management VMkernel network adapters.
- Removing the management VMkernel network adapter from a standard or distributed switch.
- Removing a physical NIC of a standard or distributed switch containing the management VMkernel network adapter.
- Migrating the management VMkernel adapter from vSphere standard to distributed switch.
vSphere Distributed Switch (vDS) Rollback – vDS rollbacks happens when invalid updates are made to distributed switches, distributed port groups, or distributed ports. The following changes to the distributed switch configuration trigger a rollback:
- Changing the MTU of a distributed switch.
- Changing the following settings in the distributed port group of the management VMkernel network adapter:
- Teaming and failover
- VLAN
- Traffic shaping
- Blocking all ports in the distributed port group containing the management VMkernel network adapter.
- Overriding the policies on at the level of the distributed port for the management VMkernel network adapter.
Configure vDS across multiple vCenters to support [Long Distance vMotion]
Starting vSphere 6.0 you have a possibility to migrate VMs between vCenter Server instances. You'll want to do that in some cases, like:
- Balance workloads across clusters and vCenter Server instances.
- Expand or shrink capacity across resources in different vCenter Server instances in the same site or in another geographical area.
- Move virtual machines to meet different Service Level Agreements (SLAs) regarding storage space, performance, and so on.
Requirements:
- The source and destination vCenter Server instances and ESXi hosts must be 6.0 or later.
- The cross vCenter Server and long-distance vMotion features require an Enterprise Plus license.
- Both vCenter Server instances must be time-synchronized with each other for correct vCenter Single Sign-On token verification.
- For migration of computing resources only, both vCenter Server instances must be connected to the shared virtual machine storage.
- When using the vSphere Web Client, both vCenter Server instances must be in Enhanced Linked Mode and must be in the same vCenter Single Sign-On domain. This lets the source vCenter Server to authenticate to the destination vCenter Server.
- If the vCenter Server instances exist in separate vCenter Single Sign-On domains, you can use vSphere APIs/SDK to migrate virtual machines.
The migration process performs checks to verify that the source and destination networks are similar.
vCenter Server performs network compatibility checks to prevent the following configuration problems:
- MAC address compatibility on the destination host
- vMotion from a distributed switch to a standard switch
- vMotion between distributed switches of different versions
- vMotion to an internal network, for example, a network without a physical NIC
- vMotion to a distributed switch that is not working properly
- vCenter Server does not perform checks for and notifies you of the following problems:
If the source and destination distributed switches are not in the same broadcast domain, virtual machines lose network connectivity after migration.
Compare and contrast vSphere Distributed Switch (vDS) capabilities
When you configure vDS on a vCenter server, the settings are pushed to all ESXi hosts which are connected to the switch.
vSphere Distributed Switch separates data plane and the management plane. The data plane implements the package switching, filtering, tagging, etc. The management plane is the control structure that you use to configure the data plane functionality.
The management functionality of the distributed switch resides on the vCenter Server system that lets you administer the networking configuration of your environment on a data center level. The data plane remains locally on every host that is associated with the distributed switch. The data plane section of the distributed switch is called a host proxy switch. The networking configuration that you create on vCenter Server (the management plane) is automatically pushed down to all host proxy switches (the data plane).
The vSphere Distributed Switch introduces two abstractions that you use to create consistent networking configuration for physical NICs, virtual machines, and VMkernel services.
Uplink port group – An uplink port group or dvuplink port group is defined during the creation of the distributed switch and can have one or more uplinks. An uplink is a template that you use to configure physical connections of hosts as well as failover and load balancing policies. You map physical NICs of hosts to uplinks on the distributed switch. At the host level, each physical NIC is connected to an uplink port with a particular ID. You set failover and load balancing policies over uplinks and the policies are automatically propagated to the host proxy switches, or the data plane. In this way, you can apply consistent failover and load balancing configuration for the physical NICs of all hosts that are associated with the distributed switch.
Distributed port group – Distributed port groups provide network connectivity to virtual machines and accommodate VMkernel traffic. You identify each distributed port group by using a network label, which must be unique to the current data center. You configure NIC teaming, failover, load balancing, VLAN, security, traffic shaping, and other policies on distributed port groups. The virtual ports that are connected to a distributed port group share the same properties that are configured to the distributed port group. As with uplink port groups, the configuration that you set on distributed port groups on vCenter Server (the management plane) is automatically propagated to all hosts on the distributed switch through their host proxy switches (the data plane). In this way, you can configure a group of virtual machines to share the same networking configuration by associating the virtual machines to the same distributed port group.
Configure multiple VMkernel Default Gateways
In order to override the default gateway for a VMkernel adapter to provide a different gateway for services such as vMotion and Fault Tolerance logging, you'll need to assign another gateway. Each TCP/IP stack on a host can have only one default gateway. This default gateway is part of the routing table and all services that operate on the TCP/IP stack use it.
For example, the VMkernel adapters vmk0 and vmk1 can be configured on a host.
vmk0 is used for management traffic on the 10.162.10.0/24 subnet, with default gateway 10.162.10.1
vmk1 is used for vMotion traffic on the 172.16.1.0/24 subnet
If you set 172.16.1.1 as the default gateway for vmk1, vMotion uses vmk1 as its egress interface with the gateway 172.16.1.1. The 172.16.1.1 gateway is a part of the vmk1 configuration and is not in the routing table. Only the services that specify vmk1 as an egress interface use this gateway. This provides additional Layer 3 connectivity options for services that need multiple gateways.
You can use the vSphere Web Client or an ESXCLI command to configure the default gateway of a VMkernel adapter
Configure ERSPAN
Port Mirroring. ERSPAN and RSPAN allow vDS to mirror traffic across the datacenter to perform remote traffic collection for central monitoring. IPFIX or NetFlow version v10 is the advanced and flexible protocol that allows defining the NetFlow records that can be collected at the VDS and sent across to a collector tool.
Available since vSphere 5.1, allows creating a port mirroring session by using vSphere web client to mirror vDS traffic to ports, uplinks, and remote IP addresses.
Requirements:
- vDS 5.0 and later.
Then
- Select Port Mirroring Session Type, to begin a port mirroring session, you must specify the type of port mirroring session.
- Specify Port Mirroring Name and Session Details, to continue creating a port mirroring session, specify the name, description, and session details for the new port mirroring session.
- Select Port Mirroring Sources, to continue creating a port mirroring session, select sources and traffic direction for the new port mirroring session.
- Select Port Mirroring Destinations and Verify Settings, to complete the creation of a port mirroring session, select ports or uplinks as destinations for the port mirroring session.
Create and configure custom TCP/IP Stacks
You can create a custom TCP/IP stack on a host to forward networking traffic through a custom application.
- Open an SSH connection to the host.
- Log in as the root user.
- Run the vSphere CLI command.
- esxcli network ip netstack add -N=”stack_name”
The custom TCP/IP stack is created on the host. You can assign VMkernel adapters to the stack.
Configure Netflow
You can analyzeVMs IP traffic that flows through a vDS by sending reports to a NetFlow collector. It is vDS 5.1 and later which supports IPFIX – Netflow version 10.
vSphere Web client > vDS > Actions > Settings > Edit Netflow Settings
There you can set collector port, Observation Domain ID that identifies the information related to the switch, and also some advanced settings such as Active (or idle) flow export timeout, sampling rate or to process internal flows only.
Wrap up:
The exam has 70 Questions (single and multiple choices), passing score 300, and you have 105 min to complete the test. Price: $250. Wish everyone good luck with the exam.
Tip: Check our How-to, tutorials, videos on a dedicated vSphere 6.5 Page.
Check our VCP6.5-DCV Study Guide Page.
More from ESX Virtualization:
- What Is VMware Virtual NVMe Device?
- What is VMware Memory Ballooning?
- VMware Transparent Page Sharing (TPS) Explained
- V2V Migration with VMware – 5 Top Tips
- VMware Virtual Hardware Performance Optimization Tips
Stay tuned through RSS, and social media channels (Twitter, FB, YouTube)



The procedures here are from web client of vsphere 6.0, although the difference between the interface of 6.5 and 6.0 are minimal, you should still put a little reminder as to not confuse other people who are still studying and not that well-versed in vsphere.
I myself was confused in the first place and I wouldn’t be able to verify it quickly if I hadn’t have a lab.
True, and I’ll do that. Thanks -:)