Today's objective is VCP6.5-DCV Objective 6.2 – Configure and Administer vCenter Data Protection (VDP). While VDP product was phased out and future releases of vSphere won't have VDP, it's still used in production. But VMware maintains this topic as an exam topic to pass a VCP6.5-DCV certification exam because vSphere 6.5 has VDP within the product suite.
Our New VCP6.5-DCV Study Guide page is starting to fill up with topics from the Exam Preparation Guide (previously called Exam Blueprint), check back frequently to see the work in progress. Don't hesitate to get back to us for updates, errors or additional topics we missed.
Why would you like still to study towards VCP6-DCV? Because the VCP6-DCV – Exam Number: 2V0-621 has 28 Objectives only compared to the VCP6.5-DCV (Exam Code: 2V0-622) which is few chapters longer (it has 32 Objectives).
The exam has 70 Questions (single and multiple choices), passing score 300, and you have 105 min to complete the test. Price: $250
Tip: Check our How-to, tutorials, videos on a dedicated vSphere 6.5 Page.
Check our VCP6.5-DCV Study Guide Page.
You can download your free copy via this link – Download Free VCP6.5-DCV Study Guide at Nakivo.
Objective 6.2 – Configure and Administer vCenter Data Protection
- Deploy VDP Application Agents
- Differentiate VMware Data Protection capabilities
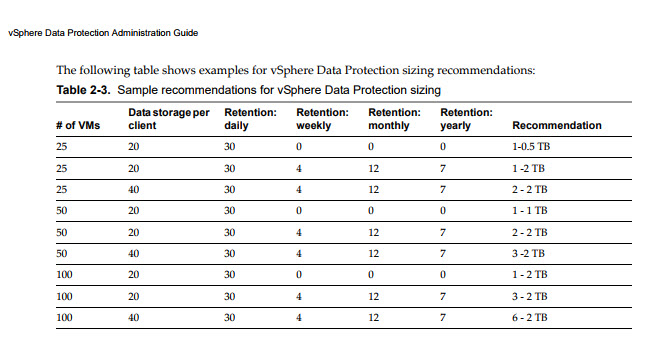
- Explain VMware Data Protection sizing guidelines
- Create/Delete/Consolidate virtual machine snapshots
- Install and Configure VMware Data Protection
- Create a backup job with VMware Data Protection
- Backup/Restore a virtual machine with VMware Data Protection
Deploy VDP Application Agents
VDP supports granular guest-level backup and recovery support for:
- Microsoft Exchange Servers
- SQL Servers
- SharePoint Servers.
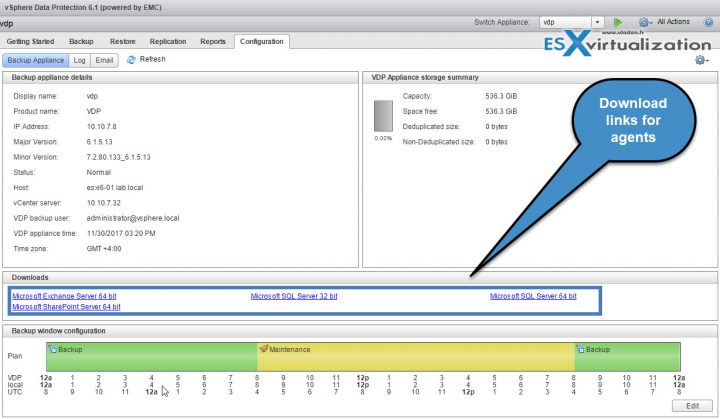
To support guest-level backups, a VDP client is installed on the Exchange Servers, SharePoint Servers, and SQL Servers. It is a process of downloading the agent from within the VDP UI and installing it on the guest OS. It's an MSI package so if you have many systems, you might consider deploying those agents via Microsoft AD and using GPO.
Differentiate VMware Data Protection (VDP) capabilities
VDP uses Image Level Backup and Restore. VDP creates image-level backups, which are integrated with the vStorage API for Data Protection. The VDP appliance communicates with the vCenter server to make a snapshot of a virtual machine’s .vmdk files. Deduplication takes place within the appliance by using a patented variable-length deduplication technology.
vSphere Data Protection’s algorithm analyzes the binary structure of a data set (all the 0s and 1s that make up a dataset) in order to determine segment boundaries that are context-dependent. Variable-length segments average 24 KB in size and are compressed to an average of 12 KB. By analyzing the binary structure within the VMDK files, vSphere Data Protection works for all file types and sizes and intelligently deduplicates the data.
In fact, VDP product is based on EMC’s Avamar code.
Each VDP appliance can simultaneously back up to 8 virtual machines if the internal proxy is used, or back up to 24 virtual machines if the maximum number of 8 external proxies are deployed with the VDP appliance.
VDP utilizes the Changed Block Tracking (CBT) to backup only changes, after the successful first full backup. It's also used for restores of VMs to their original location and reduces data transfer within the vSphere environment during a recovery operation and more importantly reduces the recovery time.
VDP automatically evaluates the workload between both restore methods (full image restore or a recovery leveraging CBT) and performs the method resulting in the fastest restore time. This is useful in scenarios where the change rate since the last backup in a virtual machine being restored is very high and the overhead of a CBT analysis operation would be more costly than a direct full-image recovery. VDP determines which method results in the fastest image recovery times for virtual machines in the environment.
vCenter Server Backup and Restore support – VDP supports backups of a vCenter Server by using an embedded Platform Service Controller (PSC) and an external PSC. VDP can perform file system quiescing during backups.
You must create a separate backup job that contains only vCenter Server. Schedule this backup job in the VDP backup window during off-peak times to ensure that you can generate a file system-consistent snapshot during the backup. If the vCenter Server’s workload is heavy, the backup can fail because of failure to quiesce the VM. vCenter Server is also reasonably resilient to crash-consistent restore. However, VMware supports backup and restore of vCenter Server by using VDP on the best-effort basis, and does not guarantee a successful restore.
Single VMDK Backup and Restore – You can select individual disk backup job, which allows you to select only the disks you need.
When you restore a VM, the VDP appliance restores the VM configuration file (.vmx), which results in the creation of all VMDKs from the original VM. If any of the original VMDKs were not backed up, the restore process creates them as provisional VMDKs. The VM may not be fully functional in this case. The protected VMDKs, however, can be accessed from the restore.
Guest-level Backup and Restore – You'll have to install (and maintain) agents inside the VMs. VDP supports guest-level backups for Microsoft SQL Servers, Exchange Servers, and Share Point Servers. With guest-level backups, client agents (VMware VDP for SQL Server Client, VMware VDP for Exchange Server Client, or VMware VDP for SharePoint Server Client) are installed on the SQL Server, Exchange Server, or SharePoint Server in the same manner that backup agents are typically installed on physical servers.
The advantages of VMware guest-level backups are:
- Provides additional application support for Microsoft SQL Server, Microsoft Exchange Server, or SharePoint Server inside the VMs
- Support for backing up and restoring entire Microsoft SQL Server, Microsoft Exchange Server, or SharePoint Servers or selected databases
- Identical backup methods for physical and virtual machines
Replication – Think of it as a Backup copy job, if you're using Veeam… VDP replication enables you to avoid data loss if the source VDP appliance fails because copies of the backups are available on the destination target.
Replication jobs determine which backups are replicated, and when and to where the backups are replicated. With scheduled or ad hoc replication jobs for clients that have no restore points, only the client is replicated on the destination server. Backups created with VDP 6.0 or later can be replicated to another VDP appliance, to an EMC Avamar server, or to a Data Domain system. If the target VDP appliance is 5.8 or earlier, then the target must be VDP Advanced or Replication Target Identity.
File Level Recovery – File Level Recovery (FLR) allows local administrators of protected virtual machines to browse and mount backups for the local machine. From these mounted backups, the administrator can then restore individual files. FLR is accomplished by using the VDP Restore Client.
Explain VMware Data Protection sizing guidelines
You must do some math before deploying VDP because you must know which size of appliance and number of appliances are necessary for your environment:
- Number of and type of VMs
- Amount of data
- Retention periods (daily, weekly, monthly, yearly)
- Typical change rate
You must think before on what size you’ll need at the destination deduplication datastore since the VDP appliance size cannot be changed later.
Create/Delete/Consolidate virtual machine snapshots
VM's snapshots should not be used in production. Everyone knows that.
Memory Snapshots – The default selection for taking snapshots. When you capture the virtual machine’s memory state, the snapshot retains the live state of the virtual machine. Memory snapshots create a snapshot at a precise time, for example, to upgrade software that is still working. If you take a memory snapshot and the upgrade does not complete as expected, or the software does not meet your expectations, you can revert the virtual machine to its previous state.
When you capture the memory state, the virtual machine’s files do not require quiescing. If you do not capture the memory state, the snapshot does not save the live state of the virtual machine and the disks are crash consistent unless you quiesce them.
Quiesced Snapshots – When you quiesce a virtual machine, VMware Tools quiesces the file system of the virtual machine. A quiesce operation ensures that a snapshot disk represents a consistent state of the guest file systems. Quiesced snapshots are appropriate for automated or periodic backups. For example, if you are unaware of the virtual machine’s activity, but want several recent backups to revert to, you can quiesce the files.
If the virtual machine is powered off or VMware Tools is not available, the Quiesce parameter is not available. You cannot quiesce virtual machines that have large capacity disks.
Delete – Use the Delete option to remove a single parent or child snapshot from the snapshot tree. Delete writes disk changes that occur between the state of the snapshot and the previous disk state to the parent snapshot. You can also use the Delete option to remove a corrupt snapshot and its files from an abandoned branch of the snapshot tree without merging them with the parent snapshot.
Delete All – Use the Delete All option to delete all snapshots from the Snapshot Manager. Deleting a snapshot removes the snapshot from the Snapshot Manager. The snapshot files are consolidated and written to the parent snapshot disk and merge with the virtual machine base disk.
When you delete the base parent snapshot, all changes merge with the base virtual machine disk.
To delete a snapshot, a large amount of information needs to be read and written to a disk. This process can reduce virtual machine performance until consolidation is complete. Consolidating snapshots removes redundant disks, which improves virtual machine performance and saves storage space. The time it takes to delete snapshots and consolidate the snapshot files depends on the amount of data that the guest operating system writes to the virtual disks after you take the last snapshot. The required time is proportional to the amount of data the virtual machine is writing during consolidation if the virtual machine is powered on.
The presence of redundant delta disks can adversely affect virtual machine performance. You can combine such disks without violating a data dependency. After consolidation, redundant disks are removed, which improves virtual machine performance and saves storage space.
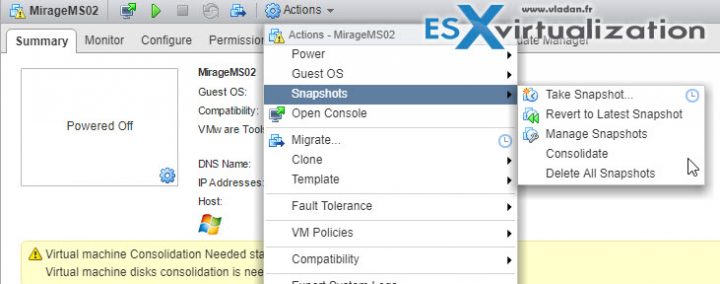
Snapshot consolidation is useful when snapshot disks fail to compress after a Delete or Delete all operation. This might happen, for example, if you delete a snapshot but its associated disk does not commit back to the base disk.
The Needs Consolidation column in the vSphere Web Client shows the virtual machines to consolidate.
Show consolidation column: Right-click the menu bar for any virtual machine column and select Show/Hide Columns > Needs Consolidation.
To consolidate the files, right-click the virtual machine and select Snapshots > Consolidate. Check the Needs Consolidation column to verify that the task succeeded.
Install and Configure VMware Data Protection
VDP is VSA based (Linux). The deployment as an OVF is fast and convenient.
VDP System Requirements VDP is available in the following configurations:
- 5 TB
- 1 TB
- 2 TB
- 4 TB
- 6 TB
- 8 TB
- After VDP is deployed the size can be increased.
Screenshot from VMware User Guide.
Requirements:
- NTP – All vSphere hosts and the vCenter Server must have NTP configured properly. The VDP Appliance gets the correct time through vSphere and must not
be configured with NTP. - DNS – create DNS forward and reverse record and check that you have vCenter server responding via nslookup.
Deploy the OVF file via vSphere Web client to a VMFS5 datastore (to avoid block size limitations).
After the deployment and startup of the VM go to the IP address precised on the console.
https://ip_of_vdp:8543/vdp-configure
Login: root
pass: changeme

Follow the assistant, you should have the info pre-filled when you click the next button…
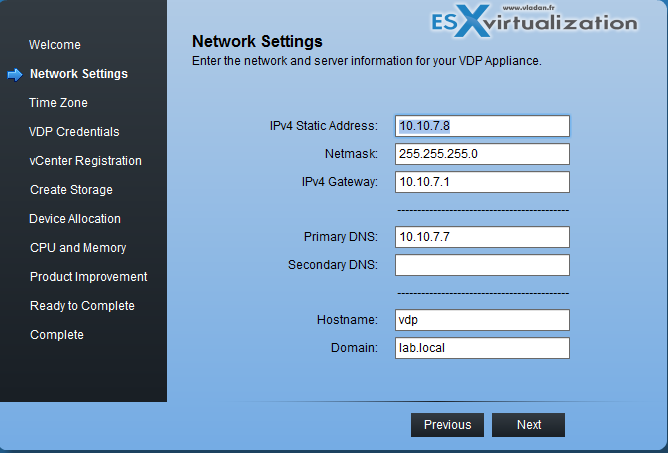
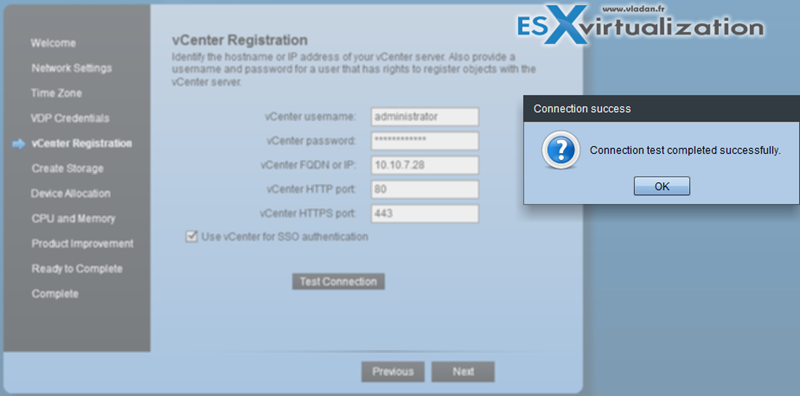
continue with the wizard. Test your connection to vCenter to avoid issues…
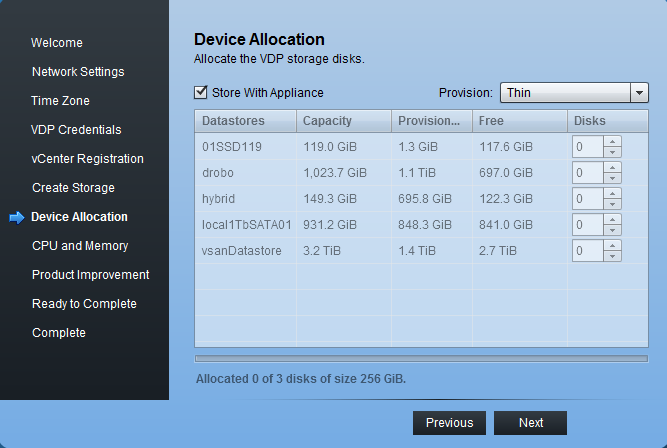
Create storage. Here you can (but don’t have to) check the box “store with appliance” in case you have enough space on the shared storage datastore you have chosen.
Continue with the assistant until the end. After the setup finished the appliance will reboot…
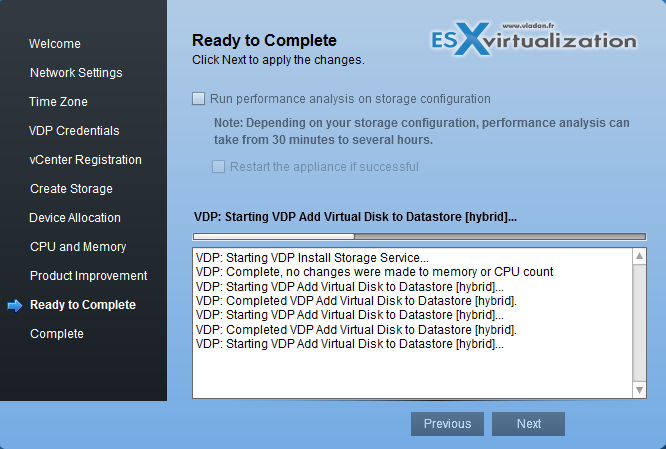
It takes up to 15 min to fully setup after the reboot… -:) You’ll have to log off and log in back again through vSphere web client to see this new plugin to appear.
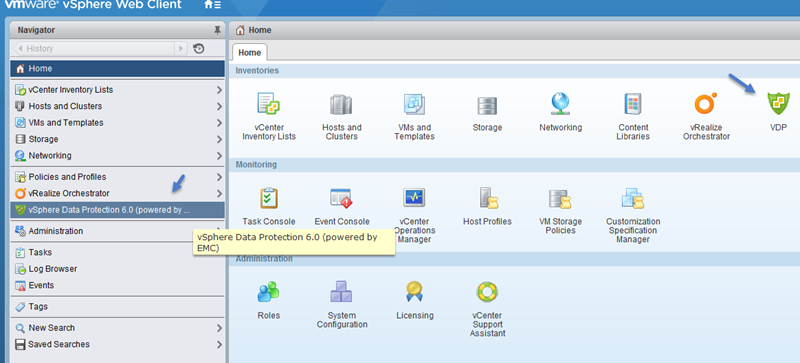
Create a backup job with VMware Data Protection
o create a first backup job, just click through the new icon on the dashboard in vSphere web client.
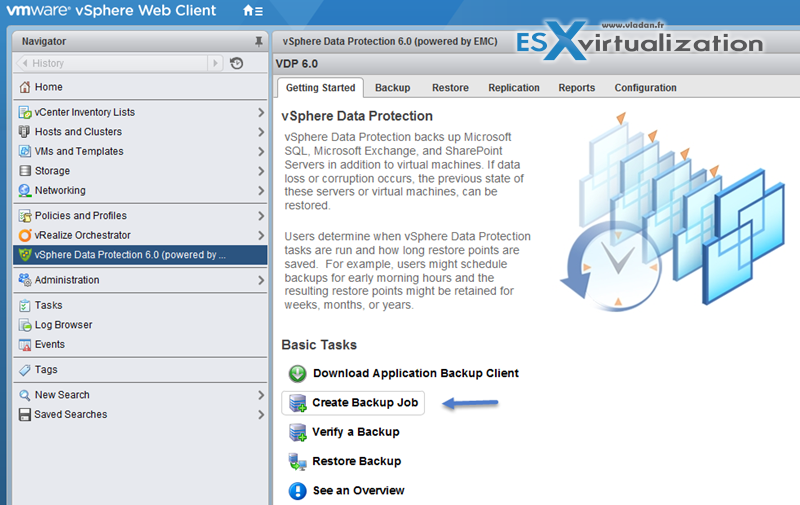
Then start an assistant…

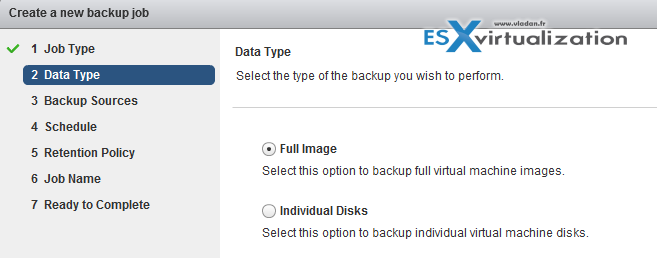
continue..
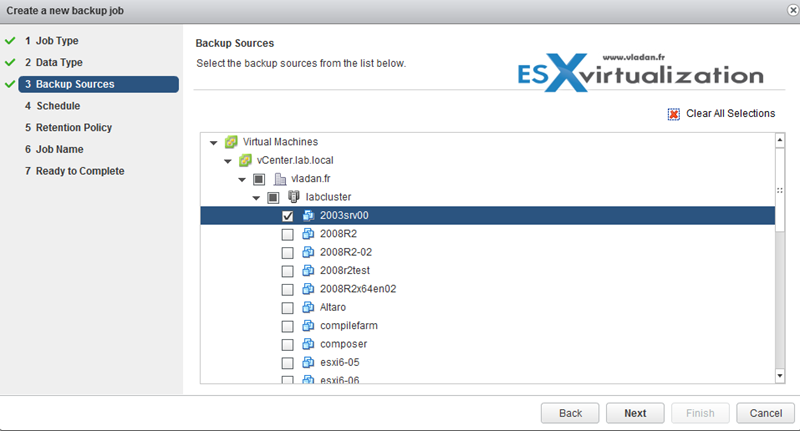
Choose a VM(s)…
Backup schedule…

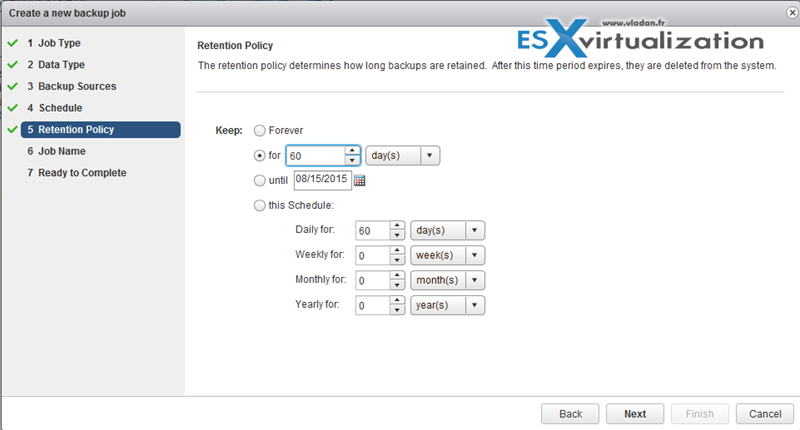
Specify retention policy…. Note that this can be changed later. (Think of sizing).
Give the job some meaningful name…

And off you go.
Just created a first backup job. If you go and click the Configuration TAB, then down there you can configure the Backup window configuration… If not the default backup starts at 8PM…

Backup/Restore a virtual machine with VMware Data Protection
You can run backup jobs immediately by:
- Choosing to backup up a protected virtual machine
- Choosing to run an existing backup job
Select the VM you want to immediately back up:
Right-click the VM > All VDP Actions > Backup Now.
Immediately Running a Backup Job
Click the job you want to run immediately > (use Ctrl- or Shift-click for multiple selections) > Hold down the Ctrl key and click multiple, specific backup jobs. Hold down the Shift key and click a range of backup jobs > Click Backup Now > Drop-down selection > Backup all Sources ( or Backup only out of date sources) > Click the sources you want to back up immediately > OK.
Backup Now Immediately initiates backup jobs if VDP is in the backup window or the maintenance window
Restore Operations
You can restore the backups to either the original location or an alternate location. Restore operations are performed on the Restore tab. The Restore tab displays a list of virtual machines that have been backed up by the VDP appliance. By navigating through the list of backups, you can select and restore specific backups. The list shows specific icons for crash-consistent and application-consistent backups.
Note: There are also icons for crash-consistent backups and the expiration date of the backup.
Detection of the application-consistent backups applies only to the Windows clients. The application-consistent backups on the Linux clients appear with the Consistency level, not aplicable icon.
You can hit refresh to actualize.
Check the Full VCP6.5-DCV Study Page for all documentation, tips, and tricks. Stay tuned for other VCP6.5-DCV topics -:).
More from ESX Virtualization:
- VMware vSphere Essentials Plus Kit Term
- VMware vSphere Essentials Plus
- What Is VMware ESXi Lockdown Mode?
- VMware Configuration Maximums
- Veeam Availability Console Released (VAC)
Stay tuned through RSS, and social media channels (Twitter, FB, YouTube)

