Vmware Mirage has been demoed during the latest VMworld 2012 in Barcelona. I have attended and also I did an interview with a demo there with Tom Nikl. If you have missed that, you can read the original article here – VMware Mirage – VMworld Barcelona Demo.
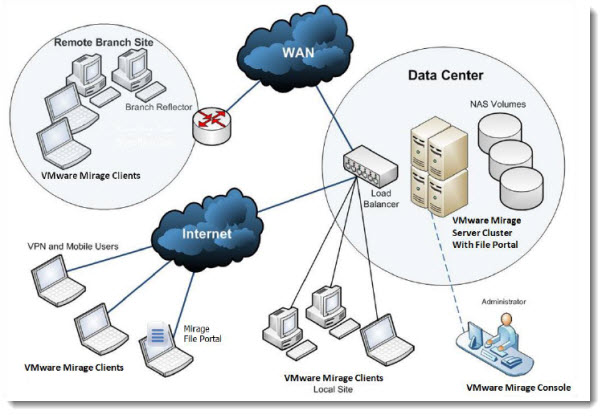
VMware Mirage Architecture is composed from several components which each of those is installed on particular place – in the datacenter, on the client computers etc. Let's see which components are used in the VMware Mirage architecture.
VMware Mirage Architecture.
Mirage client – deployed on the client's computers. The Mirage Client pushes the data from the client to the datacenter where the Mirage Server is deployed. It can be from the LAN or over the WAN. If deployed over the WAN, there are some helper components called Branch Reflectors, but we'll see later on how those can be used. Windows XP Professional with SP2 or SP3, 32-bit can be used, OR windows 7 Pro or Enterprise editions (32 and 64bit).
The client does not has to be a domain member, but the Fast user switching must be disabled. How to do that?
Click Start, click Control Panel, and then click User Accounts.
Click Change the way users log on or off.
If it is not already selected, click to select the Use the Welcome screen check box.
NOTE: The Use Fast User Switching check box is unavailable until you click to select the Use the Welcome screen check box.
Click to select the Use Fast User Switching check box, and then click Apply Options.
Here is the view of the VMware Mirage base architecture. As you can see, the solution can be clustered leveraging several Mirage servers.
Mirage Management Server – it's the main piece of the infrastructure. It manages the storage, and the desktop templates or reference machines. By using several Mirage servers, you can create cluster which is managed by another component (non used in this article) called Mirage Management server. For our lab deployment we'll use only 4 components (Mirage Client, Mirage Management Server, Mirage Server and Mirage Management Console).
Mirage Management Console – through this console, which can be installed on the Admin's laptop, you're able to connect to Mirage server and do the management tasks.
So in my small lab environment I'm using only those four components. VMware Mirage can be deployed quite easily. Let's recap on what's necessary.
VMware Mirage System Requirements.
Step 1 : VMware Mirage Server – can be deployed on Windows Server 2008 R2 Standard Edition, 64-bit. A Microsoft domain membership is required. Ok, I deployed from a template in my lab VM, which I made a member server of my local Microsoft domain. I'm not detailing those steps since I suppose that everyone can do that. I used fixed IP and made sure that I have a reverse DNS working.
Step 2: Second step is to install SQL Server 2008 R2 Express Edition (download from this link) and install it on the VMware Mirage server. You can accept the defaults during the installation.
One thing to do after the installation of the SQL Server 2008 R2 Express, is to setup the “SQL Server Browser” windows service to Automatic. (After installation this service is disabled and stopped).
You can do it through the Windows MMC for services.
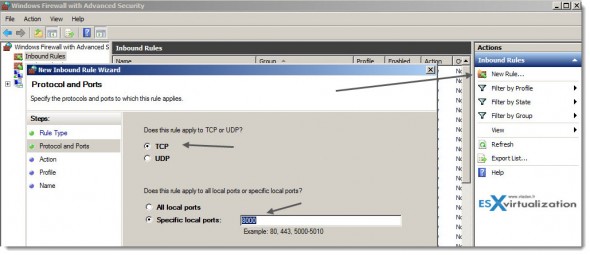
Step 3: Add firewall exception – an inbound rule – to enable the communication of Mirage server with Mirage clients. To open port number 8000.
Step 4: Now we can start installing Mirage. In the trial download, there are several files, so it's important the order in which we install the solution. First execute the file mirage.management.server.x64.msi
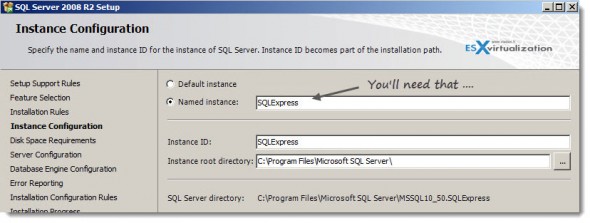
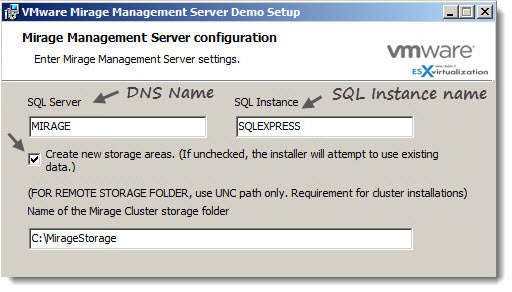
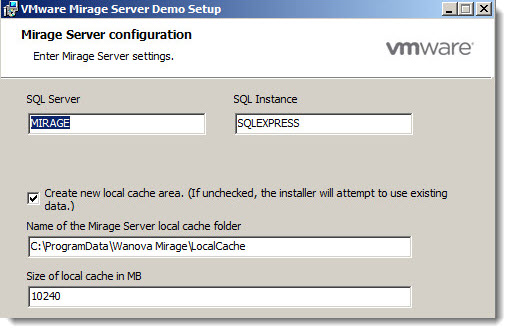
After the initial two screens, you'll be asked about the SQL Server and SQL instance names. That's where you will look at my screenshot where I'm telling you that “you” ll need that…”
Info: VMware Mirage is available for purchase at VMware.
As for the storage, you don't have to worry about that if you don't have enough space, or not configured any iSCSI, or other storage space with enough capacity right now, because you can easily add another storage node later through the management console.
You should end up with screen like this. Make sure that you enter the netbios name on the left and the SQL instance name on the right (Hint: you can also see the SQL instance name when you look through windows services…).
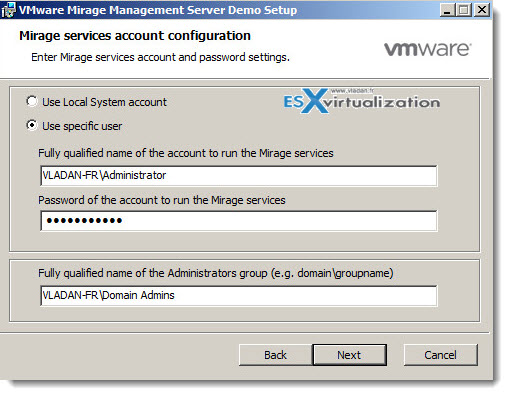
And the next screen, you'll define the Service account information. In my case, I'm using the default domain admin account, but you might probably want to separate those roles in order to separate those privileges.
Step 5: Let's continue with the setup of VMware Mirage server VM. We will install a second component which is the Mirage Management Console. The file is called mirage.management.console.x64.msi

Make sure that you know the IP address of the mirage management server as we'll need it for the installation of the client.
Step 6: Installation of Mirage Server – you'll need the third file which is also part of the bundle. It's the mirage.server.x64.msi file. By executing this, you'll install a component which installs windows service called vmware mirage.
The reboot of the VM is necessary – restart the VM.
This completes the installation of the Mirage Management Server. In the next part, we'll do the rest of the setup. What's next?
VMware Mirage – The Series:
Part 1: (This post) – VMware Mirage Installation – the lab setup
Part 2: VMware Mirage Setup – MMC and Client Setup
Part 3: VMware Mirage – Migrating XP to Windows 7
VMware Mirage is available for purchase at VMware.
Update 2: Check out my detailed posts from my VCP6-DTM Study Guide Page:

