Today we'll be testing the new VCSA 6.5 feature allowing to setup active-passive architecture where the active node is your usual VCSA 6.5 which manages your infrastructure, and the passive node is a node which sits there doing nothing, just receiving files from the active node. So today's post will detail VMware VCSA 6.5 Active-Passive Setup With Simple Configuration.
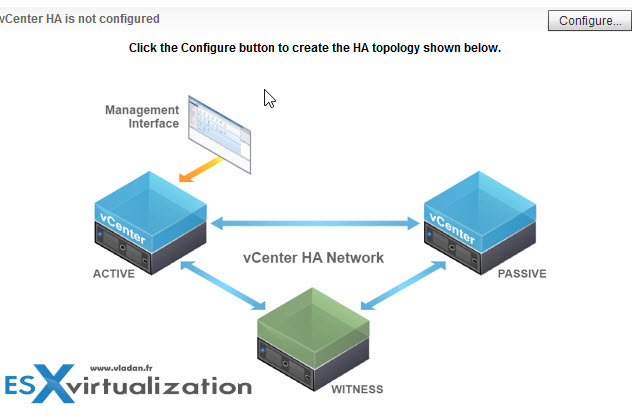
In addition to active and passive nodes, there is also a Witness which will be deployed, so we can consider vCenter HA as a “3-node cluster”. The nodes itself have each its own role, but the Witness appliance is used as a tie-break in case there is a network partitioning between Active and Passive nodes. The Witness will never take the active or passive role.
Note that both, vCenter server and PSC (embedded) or vCenter server with separate PSCs are supported.
There are two ways of creating the vCenter HA
- Basic – minimum info is required through a wizard, like IP information, if you have DRS/storage DRS and then the system will create for you active and passive nodes for you, and create affinity and anti-affinity rules. An additional vNIC is added on the VCSA appliance automatically. Or you can manually select nodes where you want to two VCSAs to run.
- Advanced – a bit more complex. You have to manually clone the VMs (active, passive and witness), provide IP information. You have to manually add an additional vNIC to the appliance. But the advanced workflow allows you to place the VM for example, into another data center, or another site, with different IP addresses etc…
In this post, we'll do the Basic scenario and then there will be a follow-up post with the Advanced configuration where the user configures. In any case, we'll have to create a new network called HA network which is used for the heartbeats.
Update: Note that I have updated the post as Adam Eckerle (check comments) pointed out that the vNIC is added automatically when using the Basic option. However, you still have to create the HA network on your hosts (see Step 0).
VMware VCSA 6.5 Active-Passive Setup Simple Configuration – The steps:
If you haven't done already, deploy your VCSA 6.5 which will be the active node. In the lab we have done it already – How to deploy VMware VCSA 6.5 (VMware vCenter Server Appliance)
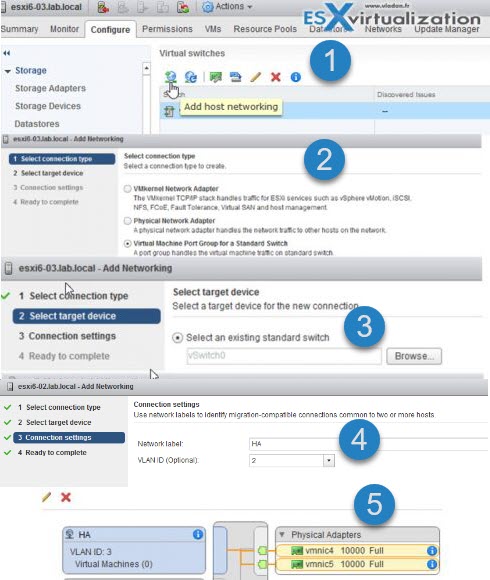
Step 0: Create a vSphere HA network. Open vSphere web client and select host. > configure > Networking > virtual switches.
Here is the workflow…
If you're on Standard switches, you'll have to do that for all the hosts in the management cluster.
Step 1:
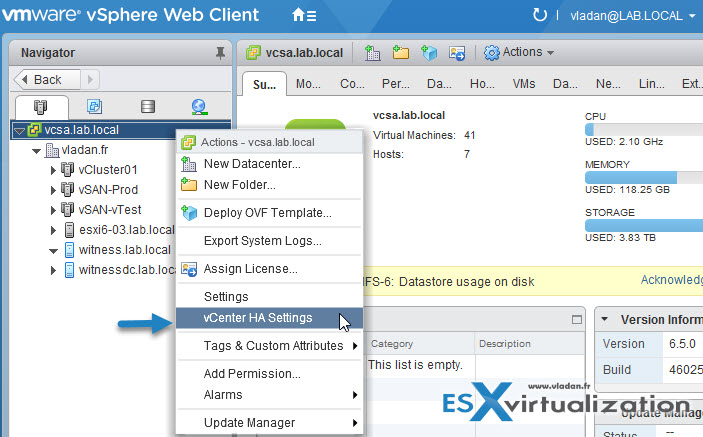
Start the main assistant which will configure the vCenter HA. After you log in to the vSphere Web client, select the vCenter Server > do a right click > vCenter HA settings
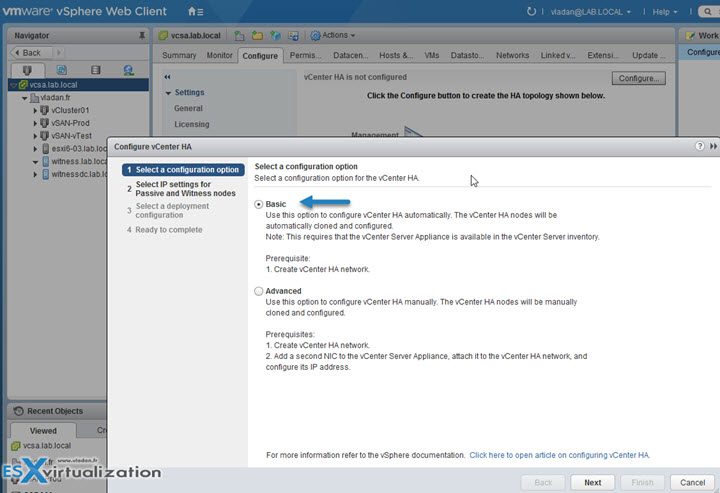
Step 2. You'll have a nice screen telling you that vCenter HA is not configured. Hit the Configure button to start the assistant which has the fist radio button preselected. It is the Basic option. Click the next button. (Note that you'll need to be a member of the SSO Admin group).
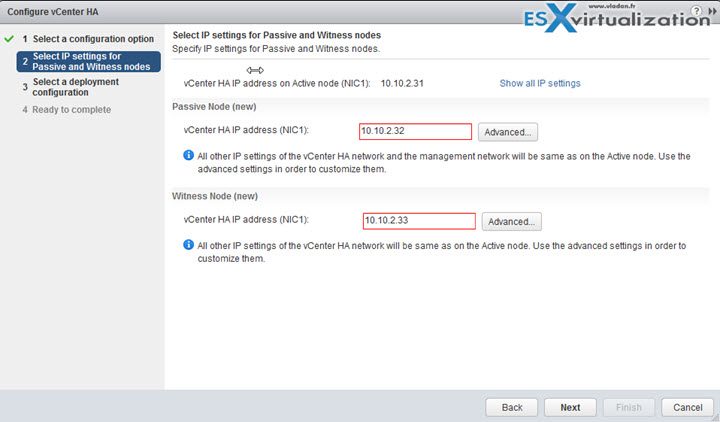
Next page will show up the
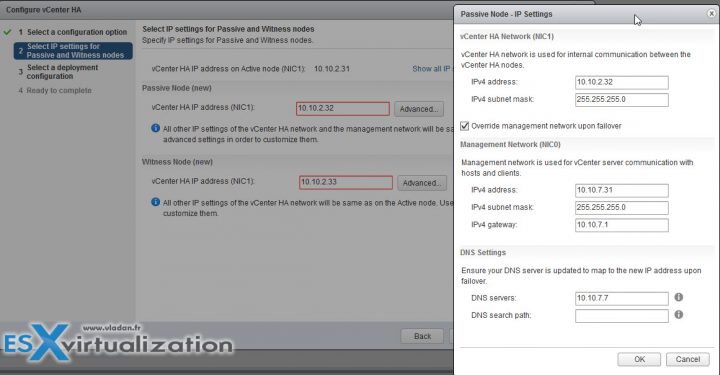
And when you click the Advanced button on the Passive node you can see that you can override management network upon failover. (there is a checkbox)..
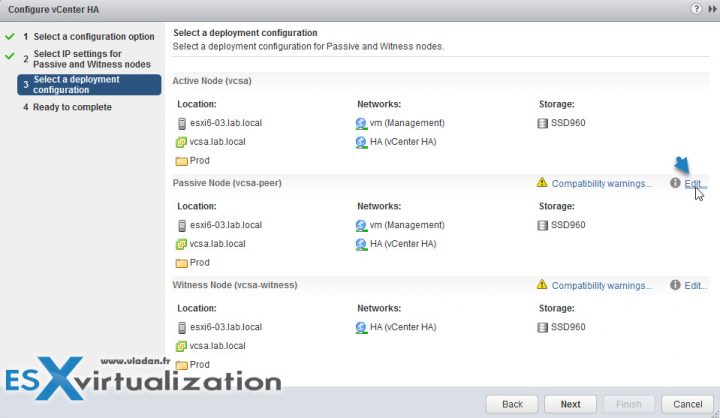
Next, we move the passive node and the Witness node elsewhere.
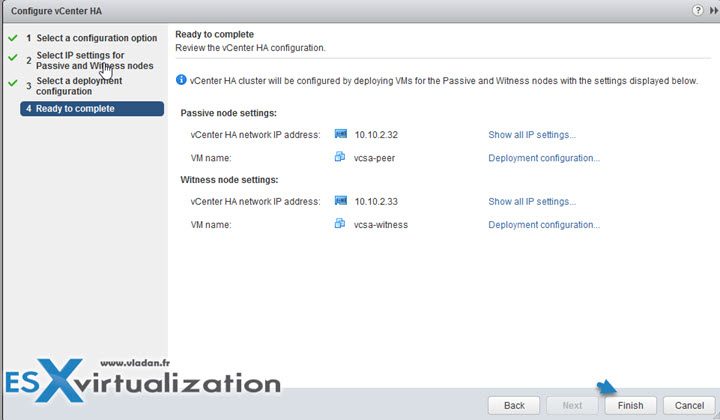
And then finally we can hit the Finish button.
This concludes the workflow. You should have 3 components running:
- VCSA (your primary active VCSA 6.5)
- VCSA-secondary (the passive node)
- VCSA-Witness (appliance running the tiebreaker code)
Here is the final screenshot…. You can see all 3 nodes up and running.
And when you click the Edit button, you can see other options:
- Maintenance Mode – Replication is enabled but automatic failover is disabled.
- Disable vCenter HA – replication and automatic failover are disabled. HA config maintained.
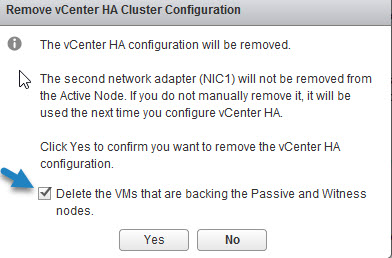
- Remove vCenter HA – This option destroys the HA config. Active mode stays as is – up and running.
Note that the last option (Remove vCenter HA) will also give you the option to Delete the VMs that are backing the Passive and Witness nodes.
Here is a screenshot showing just that…
Update: Here is a video detailing the workflow. Watch in HD and Full Screen…. Here is a video detailing the workflow. Watch in HD and Full Screen….
Wrap-up:
Nice and clean UI. Good job VMware !!! The only “hard” part was actually to add a second vNIC otherwise the assistant is pretty much-taking care of everything. The next post we'll try the advanced configuration to see how it goes. Check the follow up post which details the “Advanced” configuration – VMware VCSA 6.5 Active-Passive Setup With Advanced Configuration.
You can check all posts about vSphere 6.5 on our vSphere 6.5 dedicated WordPress page.
Other vSphere 6.5 posts:
ESXi:
- ESXi Commands List – networking commands [Part 2] – useful to check BEFORE upgrade of ESXi !!! (HCL, Drivers, Firmware…)
- How to Upgrade ESXi 6.0 to 6.5 via CLI [On Line]
- How to Upgrade ESXi 6.0 to 6.5 via ISO
- How to upgrade ESXi 6.0 to ESXi 6.5 via Offline Bundle
- How to upgrade an ESXi 6.0 to ESXi 6.5 via VMware Update Manager – New!!
- How to create a USB media with ESXi 6.5 Installation
vCenter Server (Windows or vCSA 6.5):
- How to deploy VMware VCSA 6.5 (VMware vCenter Server Appliance) – New!!
- How to Migrate Windows based vCenter Server 6.0 to vCenter 6.5 (“In-Place”)
- How to Migrate Windows Based vCenter to VCSA 6.5 [Lab] – Windows to Linux
- How to Install VCSA 6.5 in VMware Workstation [LAB] – “testing”
- VMware VCSA 6.5 Backup and Restore How-To
- VMware VCSA 6.5 Active-Passive Setup With Simple Configuration – [This Post]
Stay tuned through RSS, and social media channels (Twitter, FB, YouTube)



Vladan, I wanted to point out a small correction. For the Basic workflow we add the second vNIC for you. You do not have to add it yourself. For the Basic workflow you really only need to make sure the VCHA port group is available beforehand.
For the Advanced, however, the user does have to add the second vNIC.
That’s even better! Cool. I probably did not read the docs the way I should -:). I’ll correct the post Adam, ASAP, to reflect this.
Thanks,
Vladan
Great post! I have one question about management network. It´s clear to understading that each of 3-nodes will have at least one IP of “HA” network for private communication, right? And about management, how much IPs should I have to configure? One for each or during failover, active node management IP is assigned to passive node like in the old vCenter Heartbeat was done?
Yes, during the failover, the passive node takes the active node’s IP.
Hi Vladan,
Thanks for the great post.
I’m trying to create VCSA HA configuration and it stuck after creating a VCSA02 around 44% and finally it gives error “A general system error occurred: Failed to ssh connect peer node 10.10.10.12”
Configuration:-
VCSA01 – 192.168.0.11 – Management Network
VCSA01 – 10.10.10.11 – HA Network (VLAN 11)
VCSA02 (Peer) – 10.10.10.12 – HA Network (VLAN 11)
VCSA-Witness – 10.10.10.13 – HA Network (VLAN 11)
Can you please help me?
Hi Vladan,
I like your web site and this post is great. I have exactly the same trouble like sunil. I have already tried lot of things but i always have this error “Failed to ssh connect peer node …” 192.168.3.3 for me, management network is 192.168.2.252 for vcsa01. I don’t configure vcenter ha because of that.
Can you please help me? Sunil have you found a solution?
Make sure that your Switches can handle the VLAN that you set up in step 0
Excellent tutorial, thank you very much!
Great explanation
thanks a lot