Update: You should really check the latest post on How to create bootable VMware ESXi 5 U1 by using VMware Player for Free – It's the fastest and easiest method to create bootable USB memory stick with the latest Free VMware ESXi 5 U1 hypervisor.
Written in the past (some time ago…) , I published a how-to called “Howto install ESXi 3.5 update 3 on USB memory key“. The things has changed today a bit. The how-to is about the same but ESXi 4.0 and vSphere is new and it rocks…. We are in the ESX 4 Era… With ESX Server (vSphere) and more than 150 new features packed inside….
If you found this website useful and want to comeback for more, consider subscribing for FREE via RSS. If you don't know what is RSS, don't worry, I wrote a little guide what is RSS and how it saves your daily time.
VMware with vSphere are distancing even more the competition with the performances of vSphere greatly improved. Microsoft's Hyper-V R2 is still in Beta….. Clearly, the time for an investment into a Virtual Infrastructure with VMware was never been more advantageous. Prices for the SMB market are starting from $166 per CPU. Each physical server may contain up to two phycial processors with up to 6 cores per processor.
Ok, here is the how-to:
01.) Get this 2 tools to acomplish the task. IZArc, and also WinImage. (trial)
02.) Head to VMware Website and download the ESXi 4.0 vSphere – register for the free for the download. Here is the link.
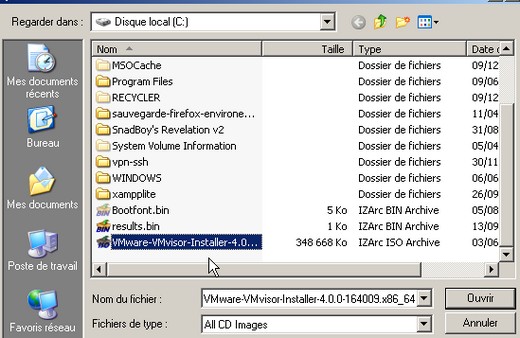
03.)Save the file to the C drive for example.
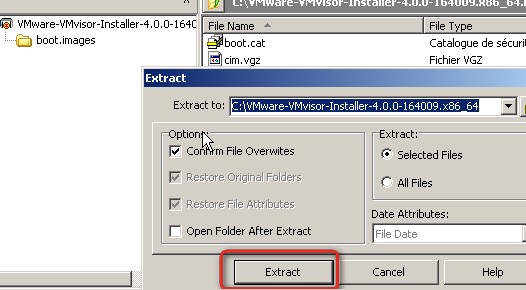
04.) Open the ISO file with IZArc and extract the whole content to c:Vmware-VMvisor-Installer-4.0.0-164009.x86_64 folder .
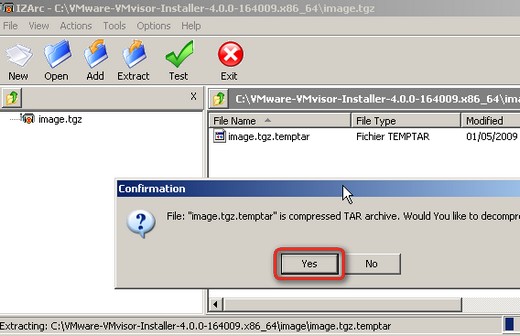
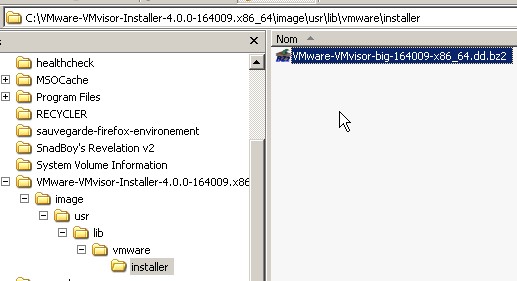
05.) Browse to “image.tgz.temptarusrlibvmwareinstallerVMware-VMvisor-big-164009-x86_64.dd.bz2”
Extract the “VMware-VMvisor-big-164009-x86_64.dd” file. You'll have to extract the “image.tgz.temptar” file first…
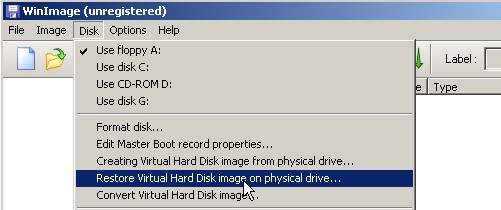
06.) From just open Winimage, and goto file menu: Disk > “Restore Virtual Harddisk Image on physical drive”
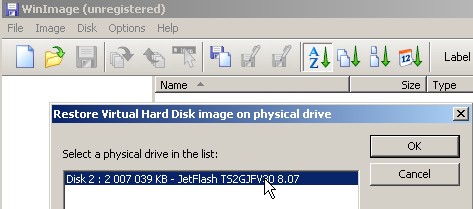
07.) Select your USB drive
08.) Select The file “VMware-VMvisor-big-164009-x86_64.dd” that you extracted earlier.
09.) Click Yes to write the image to the USB Memory Stick. (ooups… I'm running on French Windows here…… -:) ? It's because I have 3 different language versions on my Desktop at home… Where I use VMware Workstation as a Virtual Lab. I hope that you don't mind, the tuto is quite easy to follow…) . If you got any trouble, just comment below and I'll try to help.. -:)
10.) And the result of your effort should look like this.
Enjoy… -:)





There’s an even easier way. Plug in USB stick. Boot from the ESXi installable CD. Select the USB stick as the target. And just install. No need for extracting images or using DD as I used to in the past
OK but what if you do not have the ESXi Cd ?????????????????????????????????
Go and get it as an ISO image at Vmware Website, and then ,you can easily burn it into a CD.. -:)
I’ve tested both ways thanks for this great article.
This is more for ppl who want to customize oem.tgz to include drivers for unrecognized hardware. In which case it won’t boot so far to get to the option to install to usb drive. PEACE
Thanks Mike,
a pleasure to hear that easier way exist. My readers will apreciate this info… and I’ll explore this as soon as I can… -:)
Cheers
Vladan
I can confirm the easier way, works like a charm, on an HP G6 server, even without using HP Certified USB Keys.
Only thing is, doing the install, using HP ILO Virtual Devices is SLOW, as the ILO NIC only runs at 100 Mbit/S, even on the new G6 servers
Hi there,
I can confirm the direct installation on the USB stick, booting on ESXi 4 CD burnt from ISO file is an easier bit! 😉
Also, worth to know that many modern servers have an internal USB port, which allows you to secure the OS better than if it fits in the middle of the cables behind the box… I now run several HP Proliant DL360G5 & DL380G5 with this solution and could relocate all SAS drives (raid 1 previously used to run ESX) to one single DL380 to have local storage for low importance VMs that don’t need SAN availability & performance and I’m much happy with this.
Thanks for the comment. Looks like that ESXi can save some disk space. If there is a possibility to plug-in the USB stick inside the servers, then it’s possible to use the local disks of anything else…. -:) It’s a good idea…
… or simply run diskless servers, that saves energy, money & raises availability rate 😉
ESXi is anyway called to become the only VMware hypervisor, as they plan to get rid of the legacy service console in the future.
Why not use the built-in installer in ESXi 4.0 and go direct to USB flash from CD-ROM? This has changed considerably since ESX 3.5. In fact, the CD-ROM installer will find your USB flash drive and install directly to it without resorting to imaging or dd.
http://solori.wordpress.com/2009/05/22/preview-…
The process – from CD-boot to initial start-up – is about 14 minutes long, depending on CD-ROM speed and flash speed.
While writing this article, I was not aware of this. But Mike Laverick has pointed that already in the comments section. BUT since I externalized my comments to DISQUS now… -:).. all my comments BEFORE seems to dissapear…
Thanks for this. Works like a charm.
Something I just came across that you may want to add to your tutorial(at least I couldn't see that you mentioned it).
The USB thumb drive has to be clean, like no content and no partitions.
Well, all the content will be wiped out anyway during the installation. -:).
Thanks.
Obviously, but on my computer (winxp) your method failed when the USB thumb drive was not completely clean. I deleted all partitions so that disk management said unallocated space on the entire drive and it worked perfectly fine.
I am having the same problem you mentioned. I am trying to clean the thumb drive but I can’t remove the partition. How did you do that? I tried it under disk management in both XP and Vista but it said this operation is not supported on removable drives. Thanks for your help
I used Diskpart.
You can also try to use Gparted Live CD to erase all the partitions…http://gparted.sourceforge.net/screenshots.php
Or as pointed Mike Laverick, install the ESXi 4 directly to USB key. No need to folow “the long” way… -:)
Vladan
I tried to install ESXi 4.0 on the flash drive directly from the CD and I got the message that it was successfully installed but when I reboot using the flash drive, I get the following message: Cannot get bank1 parameters. Warning: Bank1 partition type is invalid. Ignoring. same message for bank2 and then: Panic no usable banks found. Any ideas why am I getting these messages even though it said the install was successful!!!??
Hi, Then there is also a tool to format the USB pen drive from HP. Once I used it to format my USB thumb, since under XP or Win 7 I could not do it. The file is available from here: http://files.extremeoverclocking.com/file.php?f=197
Hope this helps.
Vladan
Hey! Just wanted to respond. I really liked your opinion. Keep up the great work.
Great site and info! I have a DL380 G6 as well. We tried to install on a SD Card embedded using both the wmware download and HP’s download for ESXi but got “fatal error message… unable to write image to selected disk” when trying to select the 4GB PNY SD card to install to. Was able to install on USB drive connected externally just fine though. Can any sd card be used fro this type of install or only the HP supported cards that you buy from HP?
Anyone should fit as ESXi will use standard drivers – but
would recommend Kingston ones though (they are the ones which Dell OEM’s to sell with Poweredge SD-fitted servers (R710 etc.)) don’t know about HP).
Hi all
Just a general information (I’m not a Dell rep!) but new Dell PE R810 does now have a redundant SD slot (kind of mirroring) which will allow failover in case of SD card burnout.
In any case be aware that losing completely the hypervisor e.g. failed USB or SD card (tested that for you) will disconnect the host from VCenter BUT all VMs will still run unaffected, which allows you to postpone the host powerdown to later time.
Note it’s though quite annoying even if running a cluster as you won’t be able to VMotion VMs from this host elsewhere as it’s not connected in VCenter anymore – so will probably result in downtime! Then R810 SD mirroring is a good one, think all vendors will get this soon or late.
Just to say in ESX 4.1, the disk image is now located in the imagedd.bz2 file, you can exact is using the same tools, it’s just a new file to extract inside the VMware-VMvisor-Installer-4.1.0-260247.x86_64 ISO image.
Thanks Ewan for the info… -:)
Wow!!! easy and fast. I haven’t tried installing to a targeted usb device but using your directions I was up and running on 4.0.2 in a few minutes. Nice post!
my scandisk cruzer USB 2.0 is not being recognised by WinImage. Any solutions?
By WinImage? Do you actually see it appearing in the Windows Explorer? If yes then Winimage should not be in trouble…
Do not worry about it. I just re-installed Win Image again and it showed up.
Thanks for the quick reply! and thanks for the detailed procedure… the server our company ordered comes without a CD ROM drive, so your post came to the rescue.
hi again,
i am trying to format the USB which has the ESX on it. But it does not format. Any solution to format the USB drive to brand new?
Hi,
Give a look to HP Low Level Format Tool. It’s a nice one.
Here’s how to do this on a Mac http://blog.scottlowe.org/2009/01/08/creating-a-bootable-esxi-usb-stick-on-mac-os-x/
Do this directions apply to ESXi4.1 free. I am trying to do it but there is no image.tgz file after I extract the iso
extract the iso file ‘VMware-VMvisor-Installer-4.1.0-260247.x86_64.iso’, extract the inner file ‘imagedd.bz2’, and open the file ‘imagedd’ with WinImage