When willing to upload a VM to Ravello cloud, you might want not to shut down your production VM, because as you know, you only can upload VMs that are not running. What to do? There is a way to do it and I'll show you how. Basically you'll need VMware Converter Standalone and clone a running VM within your vSphere environment. The way converter software proceeds is that it deploys a small agent within the running VM and then only you can initiate the clonning operation. With this process you can clone a VM (or physical host) without the need to power down the VM. To today we'll learn small trick How to Hot-Clone a VM and upload to Ravello Cloud.
If you're new to Ravello and want to get started you might want to follow some links below this post. You'll learn what Ravello is, how you can upload a existing VM or create a new one within their cloud UI. There are also some tips as well.
Now let's get back to our subject where we'll be hot clone a Windows VM. Here are the steps:
First, create a shared folder on your management workstation/laptop so this space can be accessed remotely via network path. In my case I just created a shared folder called “share” on my E: drive so I'm able to access it through \\ip_of_my_workstation\share
If you haven't done yet, install VMware converter standalone on your management workstation/laptop and Click on the Convert Machine button.
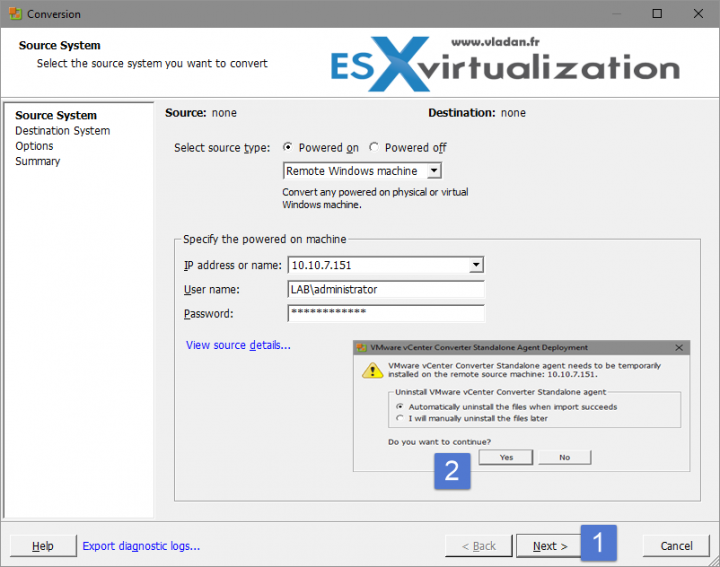
Then select Powered on Remote Windows machine, enter the IP adress and credentials. Click the Next button. You'll see a prompt for installation of a converter agent. There you also have two options for whether you want to uninstall this agent at the end of the conversion process or not.
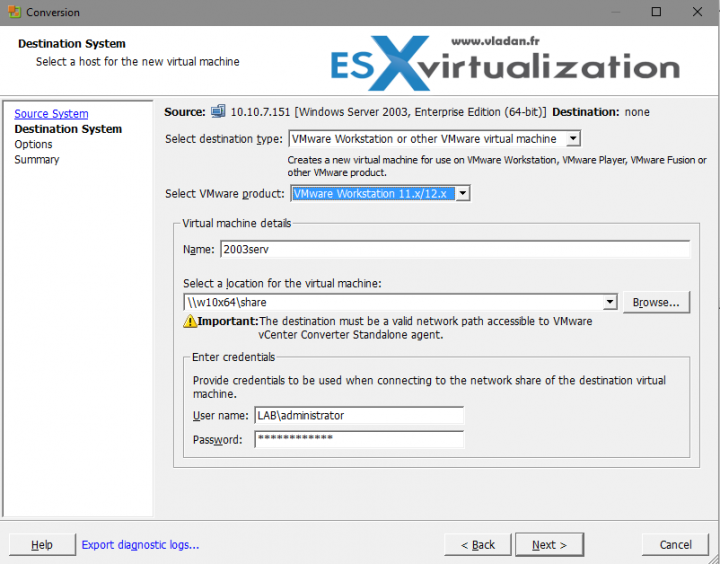
Next you follow the assistant and slect VMware Workstation or other VMware virtual machine, chose a Name and select the location which is a network path. Make sure you also provide credentials with the correct format.
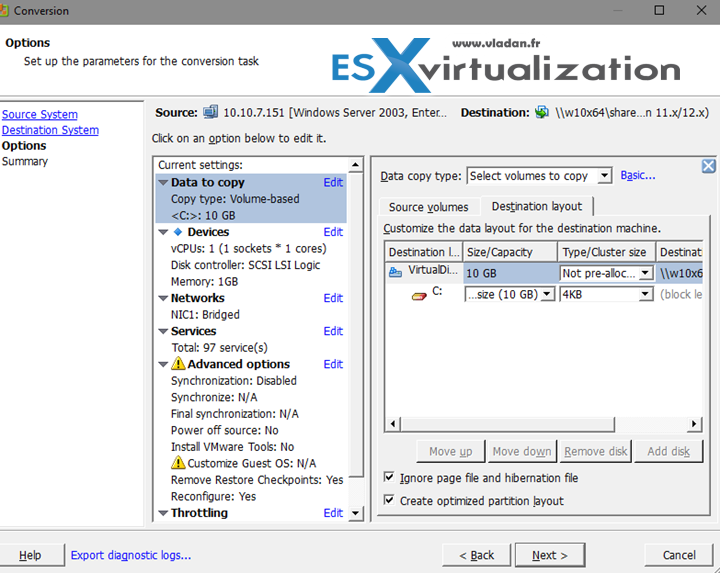
You can adjust disk configuration, the size, via the Advanced layout of the Destination Layout Tab. The two checkboxes, Ignore page file and hibernation file, and create optimized partition layout were checked in my case by default.
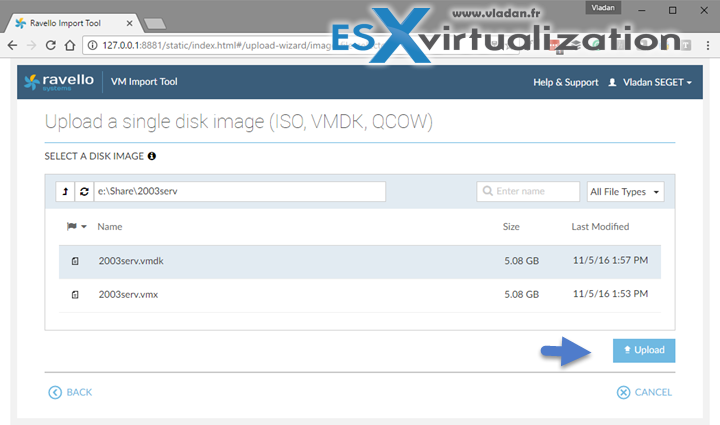
Once the conversion process finishes, you're ready to use Ravello Import utility to upload the VM to the Ravello repository. You might want to follow my post which gives you all details. (Note that the UI has evolved since then and now it is quite different. Here is a screenshot from the new UI….
So this is it. Normally when uploading a VM to Ravello from your vSphere environment, you only have an option to upload not running VMs. The running VMs are grayed out and you can see a message saying that “Powered-on VMs cannot be uploaded”, when hovering your mouse over.
(Note: Ravello Systems is now part of Oracle).
Update: New Post – Ravello Bare-Metal Option for VMware VMs
Check other posts about Ravello, to get you started:
- How to create a simple VM in Ravello?
- How to Get Started with Ravello Systems – VM Import Tool
- Run Nested ESXi in AWS or Google with RavelloSystems
- How-to Install VMware Tools on VM which runs in Ravello Cloud?
- How to configure RDP for your VM in Ravello Cloud
- How to Assign a Public IP Which Persist Across Reboots for Ravello VMs
- How to create a multi VM application In Ravello
- How to Hot-Clone a VM and upload to Ravello Cloud – [This post]


Great article, You show how to hot clone a VM and upload to Ravello cloud. It is really helpful. I have done by the help of your article. Thanks for sharing .The way you explained each and everything is really great Thanks once again.