Another topic today towards VCP6-CMA Certification exam. Today's topic for VCP6-CMA Objective 1.4 – Configure vRealize Automation Settings.
The exam is based on the 6.2 version of vRA, but I think the exam topics will evolve over time as the latest vRA 7 has been released. For now, passing the exam, according to the source, requires the 6.2 release.
The VCP6-CMA Study Guide page is work-in-progress for now. Stay tuned as new topics are completed on a regular basis.
VMware Knowledge
- Configure vRealize system settings to handle system notifications and appearance
- Enable connections and set concurrency limits on IaaS server
- Configure datacenter locations
Documentation Tools
- Configuring vRealize Automation
Configure vRealize system settings to handle system notifications and appearance
The admin is able to configure a lot of system settings, branding, e-mail notification with different protocols or also enable (and) limit for concurrent connections for provisioning activities. Most of those settings are available through the UI after logging to the vRA console as system admin or tenant admin.
Administration > Branding > uncheck the “default” checkbox > Upload logo or banner > Next > ans some optional settings like privacy policy link or contact link text boxes > click Update > Done.
Global e-mail servers can be added for notification for tenants. It's possible to setup global e-mail servers which are then used for all tenants as the system default. But tenant admin can override this setting by unchecking the default, to add his own email server.
Administration > Email servers > Add icon > Enter Name, description, SSL (if you want to use SSL – optional) > pick a protocol > Type Server Name, Port number, Folder Name (if IMAP used) > User Name, Password, e-mail. Optionally check the “delete from server” if you want emails being deleted after retrieve > Accept self-signed certs? > Test connection.
Enable connections and set concurrency limits on IaaS server
An admin is able to set concurrency limits for an IaaS Windows server to best use resources, customize email sent from the server, and enable connections to other machines.
Concurrent machine provisioning – the parallel provisioning can hurt the overall performance. That's is wise to set limits. Whether it is single user executing multiple requests or several different users at the same time, the time to provision/clone an OS or VM can be significantly higher than expected. vCenter, for example, has a limit set to four. The fifth task is queued.
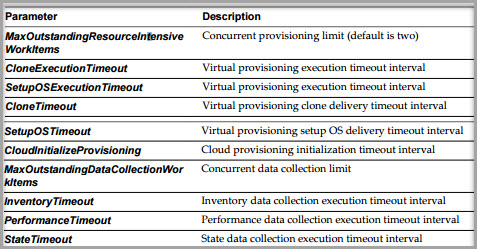
By default, vRealize Automation limits concurrent virtual provisioning activities for hypervisors that use proxy agents to two per proxy agent.
If you do increase the configured vRealize Automation per-agent limit, you need to:
- The default execution timeout intervals for the SetupOS and Clone workflow activities are two hours for each. If the time required to execute one of these activities exceeds this limit, the activity is canceled and provisioning fails. To prevent this failure, increase one or both of these execution timeout intervals
- The default delivery timeout intervals for the SetupOS and Clone workflow activities are 20 hours for each. Once one of these activities is initiated, if the machine resulting from the activity has not been provisioned within 20 hours, the activity is canceled and provisioning fails. Therefore, if you have increased the limit to the point at which this sometimes occurs, you will want to increase one or both of these delivery timeout intervals.
Log in as an administrator to the server hosting the IaaS Manager Service. For distributed installations, this is the server on which the Manager Service was installed.
The Steps:
- Open the ManagerService.exe.config file in an editor. The file is located in the vRealize Automation server install directory, typically
%SystemDrive%\Program Files x86\VMware\vCAC\Server
- Locate the section called workflowTimeoutConfigurationSection
- Update the following variables, as required.
Configure datacenter locations
- In order to configure datacenter locations: log on to the IaaS website host and edit the following file:
Program Files (x86)\VMware\vCAC\Server\Website\XmlData\DataCenterLocations.xml
- For each location create a new Data Name entry in the CustomDataType section
Then save and close the file > Restart the Manager Service > Make changes to HA Servers > Then:
- A Fabric Admin edits a compute resource to associate it with a location
- A tenant Admin or Business Group Admin creates a blueprint that prompts users to chose a datacenter location when making the request
Then you should display location on request.

