How to delete recovery partition on Samsung 9 series laptop.
The Samsung 9 series laptop has got a hidden partition (23Gigs in size) which is used by Samsung Recovery Software. This recovery partition is really used only when you need to get your laptop back to to state when you bought it. Since it's quite nice to have it… just in case, it takes a valuable space on not so big 128Gigs SSD which was present when I bought this laptop last year. See my article on it – New Working (blogging) Gear has arrived.
The 23 Gigs of non used space did not bothered me, just until recently, when I was left with only 4 gigs free on my C: drive. It's mostly because I store the vSphere Lab in the box files on the drive. Since the begining I was using my Acronis Home to backup the c: partition and store this backup file on my USB drive. The Acronis software was bundled with my first SSD ever, which I bought from Kingston two years ago.
And when I bought the laptop, the first think to do was an Acronis backup. So I do have backup with clean state of my laptop stored on my USB drive. If you don't, then you should keep that partition.
The hidden recovery partition which is present on the new laptop cannot get deleted through the computer management snap-in. It's because the partition is locked and protected against accidental deletion.
How to get this partition deleted?
Here are the steps:
01. Open command prompt window with administrative privilegies and type diskpart
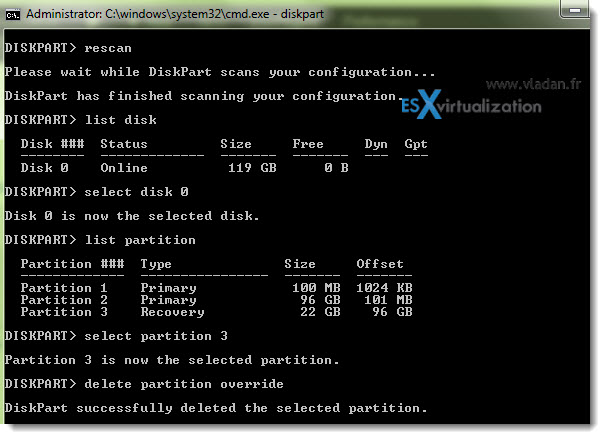
02. In the “Diskpart” prompt, enter rescan command and press Enter key to re-scan all partitions, volumes and drives available.
03. Then type in list disk and press Enter. This command shows you all the disks present on your system. In my case I had only one disk, so in the image bellow you'll see that my disk was disk 0
04. Next type select disk 0 (because I had only 1 disk – depending on your system). Press Enter.
05. Type list partition and press Enter key to show all available and created partition in the disk selected.
As you can see, the partition which I needed to delete is the third partition.
06. Type select partition 3 and hit enter.
07. Last step, type in delete partition override and press Enter key.
08. Go to the computer management and Expand the C: partition by right clicking the C: partition. You'll resize that partition and obtain an additional 22-23 Gigs of space.
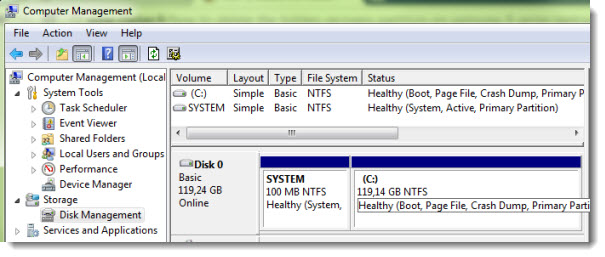
So at the end you should end up with partitions layout like this, which is a default Win 7 partitions layout.


Thanks for the guide.. I have problem extending my c drive with the unallocated free space. they ‘extend’ button is all gray.. what is the trick?
And the hiberation partition, is that something which is needed?
See pic: here
You must use the “delete partition override” option to overrride the lock. Then it will not be grayed out anymore.
I did that for the recovery disk as described in this turtorial. But the field is still gray… what about the hiberation disk, should that be removed?
I did not have a hibernation partition present. A hiberfil.sys file is located on my c: drive as it’s normal behaviour of W7 when you activate the hybernation in your power plans.
I have the same problem as Per Istre, and I followed your instructions to the letter. (See his picture link – mine looks the same.)
The extra 20GB now shows as unallocated, but when I right click on the C disk, the “Extend Volume” option is grayed out. It will only allow for “Shrink Volume.”
It’d be great if you could follow up when you get a chance, as it is definitely *not* working even though I followed your instructions exactly in the command prompt. The recovery drive is now gone and unallocated, but there is no option or way to extend the main C drive space and reclaim that. Thanks!
Hi Guys,
I had the same issue where I could not extend my partition. The reason being that the hibernation partition is sitting between C disk and unallocated space. The only option is to remove the hibernation partition and then you can put all the free space into C drive. For further info: http://forums.whirlpool.net.au/archive/1916135
Thanks that worked!
Tanks for the tips it works perfect 😀
Thanks for the tips. I like experimenting so tried the same on my new Samsung Laptop model NP550P5C, got extra 22Gb space. Now is there any way to create that Samsung Hidden Recovery Partition( i only have backed up the Samsung System Software) because now i cannot run “Samsung Recovery Solution 5”, it says- “There is no Samsung Recovery area on your hard disk drive. Setup will be cancelled.”
it works great !
thanks
Superb – Worked a treat!
Thank you so much…
Outstanding post, worked like a charm! Thank you Sir!
Hello,
Any chance you can post a how-to on how to reverse this process. For example if you decided that you wanted to re-create the recovery partition?
thank you
Then you would probbably use some partition resize tools from Acronis, or QPartEd which is free and can be installed on USB Stick. Then just boot from USB and resize you system partition. Here is the link to QParted Live CD/USB tool
god, I have FOUR recovery partitions in my samsung lap,
Can I erase ALL of them?
look at my status of partition:
cmd: http://i.imgur.com/ial52Aw.png
minitool partition wizard: http://i.imgur.com/FYSfYXv.png
First I would do a backup of your data to an image. To an external USB disk drive. You can use the free tool from Veeam, it does the job just fine -:) Veeam Endpoint Backup. Once you have that backup done you can delete the recovery partitions. Basically W7 needs only 2 partitions – 1. System; 2:C:\windows
Best,
Vladan
Will this delete any data other than the recovery partition?
I went through the removal of the recovery partition on my Samsung netbook and also am at the computer management section where I can see Disk 0 has:
System 100Mb
(C) 87Gb NTFS
(D) 130.10 GB NTFS Healthy (Logical drive), then
15.69Gb Unallocated
The first two are primary partition, third is a logical drive, and fouth unallocated.
There I am stuck as I only have a greyed option to expand drive C!
I hoped to upgrade to Windows 10 so don’t have it on DVD or anything to do a clean install
Excellent article – worked like a charm. Merci!
Great article thanks, I had 7 partitions on my Samsung, so I managed to get rid of the last 3 and recover 21.5Gb which is pretty significant on a 120Gb SSD!
Glad it helped.
Hi Vladan!
Six and a half years after you made the original post, I could still use it in my old Samsung 9 series. 🙂
I have been astonished how small my 128 Gb disk appeared, so gave it a try following your post and recovered nearly 25 Gb!
Keep the excelente job, mate!
Thanks a lot!
That’s what I call longevity -:) Glad it helped.